background image

15

Kit Contents

What’s In the Kit

CALCIUM SILICATE BOARD

3 x Calcium Silicate Boards 1000x615x50mm

This is the 50mm thick insulation board layer that you will install underneath your oven; it comes with printed 

paper templates & drawing pins so that you can pin the templates onto the CalSil board and cut out the pieces 

you need, following the lines shown on the paper templates.

REFRACTORY CASTABLE

1 x Novaref Refractory Castable 25kg bag

Refractory Castable is premixed high temperature concrete, which you’ll use to pour the dome keystone.

FIRE BRICKS - OVEN DOME

All bricks for the Oven Dome are provided, carefully cut to keep the internal gaps on the inside face of the oven 

to a minimum. These fire bricks are 38% Alumina, rated to 1350°C and are 115mm thick. 

FIRE BRICKS - FLOOR TILES

The Floor Tiles are all cut to size and ready to lay; the center tile has a 3mm hole pre-drilled in the center for 

the trammel tool to lock into. The fire bricks used in the oven floor are 38% Alumina, rated to 1350°C with an 

exceptionally hard wearing surface, and are 50mm thick.

FIRE BRICKS - ENTRY & VENT ARCHES

The bricks for the Entry and Vent Arches that form the mouth of the oven are all cut to size from 38% Alumina 

fire bricks rated to 1350°C, ready to lay. 
The Entry Arch Bricks (the opening into the dome) are machine-ground on their back face to follow the curvature 

of the dome, to give you a smooth transition from the dome into the opening. 

The Vent Arch Bricks are carefully selected as these will be on display at the front of the oven. They are all cut 

to size, and are designed to lock into the Entry Arch for strength and stability.


FORMWORK - ENTRY & VENT ARCHES

We provide CNC machined timber formwork with your kit to construct the Entry and Vent Arches around, to 

ensure that your brickwork is exactly as per our design. The Formwork is clearly marked to help you position 

the arches accurately, and has machined markings showing the location and thickness of each mortar joint.

TRAMMEL TOOL

The trammel is a tool that you will clamp each dome brick into, enabling you to lay the dome bricks in a perfect 

hemisphere. It has a hardened pin in the base that fits into the 3mm hole drilled in the center tile.

What’s Inside the Kit

Summary of Contents for D95

Page 1: ...D95 Brick Oven D95 PRECUT BRICK OVEN KIT Instruction Booklet ...

Page 2: ...2 Our Wood Fired Brick Oven Kits are as authentic as you can get With all the fire bricks cut to size with custom formwork and tooling building a quality Brick Oven has never been so simple ...

Page 3: ... DRAWING 13 WHAT S IN THE KIT 15 ADDITIONAL TOOLS MATERIALS REQUIRED 18 SUBFLOOR INSULATION 19 LAYING THE FLOOR TILES 20 BUILDING THE DOME 23 INSTALLING THE FLUE GALLERY 35 INSULATING THE DOME 36 OVEN LANDING SURROUNDS 38 PERLITE RENDER 39 INSTALLING THE STANDARD FLUE 40 FLUE INSTALLATION TIPS 41 CURING THE OVEN 42 PAINTING 43 ...

Page 4: ...4 You really don t need to be a skilled bricklayer to put this kit together we have done all of the difficult work for you You get the fun part of putting it all together ...

Page 5: ...building something that s going to bring your family and friends together in a shared cooking experience You re building something that you will spend quality time with the people that you love around where you are forced to slow down and just enjoy what you ve built You re building something that you can use to love and serve others it s rare to see someone fire up their oven just to cook for the...

Page 6: ...is to fire the oven thoroughly before the end of Autumn then remove the flue and protect the oven with a suitable weatherproof cover for the winter The key is to keep the oven completely dry in deep cold conditions USING OUR INSTRUCTIONS Building a Wood Fired Oven is a hugely enjoyable process providing you take your time and pace yourself The best way to prepare for the build is to first watch th...

Page 7: ...op of the fibreglass dome formwork If you are laying these final courses over several days it will be wise to lower the dome formwork after you lay each course in order to remove excess mortar and clean your brickwork 3 The D95 PreCut Brick Oven is very similar to its bigger brother the D105 with one key difference To balance the thermal mass of the smaller oven dome with the thermal mass in the o...

Page 8: ... FIRE MAY RESULT TO REDUCE THE RISK OF FIRE FOLLOW THESE INSTALLATION INSTRUCTIONS PLEASE READ THIS SET OF INSTRUCTIONS IN FULL AND WATCH THE INSTRUCTIONAL VIDEOS BEFORE INSTALLING AND USING YOUR OVEN FAILURE TO FOLLOW INSTRUCTIONS MAY RESULT IN FIRE CARBON MONOXIDE POISONING OR EXPLOSION LEADING TO PROPERTY DAMAGE BODILY INJURY OR EVEN DEATH IF YOU HAVE ANY QUESTIONS AT ALL REGARDING THE SAFE INS...

Page 9: ...laws for your area If in doubt contact a qualified plumber or your local fire authority for more information v 400mm Above Oven Clearance 750mm Flue Clearance 750mm Flue Clearance 700mm Vent Brick Flue Gallery Clearance 1200mm Non Combustible Floor Material Clearance Zone Combustible Material Non Combustible Material Clearance Continues 50mm Dome Clearance MINIMUM CLEARANCES ARE AS FOLLOWS 50MM CL...

Page 10: ...bt wear safety glasses SKIN PROTECTION The mortar mixture that you ll use to lay the fire bricks in your Wood Fired Oven Kit is quite alkaline and repeated exposure to your skin can result in chemical burns The same goes for the Refractory Castable and Perlite Render mixes This is compounded by having to handle wet bricks which if done without gloves makes your skin softer and more vulnerable to b...

Page 11: ... DO NOT close the oven door fully while a fire is burning in the oven Closing the door fully will cut off oxygen to the fire causing the fire to flare up violently if the door is then removed This does not apply to hot coals Dispose of ashes using a metal shovel and place in a metal bin with a snug fitting lid The container should be stored on a non combustible surface away from all combustible ma...

Page 12: ...r or refund as specified above and such liability shall not include and purchaser specifically renounces any rights to recover special incidental consequential or other damages of any kind whatsoever including but not limited to injuries to persons or damage to property loss of profits or anticipated profits or loss of use of the Oven In no event shall The Fire Brick Company be responsible for any...

Page 13: ...0 mm 540 mm 150mm Center of Flue 1380 mm Overall Width 1475 mm Overall Depth 50 mm Fire Brick Tile Floor PreCast Flue Gallery 50 mm Calcium Silicate Board 50 mm Ceramic Fibre Insulation 50 mm Perlite Render Insulation 115 mm Fire Brick Dome Wall 1050 mm Flue Height 695 mm Oven Height 790 mm External Dome Height 475 mm Internal Dome Height 335 mm 345 mm Layout Drawing ...

Page 14: ...14 All of the bricks come cut and ground to size We provide you with templates CNC machined formwork a trammel tool fibreglass dome form and much more Your job is to assemble the kit like a big Lego set ...

Page 15: ...ionally hard wearing surface and are 50mm thick FIRE BRICKS ENTRY VENT ARCHES The bricks for the Entry and Vent Arches that form the mouth of the oven are all cut to size from 38 Alumina fire bricks rated to 1350 C ready to lay The Entry Arch Bricks the opening into the dome are machine ground on their back face to follow the curvature of the dome to give you a smooth transition from the dome into...

Page 16: ...RY The PreCast Flue Gallery is the molded section that fits over the brick arches at the front of the oven Made from refractory castable and reinforced with stainless steel fibres it s fitted with 7 Stainless Steel Flue sleeve ready to attach the flue section onto A brushed stainless steel ring covers the flue expansion joint CERAMIC FIBRE BLANKET One full roll and one half roll of 25mm thick Cera...

Page 17: ...Wire 25 x 100mm Phillips Head Screws 2 x Long Sleeve Vet Examination Gloves OPTIONAL EXTRAS WATERPROOFING SYSTEM Roll of 150mm wide Aluminium Flashing and 1 x Cartridge of Sikasil High Temperature Silicone To prevent rain being drawn into the oven from beneath the outer dome the perlite render layer install our waterproofing system around the oven perimeter prior to rendering Only needed for outdo...

Page 18: ...on hand TOOLS REQUIRED Trowel Small Plastic Flexi Tub for mixing Mortar Castable Large Plastic Flexi Tub OR a Wheelbarrow for mixing Perlite render Jigsaw with wood cutting blade Drill driver for putting in screws Level Straight Edge can be a straight piece of timber or metal Stanley knife scissors Car Jack Sponges scourers rags old towel Angle grinder with masonry grinding disk SAFETY GEAR REQUIR...

Page 19: ...ded you with thumbtacks to hold the templates to the CalSil surface 1C LAY CALSIL BOARD PIECES ON THE SLAB Using the center line on your slab and the corresponding line on the templates position your CalSil board pieces on your slab There is no need to glue these pieces down as the weight of the finished oven will hold them in place If your concrete slab is flat and level you can lay the CalSil di...

Page 20: ...fe of this mix is around 20 minutes Get all of your floor tiles soaking in water and mix up some mortar Only prepare one small area at a time enough to lay a single tile If you try to mortar a large area it will dry out before you have a chance to lay the tiles Spread a layer approximately 10mm thick on the top of the heat bank Use your fingers to notch this mortar mixture to bed your tile into We...

Page 21: ...mel Tool will lock into Make sure you lay this brick with the hole as close to the front of the oven as possible as indicated in the image above If you lay this brick in the wrong orientation you will have to drill a new hole for the Trammel Tool once the mortar has set so take your time and get it right 2B LAY FRONT CENTER TILE Lay the front center tile making sure it s level with your stand so t...

Page 22: ...emembering that gaps of up to 2mm are normal and once they re all laid you can fill in the joints with the same mortar mix if you want it s not necessary Leave the Floor Tiles to set for at least 12 hours before starting the construction of the dome 3D GRIND HIGH EDGES If there are any raised edges at joints between the tiles these can be ground back using an angle grinder with a masonry grinding ...

Page 23: ...e hang of it This mix is thixotropic meaning it will become more fluid runny when it is stirred and very thick when it remains still If your mortar becomes stiff in the bucket stir it again with your trowel or mixing drill and it will become workable Do not add more water This would greatly reduce the final strength of the cured mortar After use close the tops of these bags to stop the contents de...

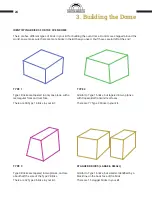
Page 24: ... planes with trapezoidal front and rear faces There are 77 Type 2 bricks in your kit STAGGER BRICKS LARGE SMALL Similar to Type 1 bricks but smaller Identified by a black line on the back face of the brick There are 16 stagger bricks in your kit 3 Building the Dome IDENTIFYING BRICKS FOR THE OVEN DOME There are five different types of brick in your kit for building the oven dome Our kits are shipp...

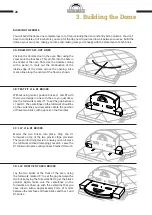
Page 25: ...ave modeled the best possible spots for them When you reach the end of a row there will be a gap that needs to be filled the keystone for each course Two options are available to you grind a brick down to make it fit the gap or fill the gap with the refractory mortar Remember the mortar is able to fill gaps up to 75mm width and typically these gaps are out of sight The dome bricks butt up against ...

Page 26: ...place Prop the 1 formwork on top of the two plastic strips provided The reason for doing this is to ensure you can remove the formwork without damaging your arch Leave the 1 formwork in place until you have finished this arch 3D LAY FIRST VENT ARCH BRICKS Lay the two bricks at the front of the oven using the formwork marked 2 to set the gap between the two bricks laying the formwork flat to get th...

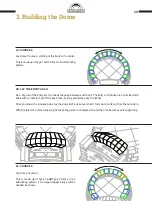
Page 27: ...d as shown This course is made up of Type 1 bricks Two small Stagger bricks may work as keystones 3G COURSE 3 Lay bricks L3 and R3 followed by the bricks for next layer of the vent arch columns This layer keys into the entry arch columns using special bricks which are easy to identify in your kit Dry fit these bricks to ensure you have the mortar joints set correctly Don t be concerned if you have...

Page 28: ...emperature Gauge to mount through the oven wall take the Thermowell and lubricate the stem with vegetable oil to prevent the mortar bonding to it Set it in the base of a mortar joint between rows 3 and 4 as shown You may need to widen the joint or grind the corner off a brick to allow room for the stem to fit Fill mortar around the stem of the Thermowell and make sure you re happy with the angle i...

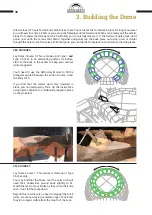
Page 29: ...Stagger bricks will be needed as shown 3K LAY THE ENTRY ARCH Do a dry run of the Entry Arch to check the gaps between each brick The Entry Arch bricks are a full sized arch brick with a chamfer cut off the back face so they should be easy to identify Once you know the required gaps lay the Entry Arch bricks over the 1 formwork working from the outside in With the full arch in place the weight keep...

Page 30: ...heir undersides ground back slightly to fit Watch the level of your bricks as they cross the Entry Arch don t let them dip down Beyond this row there is no need to stagger the brick joints we are now laying complete rings of brick and they re no longer visible from the mouth of the oven Allow at least 12 hours for the Entry Arch bricks to set You can leave the formwork in place for longer however ...

Page 31: ...l if you choose to it gives you more control over the final position of each brick as you can see the inside face of the brickwork You can t see the inside when using the Fibreglass Dome The downside of the trammel method is that it s quite slow due to the angle the bricks are being laid on If you find that the bricks are starting to move once released from the tool use this trick soak your bricks...

Page 32: ...mplete surface contact with the surrounding ring of bricks To make sure the fiberglass dome comes off cleanly wipe the dome surface with a small amount of vegetable oil Add a tiny amount of hydrated lime to the castable if the temp is below 20 C using the ratio of 1 tsp 25kg bag Mix the castable to a thick consistency and pour into the void vibrating the mix with your trowel to remove bubbles To p...

Page 33: ...n with you First scrape off as much of the excess mortar castable as you can then scrub any remnants off using the scourer Now fill in any holes in your joints using the wet mortar mix and wipe off the excess before it sets with a damp sponge Wash all of the brickwork with clean water and a sponge and dry with an old towel TIP Don t wait too long to get in and do this If you wait for 12 hours afte...

Page 34: ...s to set for at least 12 hours to avoid dislodging the bricks when the PreCast Flue Gallery is installed Leave the formwork in place until you have the PreCast Flue Gallery mortared in position You ll note that we followed a different order in the videos laying the Vent Arch and fitting the PreCast Flue Gallery before cleaning the dome This was due to the limited days we had for filming If you re ...

Page 35: ...the gap between the Entry Arch and the Flue Gallery next Be sparing with the mortar aim to apply just a little more than the final joint thickness so that you don t have to force much out when the Flue Gallery is installed 4D PLACE FLUE GALLERY Quickly while the mortar is still wet lower the Flue Gallery onto the mortar and wriggle it into place until it rests on the packers Leave the gap between ...

Page 36: ...B but this time the horizontal section will rest on your concrete benchtop insulating the edge of the heat bank layer Don t throw any offcuts away until you have the dome fully covered there is just the right amount of blanket in your kit OPTIONAL WATER BARRIER SYSTEM If your oven will never get rained on you can skip to step 6D If not we recommend that you install our water barrier system This mi...

Page 37: ...ails that you installed earlier You will find that the chicken wire tends to bulge out away from the dome You can scrunch these sections down which will pull the chicken wire back in against the blanket Run the next layer of chicken wire around the perimeter of the dome hooking it onto the screws around the base and fold scrunch down the areas that are bulging away from the dome Continue until you...

Page 38: ...ave two key benefits it s a very useful area to pull large dishes onto to check how they re cooking and it s also a platform to rest the Oven Door on so that it can be used as a Draft Door see our instructional videos on firing your oven for more details Polished granite is one of the best materials to use it resists high temperatures it s easy to keep clean and will last practically forever If yo...

Page 39: ...s The Perlite Render should be put on one layer at a time for the first layer you ll work the wet mixture into the chicken wire using your hands Start around the base then cover over the top This layer will only be around 15 to 20mm thick Leave to set for 12hrs covered in wet sheets or plastic to minimise drying shrinkage cracking Before applying the next layer wet the surface of the existing rend...

Page 40: ...tricity the risks massively outweigh the rewards Don t risk it use a licensed plumber You may want to change the colour of the flue let s say you wanted it black for example Don t try to paint the stainless steel flue there is no paint available that can withstand the full range of temperature that this flue can reach Rather get a twin skin flue system and have the external flue pipe the second sk...

Page 41: ...ion your flue such that it terminates beneath something even if it s several meters below it Remember nothing but clear sky CLEARANCE AROUND THE FLUE Referring to the diagram on page 9 you ll see you need at least 750mm clearance to combustibles from the flue If you need to reduce the clearance that s easy A twin skin flue reduces the clearance by a lot and a triple skin flue brings it down to alm...

Page 42: ...ne or rubbing alcohol to wipe the surface down then wash with soapy water before drying with a soft cloth It is critical that you watch the instructional video that we ve made for Curing your Oven While it s not rocket surgery it s something that is much more easily communicated by video than in these written instructions Head to our website or YouTube channel to find this video which takes you th...

Page 43: ...nce you have cured your oven you need to apply at least two coats of Acrylic Roll On Render over your Perlite layer as the perlite render is very porous and will absorb almost all of the rain that falls on it Acrylic Roll On Render is essentially a thick elastomeric paint with a fine aggregate similar to sand mixed through it for texture This creates a stretchy water resistant membrane over the do...

Page 44: ...44 Examples ...

Page 45: ...45 Examples ...

Page 46: ... friends enjoying food that s been cooked by a real wood fire From the whole team at The Fire Brick Company thank you for choosing us You re not only a customer you re now a part of The Fire Brick Co family and we re here to support your wood fired endeavours in whatever way we can We have a number of videos and other resources to help you with using your oven now that you have it built and will b...

Page 47: ...47 Contact THE FIRE BRICK CO 11 167 Princes Highway Hallam Victoria Australia Ph 03 9703 1758 Email sales melbournefire bricks com au www melbournefire bricks com au ...

Reviews: