background image

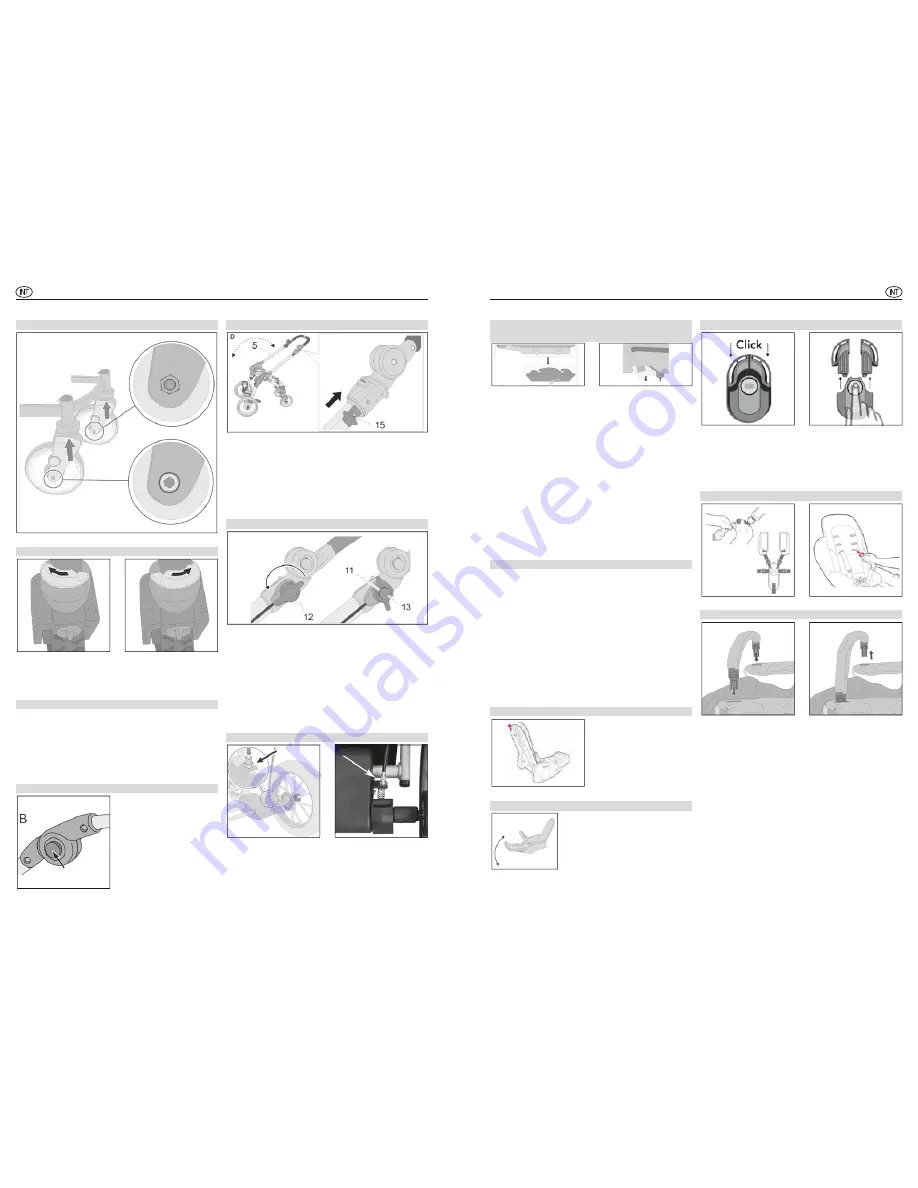
Assembling the wheels

Swivel wheel

Swivel wheel unlocked 

Swivel wheel locked

We recommend that you do not lock the wheels while 
 moving as this will give a more comfortable ride.

Seat cover

The seat cover can be removed completely from the 
seat unit for washing. Simply open the snaps on the 
seat unit.

Attention: 

When mounting the seat cover, thread the 

ends of the 5-point restraint back through the relevant 
openings without twisting the straps.

Height adjustable, collapsible handlebar

Press and hold the adjust-
ment buttons on both sides 
and adjust the height of the 
handlebar to the desired 
position.

Swiveling the handlebar

Pull and hold the arrester on the swiveling handlebar 

(15)

 in arrow direction; the swiveling handlebar can 

now be moved to the other of the two positions.

ATTENTION Danger of injury! Make sure that noth-
ing (the child!) gets caught in the mechanism while 
swiveling the handlebar. 

Activating the parking brake

Activating the parking brake

Turn the brake lever 

(12)

 in arrow direction until it 

locks, a red ring 

(11)

 becomes visible, the parking 

brake is  engaged.

Releasing the parking brake

Press the release button 

(13)

 and move the brake 

lever 

(12)

back to the depicted position; the parking 

brake is disengaged.

Supplement to the parking brake

If you should notice a change to the braking action, 
loosen the lock nut first in order to be able to imple-
ment settings on the adjusting screw (unscrew). Then 
re-attach the lock nut.

Attaching and removing the seat or carry-cot 
(upper section)

4

3

1

2

2

1

Place the upper section (sports buggy seat or carry-cot) 
onto the pram chassis in such a way that the lateral 
bars 

1

 of the upper section click into the slots provid-

ed 

2

 on each side of the chassis and push the upper 

section in as far as it will go. The locks then close 
automatically. (The locks must „click“ into place.)

WARNING:


Check that the pram body or seat unit attach-
ment devices are correctly engaged before use.

The upper section is secure if the red field in the re-
lease lever is no longer visible. To remove the upper 
section press the safety lever 

(3)

 up and then the 

release lever 

(4)

 down until the lever locks. (red field 

appears). Then pull the upper section out of the slots 
and remove it.

How to use the hood

Push the insert pieces for the hood joints into the 
corresponding openings on the armrest or on the 
carry-cot.

Attention:

 You must secure the press studs on the 

back end of the cover onto the rear of the backrest 
as the cover is also used as a protection against 
falling out.
If you need to remove the hood, undo the press studs 
on the rear of the backrest; press the release buttons 
on the insert pieces of the hood joints and pull the 
joints out of the openings. You can open the zip at the 
top of the hood for ventilation.

Adjusting the back rest

Pull up on the arrester of 
the back rest to change its 
inclination angle (4 seating 
and prostrate pos 
folding position all the way 
forward). 

Adjusting the foot rest

Press and hold the foot rest ar-
rester there are three positions 
available for the foot rest.

Using the 5-point harness 

You can position the shoulder harnesses at 3 levels. 
Always use the position closest to the shoulder level 
of your child. To open the harness press the central 
button on the buckle. To adjust the shoulder/ weist 
harness pull the free ends of the strap.

Adjusting the restraints

Safety bar

Push the insert pieces on the safety bar through the 
slots in the seat cover into the receptacles beneath, 
which are located in the armrests. Make sure that the 
safety bar has clicked into place on both sides. To re-
move it, press the release buttons on the insert piec-
es. In order to make it easier for your child to get in 
and out, it suffices to release and fold up one side of 
the bar.

12

13

Summary of Contents for BeYou V2

Page 1: ...tions mode d emploi k ytt ohje brunksanvisning gebruiksaanwijzing brugsanvisning brunksanvisning istruzioni per l uso manual de instrucciones n vod k obsluze instrukcja obs ugi N vod na pou itie Lieto...

Page 2: ...Regen r nder oder Farbunterschiede im Stoff wie oben be schrieben keine berechtigte Reklamation darstellen Regelm ige Pflege aller Metallteile spe ziell der Chromteile und insbesondere nach Aufent ha...

Page 3: ...ielzeug Bit te lassen Sie Ihr Kind nie unbeaufsichtigt F r eine optimale Bel ftung des Wagens empfehlen wir die Regenpelerine nur f r die Dauer des Regenschauers aufzuspannen Abziehen des Verdeckbezug...

Page 4: ...rstellen der R ckenlehne Arretierung der R ckenleh ne nach oben ziehen um die Neigung zu verstellen 4 Sitz Liegepositionen Falt position ganz vorne Verstellung der Fu st tze Fu kastenarretierung dr ck...

Page 5: ...er pram and its appropriate accessories should understand all instruc tions You should explain the operation of the stroller pram to all persons using it and its appropriate accessories Consult an aut...

Page 6: ...may cause discolouration of floor surfaces Foreign bodies e g little stones in the wheels must be removed to prevent any potential damage to floor surfaces Extreme heat in particular direct contact wi...

Page 7: ...hen close automatically The locks must click into place WARNING Check that the pram body or seat unit attach ment devices are correctly engaged before use The upper section is secure if the red field...

Page 8: ...sonne utilisant la poussette et les accessoires correspon dants Si certaines instructions ne sont pas claires et que de plus amples expli cations s av rent n cessaires ou si vous avez d autres questio...

Page 9: ...rit Ne jamais utiliser le repose pieds ou l arceau de protection pour soulever et ou porter la poussette Jusqu 6 mois il est conseill de tou jours placer le dossier dans la position la plus basse Arr...

Page 10: ...p ration de pivotement Actionnement du frein de maintien Actionner le frein de maintien Tourner le levier de frein 12 dans le sens de la fl che jusqu ce qu il s encliquette un anneau rouge 11 appara t...

Page 11: ...gler le boulon qui se trouve sous les bo tiers de frein proximit des roues Pour visser et d visser le boulon utiliser une cl de 8 mm Le freinage augmente lorsque l on d visse Il doit tre identique pou...

Page 12: ...on v ltt m t nt jotta vaunun korkealuokkainen ul kon ky s ilyisi T h n tarkoituksen normaalit puhdis tusaineet riitt v t Akseleiden p t t ytyy puhdistaa ja voidella pienell ljym r ll noin 4 viikon v l...

Page 13: ...rsinkin tummaa kangasta voimakkaasti Voit yleens pest kaikki irrotettavat kangasosat hienopesuaineella il man valkaisuaineita pesukoneessa 30 C ssa hieno pesu Katso p llisen k ytt ohjetta Tuulipussin...

Page 14: ...ed hihnoja niiden va paista p ist V iden s t minen Turvakaari Ty nn turvakaaren kiinnitysosat istuinkankaassa ole vien lovien l pi ja kiinnit ne k sinojissa oleviin kiinnik keisiin Huolehdi siit ett t...

Page 15: ...runder F r att det h gklassiga utseendet skall bevaras r det n dv ndigt att v rda vagnens alla metalldelar och speciellt efter en vistelse vid havet kromdelarna Vanliga reng rningsmedel r cker till f...

Page 16: ...n kan under omst ndigheter f rga av sig p golvbel ggningen Fr mmande f rem l t ex sm sten i d cken m ste tas bort f r att undvika eventuella skador p golvbe l ggningen Extrem v rme s rskilt direktkont...

Page 17: ...rp sen sitter ordentligt fast verdelen r i s krat tillst nd d det r da f ltet p lossningshandtaget inte l ngre syns F r att ta av verdelen tryck f rst s kerhetsspaken 3 upp t och sedan utl snings spak...

Page 18: ...soires gebruikt de bediening van de wagen uit te leggen Als handleidingen onbegrijpelijk zijn en meer uitleg nodig is of als u nog vragen hebt neem dan con tact op met een geautoriseerde teutonia vakh...

Page 19: ...or baby s tot 6maanden is onze aan beveling om de rugleuning complete vlak te stellen Neerzetten van de wagen Opgelet de banden kunnen onder bepaalde omstan digheden tot verkleuren van de vloerbedekki...

Page 20: ...worden gecontroleerd of de wandelwagenstoel resp de reiswieg correct is vergrendeld Het bovendeel bevindt zich in bevei ligde toestand wanneer het rode veld in het ontkop pelingsmechanisme niet meer...

Page 21: ...skal du sikre at dit barn ikke er i n rheden af vognen n r den klappes ud eller sammen ADVARSEL B rn m ikke lege med dette produkt ADVARSEL F r brugen skal du sikre at monteringsanordningerne p barne...

Page 22: ...s for at undg en eventuel beskadigelse af Gulvbel gningerne Ekstrem varme s rligt direkte kontakt med varme overflader f eks i bilen om som meren kan medf re varige deformeringer p hulkam merd k Rekla...

Page 23: ...et ikke l ngere er synligt For at tage overdelen af skal du f rst trykke l searmen 3 opad og derefter trykke udl sergrebet 4 nedad indtil det g r i indgreb det r de felt er synligt Tr k herefter overd...

Page 24: ...e p begge hjul Indstilling af selerne Beskyttelsesb jle Stik indstikningsdelen for beskyttelsesb jlen igennem slidserne under s debetr kket i de derunder liggen de holdere i arml nene S rg for at besk...

Page 25: ...et ovenfor Regel messig stell av alle metalldeler spesielt kromdelene er spesielt n dvendig etter opphold ved havet for bevare den h yverdige glansen p vognen Akeselen dene m rengj res og oljes symask...

Page 26: ...Parkering av vognen Nb Hjulene kan evt for rsake misfarging av gulvbe legget Fremmedlegemer f eks sm stein p hjulene b r fjernes for unng eventuelle skader p gulvbelegget Ekstrem varme spesielt direkt...

Page 27: ...nbagen Obs Trykknappene bakerst p kalesjen skal alltid festes p baksiden av ryggst tten ellers fungerer ikke sikringen mot at barnet kan falle ut For ta av kalesjen l sner du evt trykknappene p baksid...

Page 28: ...no e dei relativi accessori l utilizzo del passeggi no Nel caso in cui le istruzioni non siano chiare nel caso in cui siano necessarie spiegazioni pi precise oppure in caso di ulteriori domande metter...

Page 29: ...esi d et lo schienale deve essere utilizzato in posizione completamente re clinata Parcheggiare la carrozzina Attenzione Le ruote in gomma possono provocare eventuali variazioni di colore della pavime...

Page 30: ...a attorcigliarla Manico ribaltabile regolabile in altezza Mantenere premuti su en trambi i lati i bottoni di re golazione e impostare l al tezza del manico nella posizione desiderata Ribaltamento del...

Page 31: ...il corrimano di sicurezza scatti su entrambi i lati Per rimuoverlo premere i bottoni di sblocco sulle parti maschie Affinch il bambino possa salire e scendere pi facilmente sufficiente aprire il corri...

Page 32: ...n El cuidado regular de todos los elementos de metal del cochecito y especialmente las piezas de cromo es necesario para conservar la alta calidad del aspecto exterior sobre todo despu s de estancias...

Page 33: ...desplazar el cochecito Para beb s de hasta seis meses de edad recomendamos utilizar exclusivamente la posici n m s baja del respaldo Guardar y estacionar el cochecito Atenci n Las ruedas pueden en det...

Page 34: ...antenga pulsados los bo tones de regulaci n situa dos a ambos lados y regule la altura del manillar hasta que alcance la posici n de seada Bascular el manillar Tirar y seguir tirando de ambas partes d...

Page 35: ...ue la barra de protecci n ha encajado en los dos lados Para desmontarla presione los botones de desbloqueo que hay en las piezas insertables Para que el ni o pueda subirse y bajarse con facilidad de l...

Page 36: ...70 teutonia teutonia teutonia teutonia 20 C 60 C 4 F 140 F teutonia 4 teutonia 71 Soporte de la sombrilla en el cochecito Ajuste de la marcha rectil nea...

Page 37: ...teutonia teutonia 15 5 6 30 C 85 F 4 5 6 5 8 5 4 7 72 73...

Page 38: ...10 5 15 12 11 13 12 4 3 1 2 2 1 1 2 3 4 4 3 5 3 74 75...

Page 39: ...77 8 1 1 5 2 22 29 2 2 76...

Page 40: ...o pobytu u mo e o et ovat v echny jeho kovov d ly a speci ln chromovan sti Sta k tomu pou t b n o et uj c prost edky Konce n prav se mus cca ka d 4 t dny o istit a naolejovat V eobecn bezpe nostn poky...

Page 41: ...kup kam nky v pneumatik ch mus te od stranit aby jste p ede li eventueln mu po kozen pod lahoviny Extr mn teploty p edev m p m kontakt s hork mi povrchy nap v l t v aut mohou u dutino v ch pl v st k...

Page 42: ...ji nen erven pol ko v uvol ovac p ce viditeln Pro sejmut horn ho d lu nejd ve tla te zaji ovac p ku 3 nahoru a pot uvol ovac p ku 4 dol a je p ka zaji t na objev se erven pol ko Pot vyt hn te horn d l...

Page 43: ...zumie wszystkie zalecenia Ka dej osobie maj cej u y w zek i jego akcesoria nale y obja ni ich prawid o w obs ug W przypadku gdy instruk cje s niezrozumia e i konieczne s do datkowe wyja nienia lub maj...

Page 44: ...ale y nigdy u ywa podn ka lub pa ka ochronnego do podnoszenia lub przenoszenia w zka Dla dzieci w wieku do 6 miesi cy zaleca si korzystanie tylko z oparcia w najni szym po o eniu Stawianie w zka Uwaga...

Page 45: ...amianie blokady hamulca D wigni hamulca 12 nale y przekr ci zgodnie ze strza k a do zatrza ni cia Gdy pojawi si czerwony pier cie 11 blokada hamulca jest uruchomiona Zwolnienie blokady hamulca Nale y...

Page 46: ...5 2 bar 22 29 psi Zbyt niskie ci nienie w ko ach jest przyczyn ich szybszego zu ycia Uwaga Bezwzgl dnie nale y przestrzega podanego na ko ach maksymalnego ci nienia kt re ze wzgl du na ich ma pojemno...

Page 47: ...n s a nosti Podmienkou zachovania kvality vzh adu ko ka je pra videln kontrola a dr ba v etk ch kovov ch s ast najm chr mov ch a najm po pobytoch pri mori Pre tento el dosta uj be ne pred van v robky...

Page 48: ...ko ka Upozornenie Za ur it ch podmienok m u koles sp sobi zmenu farby povrchu dl ky Je nutn odstr ni z kolies cudzie teles napr klad kamienky aby sa zabr nilo mo n mu po kodeniu povrchu dl ky Extr mne...

Page 49: ...osun do druhej z oboch pol h POZOR Nebezpe enstvo zranenia Zaistite aby sa pri vykl pan rukov te v mechanizme nezachytil iadny predmet ani die a Aktivovanie parkovacej brzdy Ot ajte brzdov p ku 12 v s...

Page 50: ...tlaku m e ma za n sledok nehodu alebo zranenie 2 Ak je potrebn opravi vn torn du u pou ite bu tandardn s pravu na opravy bicyklov alebo sprej na prerazen pneumatiky pou va sa napr klad u hor sk ch bi...

Page 51: ...aptuveni ik p c 4 ned m Visp r ji nor d jumi par dro bu UZMAN BU J s atbildat par sava b rna dro bu o nor d jumu neiev ro ana j su b r na dro bu var pak aut riskam Turkl t visus iesp jamos apst k us u...

Page 52: ...rati u lieto anas pir mo reizi l dzu no emiet uzl mes vai eti Aizmugur jie rite i Aizmugur j rite a no em ana Nospiediet blokatoru 7 un novelciet riteni nost no ass Lai atkal uzliktu riteni uzb diet...

Page 53: ...d mi S dek a p rvalks S dek a p rvalku var no emt no se am s da as lai izmazg tu Vienk r i atveriet spiedpogas UZMAN BU Uzst dot s dek a p rvalku 5 punktu s dek a balsta gala diegus izvelciet atpaka c...

Page 54: ...informacija Gaminys i bandytas nuo 20 C iki 60 C nuo 4 F iki 140 F temperat ros diapazone Nepaisant daugelio m s med iag teigiam savybi pvz oro pralaidumo ir kt m s med iagos labai jautrios inten syv...

Page 55: ...pvz ma us akmenukus kad negadint grind pavir iaus Did iulis kar tis ypa tiesioginis kontaktas su kar tais pavir iais pvz automobilyje vasaros metu negr ta mai gali sukelti tu iaviduri padang deformac...

Page 56: ...s dangalas Nor dami i skalbti s dimosios dalies dangal galite j nuimti tiesiog atsekite spaudes esan ias ant s di mosios dalies D MESIO Tvirtindami s dimosios dalies dangal perverkite dir us per 5 atr...

Page 57: ...avyb s Modeliai su l tinimo stab d iu Galima kontroliuoti pristab dym ant rankenos esan iu stabd iu Stabdym galima reguliuoti ant stabdymo svirtel s esan iu reguliavi mo var tu Pastaba stabdis turi b...

Page 58: ...sse Lapsek ru vankri parkimine T helepanu Teatud oludes v ivad rattad kahjustada p randapinda de v rvkatet V rkehad nt v iksed kivid tuleb ratas test eemaldada p randapindade v imaliku kahjustu mise r...

Page 59: ...i t iendus Kui m rkate muutust pidurdustoimingus l dvendage esmalt lukustusmutrit et reguleerimiskruvi oleks v i malik seadistada lahtikruvimine Seej rel kinnitage lukustusmutter uuesti Istme ja vankr...

Page 60: ...te paranduskomplekti v i torgete pihustusvedelikku nt nagu seda kasutatakse maastikujalgrataste mopeedide jne puhul Rehvi eemaldamiseks kasutage kaht paranduskangi mis kuuluvad alati heasse jalgratast...

Page 61: ...ung eines mangelfreien Produktes verlangen Ziffer 7f gilt entsprechend 9 Garantieverpflichtungen bestehen nicht wenn der Mangel dadurch entstanden ist dass das Produkt unsachgem behandelt oder berbean...

Page 62: ...n the consumer can only request the delivery of a product same or of equivalent value free of defects from teutonia Sec tion 7f applies accordingly 9 These commercial guarantee conditions do not apply...

Page 63: ...Teu tonia 3 11 4 5 teutonia 6 11 teutonia teutonia teu tonia teutonia Teutonia teu tonia 7 6 teutonia 11 teutonia teutonia teutonia teutonia 8 6 teutonia teutonia 7 9 teutonia teutonia teutonia 10 11...

Page 64: ...nis genommen und insbesondere die Bedienungsanleitung mit den darin enthaltenen Informationen zu meinen Anspr chen im Reklamationsfall erhalten Dealer stamp Customer signature Dealer signature Name St...

Page 65: ...Soft Carry Cot X X X X X X X Vario Plus Carry Cot X X X X X X X Insert Carry Cot X Made for You Carry Cot X X X X X X Comfort Plus Carry Cot X X X X X X Elegance Chassis Carry Cot X Autositz Car Seat...

Page 66: ...130 NOTIZEN NOTES...

Page 67: ...l changes R servation sur des modifications techniques Oikeus teknisiin muutoksiin pid tet n Teutonia f rbeh ller sig r tten till tekniska f r ndringar Technische wijzigingen voorbehouden Vi forbehold...

Reviews: