background image

22


 • DecoderStation 6

Radio Playback

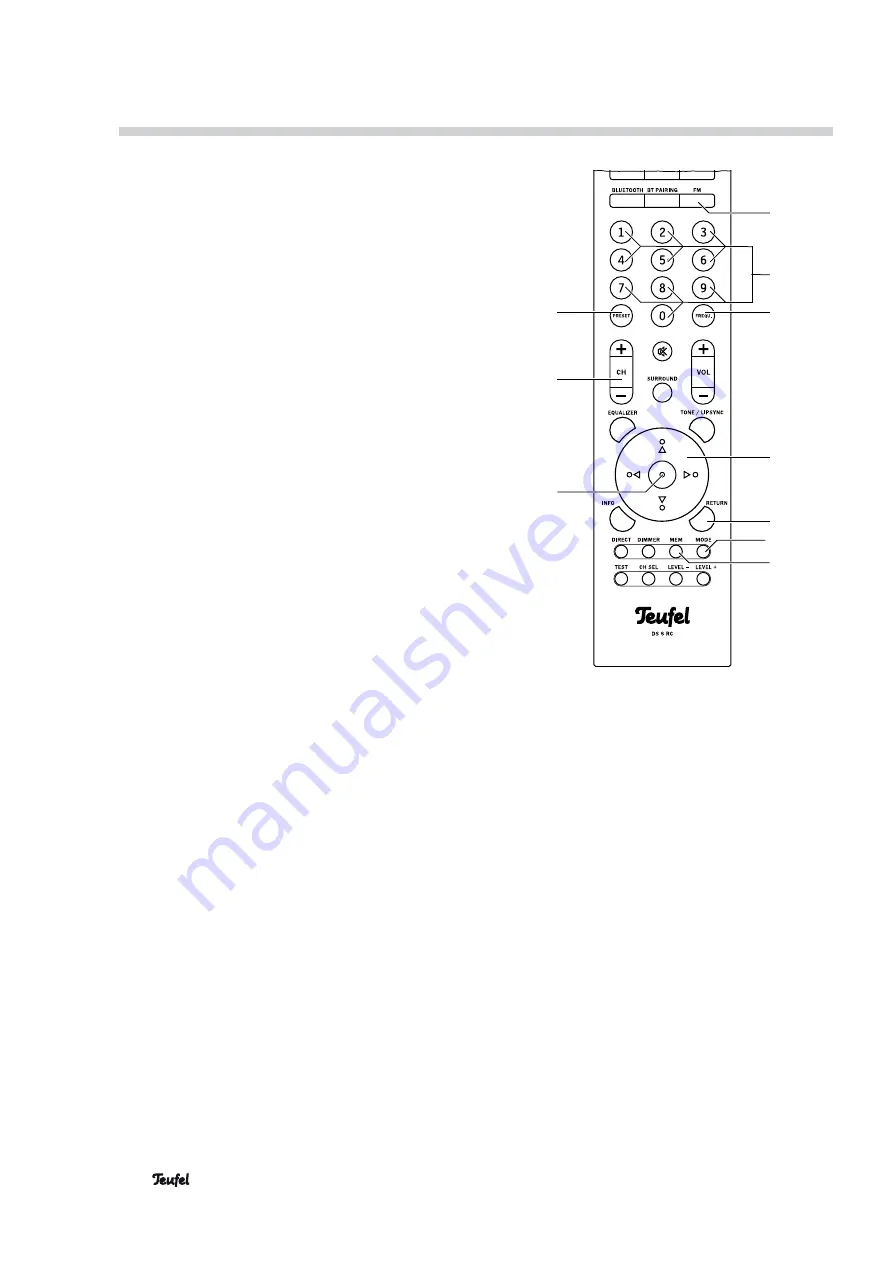
Your DecoderStation 6 has a radio receiver for receiv-
ing mono and stereo stations within the FM range 
from 87.5 to 108 MHz.

Setting the radio stations

Use the FM button 

(19)

 to select the radio as the 

source. The set frequency will be displayed on the 
connected TV set.

Set the receiving frequency with the navigation but-
tons 

(25)

:

• Automatic: After pushing the button for a prolonged 

period (approximately 2 seconds), the station 
search will start in the desired direction until a sta-
tion with a sufficiently strong signal is found.

• Manual: Every time you tap the button, the frequen-

cy will be increased or decreased by one increment 
(0.05 MHz).

Or press the FREQU. button 

(21)

 and enter the de-

sired receiving frequency with the number buttons 

(20)

 and push the • button 

(35)

.

If the station transmits an RDS signal, the frequency 
and the name of the station will alternate in the dis-
play panel after a short time.

Stereo/Mono

You may hear bothersome noise with stereo sta-
tions with a weak signal. In this case, you can switch 
between mono and stereo reception using the MODE 
button 

(27)

 or in the “Tuner” menu under “Mode” (see 

page 17).

Station memory slots

The DecoderStation 6 can save up to 30 stations. You 
can conveniently select the saved stations with the 
push of a button.

Saving stations

You can save the current station in the “Tuner” menu 
under “Memory Store” or have the station memory slots 
occupied automatically (see page 17).

To save the currently selected station directly:

1. Push the MEM button 

(28)

.

The prompt “Store in Pxx?” will appear on the dis-
play panel (3) and the connected screen; “Pxx” is 
the number of the first available memory slot.

2. Press the • button 

(35)

 to save and press the RE-

TURN button 

(26)

 to abort.

Selecting stations from the memory

With the buttons CH +/– 

(37)

 or the navigation 

buttons 

/


(22) 

, you access the occupied station 

memory slots consecutively.

Or you push the PRESET button 

(39)

, enter the 

number of the desired memory slot with the number 
buttons 

(20)

 and push the • button 

(35)

.

Clearing station memory slots

In the “Tuner” menu under “Memory Erase”, you can 
clear individual or all station memory slots (see page 
17).

To clear the current memory:

1. Push the MEM button 

(28)

.

The prompt “ERASE MEMORY, Current slot?” will 
appear on the display panel (3) and the connected 
screen.

2. To erase, push the • button 

(35)

, push the RETURN 

button 

(26)

 to abort.

19

20

21

25

26

35

39

37

27

28

Summary of Contents for DecoderStation 6

Page 1: ...Technical description and instruction manual AV controller pre amplifier with wireless technology DecoderStation 6...

Page 2: ...u 17 Preset 17 Frequency 17 Mode 17 Memory Store 17 Memory Erase 17 Surround menu 18 Tone Control menu 18 Tone 18 Mode 18 Equalizer 18 Speaker Levels menu 18 Source Levels menu 18 Audio Mapping menu 1...

Page 3: ...dictions The HDMI and High Definition Multimedia Interface symbols as well as the HDMI logo are trademarks or registered trademarks of HDMI Licensing LLC in the USA and other countries General notes a...

Page 4: ...splash water Make sure that no vases or other vessels filled with liquid are located on the device or nearby in order to prevent liquid from penetrating the housing If water or any foreign objects ha...

Page 5: ...e DecoderStation 6 in such a way that it cannot be knocked over inadvertently and that the cables do not pose a trip hazard Carefully follow the instruction manual When storing the DecoderStation 6 ma...

Page 6: ...re recycled in a profes sional manner and also rules out negative consequences for the environment For this reason electrical equipment is marked with the following symbol Batteries and rechargeable b...

Page 7: ...DS 6 RC 1x wall adapter for the DecoderStation 6 1x FM wire antenna 2x batteries for the remote control Instruction manual Warranty card Checking the delivery Check that all items have been delivered...

Page 8: ...dio input jack 3 5 mm phone jack 8 AUX 2 3 Analogue audio input jacks RCA 9 COAXIAL 1 2 Digital audio input jacks for coaxial cables 10 OPTICAL 1 2 Digital audio input jacks for optical cables 11 HEAD...

Page 9: ...nd stereo in radio mode 28 MEM Save to station memory slots 29 LEVEL Adjust the channel level 30 CH SEL Select the channel for the level adjustment 31 TEST Activate deactivate test sound 32 DIMMER Adj...

Page 10: ...injury damage Lay the cables so that they do not pose a tripping hazard FM antenna WARNING Risk associated with lightning strike If you are using outdoor or roof antennas be abso lutely sure that the...

Page 11: ...oaxial digital audio outputs of two source devices to the COAXIAL jacks 9 You will need a coaxial cable with RCA plugs for this OPTICAL 1 and 2 You can connect the optical digital audio outputs of two...

Page 12: ...m plug The outputs to the power amplifiers 12 are auto matically deactivated when connecting headphones However they can be reactivated with the button 22 on the remote control This makes it possible...

Page 13: ...burns Do not allow battery acid to come into contact with skin eyes or mucus membranes In the event of contact with acid immediately flush the applicable areas with plenty of clean water and consult...

Page 14: ...r than 30 or 60 minutes it will automatically switch to standby see Auto off on page 19 The DecoderStation 6 is not disconnected from mains in standby mode Pull the mains plug out of the mains socket...

Page 15: ...the menu function see page 18 this provides you with ultra fine sound adjustment in nine frequency ranges 1 By pushing the EQUALIZER button 36 several times you can select the desired frequency The R...

Page 16: ...vel meter which you can order on our website in the accessories area Info Pushing the INFO button 34 shows information on the current audio signal on the screen and on the display panel for approx thr...

Page 17: ...dio mode FM Preset Here you can switch the station memory slots with the navigation buttons 25 Frequency To set the receiving frequency start by turning the dial 4 or pushing the navigation buttons 25...

Page 18: ...ative volume within a range from 10 decrease to 10 increase for each speaker With the Test Tone you can activate and deactivate pink noise as a neutral test tone and also set the speaker levels as des...

Page 19: ...s re mote control and the DecoderStation 6 will automati cally select the input of the respectively active source Possible settings On or Off ARC Audio Return Channel In case of a HDMI connection this...

Page 20: ...nection will be established after a short time and the status Connected is shown you can now use the wireless subwoofer with the DecoderStation 6 3 1 5 1 With this you switch between 3 1 and 5 1 mode...

Page 21: ...th devic es You will find more information about this in the instruction manual of your source device After the search run the DecoderStation 6 should also be present in the list of detected devices 5...

Page 22: ...E button 27 or in the Tuner menu under Mode see page 17 Station memory slots The DecoderStation 6 can save up to 30 stations You can conveniently select the saved stations with the push of a button Sa...

Page 23: ...n the SERVICE jack 13 Notice Risk of damage The DecoderStation 6 may not be disconnected from the power supply during the next steps 5 Insert the mains adapter of the DecoderStation 6 back in the sock...

Page 24: ...Then immediately wipe the damp surfaces off with a soft cloth without applying pressure Notice Risk of damage Using the wrong cleaning agents may damage the delicate surface of the housing If possibl...

Page 25: ...the DecoderStation 6 directly to the wall socket Playback is noisy In general the DecoderStation 6 is a very low noise system In most cases the system with very high resolution in the high range area...

Page 26: ...European Union guidelines 2004 108 EC and 2006 95 EC Dimensions WxHxD 270 x 65 x 175 mm Weight 1 6 kg Operating voltage 100 240 V 50 60 Hz Max power consumption 30 watts Technical data You can find fu...

Page 27: ......

Page 28: ...r criticism Lautsprecher Teufel GmbH Bikini Berlin Budapester Str 44 10787 Berlin Germany Phone 00800 200 300 40 toll free Fax 49 0 30 300 930 930 www teufelaudio com No responsibility is assumed for...

Reviews: