background image

TELink 

1200 

     5      Rev. 

4/25/01 


2.  Installation 


If your messaging provider included other installation instructions, those 
instructions should be followed first.   


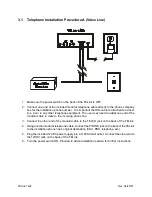
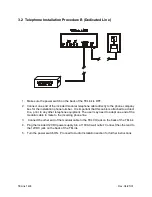
There are three installation procedures available: 


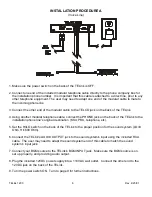
 Use

 Installation Procedure A

 if the installation phone line is also used as a normal voice line. 


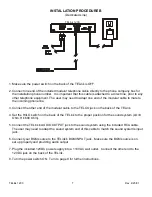
 Use 

Installation Procedure B

 if the unit is to be installed on a phone line dedicated 

exclusively to the TELink. 
 

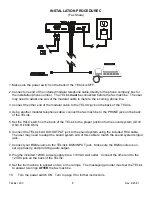
 Use

 Installation Procedure C

 if the installation phone line is to be shared with a fax machine. 


Keep in mind that whichever procedure is used, the TELink must always be connected directly to the 
telephone company input, ahead of any other devices using that line. 


If you have any questions or require assistance installing the TELink, please 
contact your messaging provider. 


Summary of Contents for 1200

Page 1: ...Link 1200 Rev 4 25 01 80 001200 TELink 1200 INSTALLATION AND OPERATION MANUAL Please leave this manual with the unit after installation Important warranty information enclosed see page 2 Nel Tech Labs Inc ...

Page 2: ...T AND NEL TECH SHALL HAVE NO LIABILITY WHATSOEVER ON ACCOUNT OF DEFECTS TO SUCH PRODUCT LIMITATIONS EXCEPT AS STATED ABOVE THERE ARE NO WARRANTIES EXPRESS OR IMPLIED THAT EXTEND BEYOND THE SPECIFICATIONS FOR THE PRODUCT NEL TECH EXPRESSLY DISCLAIMS ANY WARRANTY EXPRESS OR IMPLIED THAT EQUIPMENT SOLD HEREUNDER IS OF MERCHANTIABLE QUALITY OR THAT IT CAN BE USED OR IS FIT FOR ANY PARTICULAR PURPOSE B...

Page 3: ... 3 Rev 4 25 01 TABLE OF CONTENTS FCC Notice 2 LIMITED WARRANTY 2 1 System Description 4 2 Installation 5 Voice Line 6 Dedicated Line 7 Fax Share 8 Final Installation 9 3 Additional Features 9 4 Troubleshooting 11 ...

Page 4: ... configuration settings are sent from the PC Controller to the TELink over telephone lines The TELink 1200 features non volatile FLASH memory which means your messages are safe from erasure due to power loss for up to 10 years If power is lost message playback resumes automatically when power is restored This feature eliminates the need for a battery backup system The TELink 1200 has been designed...

Page 5: ...oice line Use Installation Procedure B if the unit is to be installed on a phone line dedicated exclusively to the TELink Use Installation Procedure C if the installation phone line is to be shared with a fax machine Keep in mind that whichever procedure is used the TELink must always be connected directly to the telephone company input ahead of any other devices using that line If you have any qu...

Page 6: ...le connect the PHONE jack on the back of the TELink to the installation phone line s original destination KSU PBX telephone etc 5 Set the HI LO switch on the back of the TELink to the proper position for the sound system LO 8 Ohm HI 600 Ohm 6 Connect the TELink s AUDIO OUTPUT jack to the sound system s input using the included RCA cable The user may need to adapt the sound system end of this cable...

Page 7: ...e to the TELCO jack on the back of the TELink 4 Set the HI LO switch on the back of the TELink to the proper position for the sound system LO 8 Ohm HI 600 Ohm 5 Connect the TELink s AUDIO OUTPUT jack to the sound system using the included RCA cable The user may need to adapt the sound system end of this cable to match the sound system s input jack 6 Connect your BGM source to the TELink s BGM INPU...

Page 8: ...he TELink 5 Set the HI LO switch on the back of the TELink to the proper position for the sound system LO 8 Ohm HI 600 Ohm 6 Connect the TELink s AUDIO OUTPUT jack to the sound system using the included RCA cable The user may need to adapt the sound system end of this cable to match the sound system s input jack 7 Connect your BGM source to the TELink s BGM INPUT jack Make sure the BGM source is o...

Page 9: ...s complete After a successful download the STATUS light remains on steady While listening to the audio play over the sound system adjust the volume on the BGM source the TELink and or the sound system as required to achieve the desired output level Note The volume buttons on the TELink control the message volume only not the BGM volume which can only be adjusted on the BGM source itself If you hea...

Page 10: ...elephone number must be validated during initial installation and whenever the callback number is changed by the messaging provider During validation the TELink makes one call attempting to establish communications with the PC Controller If it is successful the feature becomes operational If validation fails indicated by the STATUS light alternating between 1 second fast flash 1 second no flash co...

Page 11: ...ed directly to the telephone company input The TELink must be the first device connected to where the telephone line enters the building In a fax line installation the fax machine must be set to answer on at least two rings and the TELink set to answer two rings AFTER the fax machine Can t get a dial tone on the TELink s phone line The TELink may be communicating with the PC Controller The unit au...

Page 12: ...TELink 1400 Rev 04 25 01 80 000031 TELink 1400 INSTALLATION OPERATION MANUAL Please leave this manual with the unit after installation Important warranty information enclosed see page 2 FCC Notice ...

Page 13: ...NEL TECH SHALL HAVE NO LIABILITY WHATSOEVER ON ACCOUNT OF DEFECTS TO SUCH PRODUCT LIMITATIONS EXCEPT AS STATED ABOVE THERE ARE NO WARRANTIES EXPRESS OR IMPLIED THAT EXTEND BEYOND THE SPECIFICATIONS FOR THE PRODUCT NEL TECH EXPRESSLY DISCLAIMS ANY WARRANTY EXPRESS OR IMPLIED THAT EQUIPMENT SOLD HEREUNDER IS OF MERCHANTIABLE QUALITY OR THAT IT CAN BE USED OR IS FIT FOR ANY PARTICULAR PURPOSE BUYER P...

Page 14: ...d their own Ads which are sequenced for play along with the remotely loaded Ads As with all TELink products once installed no further interaction from the user is required Unlike other messaging products the TELink 1400 is designed to be operated remotely by the messaging provider using a specially equipped computer the PC Controller This feature eliminates the need for tape distribution because a...

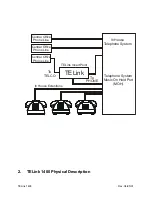
Page 15: ... 1400 Physical Description Central Office Phone Line Central Office Phone Line Central Office Phone Line In House Telephone System Telephone System Music On Hold Port MOH TELink To TELCO In House Extentions To PHONE TELink Insert Point ...

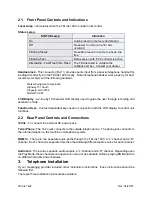
Page 16: ...character LCD display used to guide the user through recording and activation of Ads Function Keys Context dependent keys used in conjunction with the LCD display to control unit functions 2 2 Rear Panel Controls and Connections 12Vdc To connect the external DC power pack Telco Phone The Telco jack connects to the outside telephone line The phone jack connects to the internal telephone fax machine...

Page 17: ...icated exclusively to the TELink Use Installation Procedure C if the installation phone line is to be shared with a fax machine Keep in mind that whichever procedure is used the TELink must always be connected directly to the telephone company input ahead of any other devices using that line If you have any questions or require assistance installing the TELink please contact your messaging provide...

Page 18: ...The user may need to adapt one end of the modular cable to mate to the incoming phone line 3 Connect the other end of the modular cable to the TELCO jack on the back of the TELink 4 Using another modular telephone cable connect the PHONE jack on the back of the TELink to the installation phone line s original destination KSU PBX telephone etc 5 Plug the included 12VDC power supply into a 110VAC wa...

Page 19: ...that this cable is attached to a direct line prior to any other telephone equipment The user may need to adapt one end of the modular cable to mate to the incoming phone line 3 Connect the other end of the modular cable to the TELCO jack on the back of the TELink 4 Plug the included 12VDC power supply into a 110VAC wall outlet Connect the other end to the 12VDC jack on the back of the TELink 5 Tur...

Page 20: ...ng phone line 3 Connect the other end of the modular cable to the TELCO jack on the back of the TELink 4 Using another modular telephone cable connect the fax machine to the PHONE jack on the back of the TELink 5 Plug the included 12VDC power supply into a 110VAC wall outlet Connect the other end to the 12VDC jack on the back of the TELink 6 Set the fax machine to answer on two or more rings The m...

Page 21: ...tem s input using the included RCA cable The user may need to adapt the sound system end of this cable to match the sound system s input jack 2 Connect your BGM source to the TELink s BGM L jack Make sure the BGM source is on set up properly and providing audio output 3 Connect the TELink s AUDIO OUT L jack to the sound system s input using the included RCA cable The user may need to adapt the sou...

Page 22: ...only be adjusted on the BGM source itself If you hear the BGM feed but not Ads this is not a malfunction The TELink is likely waiting out the time interval between Ad play This delay can be anywhere from 0 seconds no delay in between to 9999 seconds about 2 hours and 45 minutes Check with your service provider to find out what time interval has been set for your machine If there is no sound system...

Page 23: ... separate line In a Fax Share installation the TELink only answers calls from the PC Controller and does not interfere with incoming or outgoing fax transmissions because the fax machine always answers first The fax machine must be set to answer on two or more rings and the TELink must be set to answer two rings AFTER the fax machine Example fax machine set to answer on second ring TELink set to a...

Page 24: ...line prompts the user with possible selections The user makes selection by pressing the function key associated with the text display on the bottom line of the display Keys I II III and IV are function keys whose action and meaning are constantly changing depending upon the current operation The meaning of these keys is determined by the bottom line of the display Local mode is accessed by pressin...

Page 25: ...d Select 5 3 2 Ad Action The currently selected Ad number is shown on the top line of the display along with the name of the Ad while the bottom line of the display indicates possible actions Record Review Activate LCD Display Ad Action Ad 01 LOCAL Rec Rev Act Quit I II III IV Key I Sets the unit to record audio from the handset input Key II Sets the unit to play the Ad to the handset ear piece Ke...

Page 26: ...able and restored once a new shipment has been received Ads can only be Activated or Deactivated locally and cannot be done remotely Ads downloaded remotely are automatically activated however should the local user deactivate the Ad the remote controller cannot reactivate the Ad without completely reloading the Ad Ad Activation DeActivation is a toggle condition LCD Display Ad Activation Ad 01 LOC...

Page 27: ... volume Key II Selects adjustment to the Right Channel s Ad volume Key IV Quits Volume adjustment 5 4 1 Channel Ad Volume Adjustment LCD Display Channel Ad Volume Adjust Left Quit I II III IV Key II Decreases the channel s Ad volume level Key III Increases the channel s Ad volume level Key IV Quits Volume adjustment ...

Page 28: ...ying I There is two choices Full Fade completely blocks the background music or Partial Fade allows a small amount of the background music to play while a message is playing LCD Display Ad Fade Fade Partial Change Quit I II III IV Key I Selects Change of Fade as Full or Partial Key IV Quits Ad Fade ...

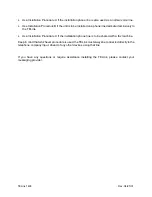
Page 29: ...nput The TELink must be the first device connected to where the telephone line enters the building In a fax line installation the fax machine must be set to answer on at least two rings and the TELink set to answer two rings AFTER the fax machine Can t get a dial tone on the TELink s phone line The TELink may be communicating with the PC Controller The unit automatically locks its phone line durin...

Page 30: ...TELink 1400 Rev 04 25 01 6 10 99 Added Fade to Mode Selection Section 5 to 5 12 99 Revision ...

Reviews: