background image


17 


§

3.2.4  Advanced Parameter setting 

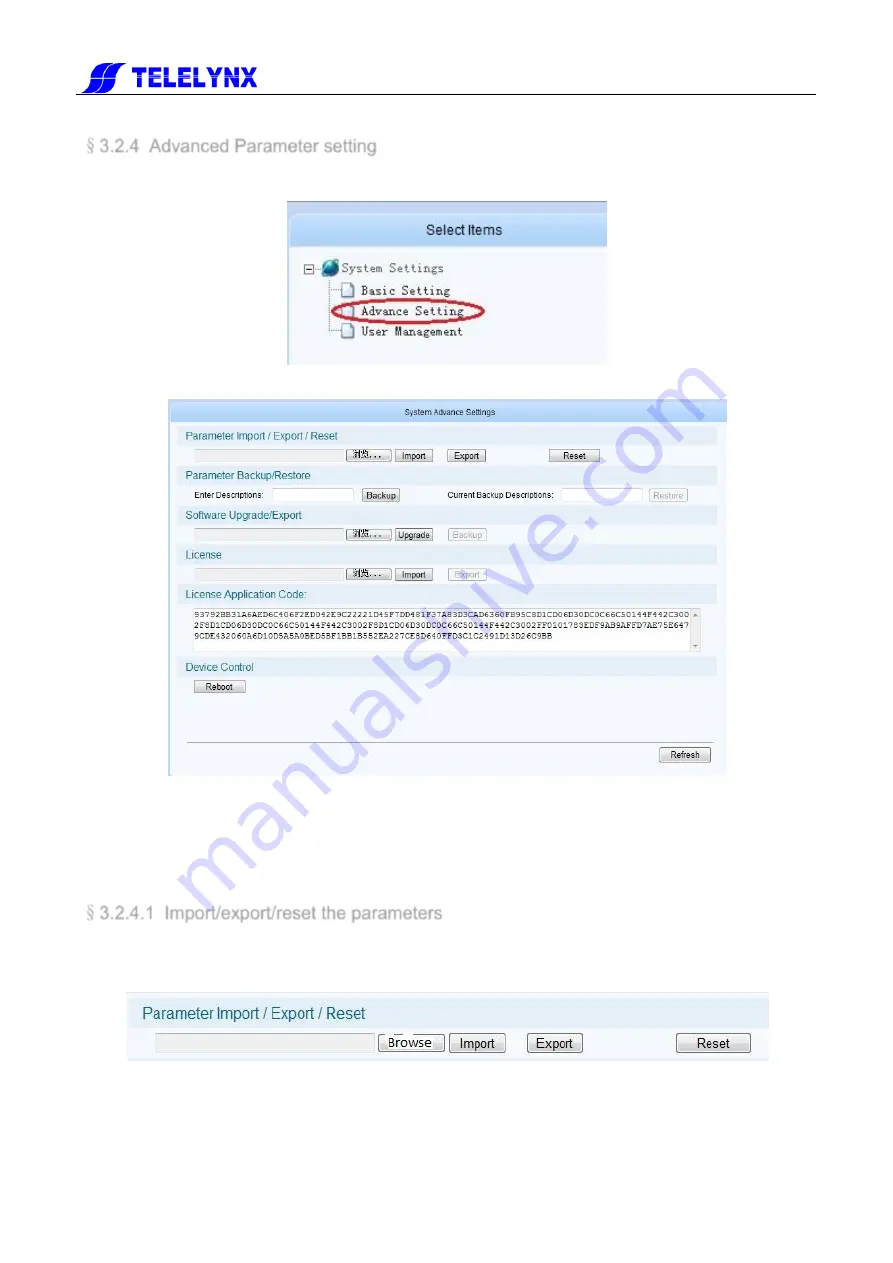
In the “system setting” page, click “Advanced setting” in the “select option” area 


To enter the parameter setting page, as shown in the figure below: 


Fig.13 

Advanced setting page 

In this page, you could import/export/reset the parameters, back-up/recover the parameters, 

upgrade/back-up the software, import the authorization document, restart the device,etc. 


§

3.2.4.1  Import/export/reset the parameters 

Import the parameters

: In the page of figure 13, click “browse” button in the “inport/export/reset the 

parameters” bar to choose the parameters‟ document, a .bin file, of the device. 


Fig.14 

Import/export/reset the parameters page 


After choosing the parameters‟ document, click “Open” button. Then return to last page, click “import” 
button, system will change the page to uploading management page,as shown in the figure below: 

Summary of Contents for Lavision-868FTA

Page 1: ...868FT MODE LAVISIO...

Page 2: ...network interfaces of the device Avoid rapid and frequent power on off or it may cause damages to the semiconductor chipsets Keep proper direction of the power cord when plug into or out from a power...

Page 3: ...r 14 3 2 3 Basic parameter setting 15 3 2 3 1 IP Settings 15 3 2 3 2 MAC setting 16 3 2 3 3 Parameter setting about system clock 16 3 2 4 Advanced Parameter setting 17 3 2 4 1 Import export reset the...

Page 4: ...2 8 Monitoring 50 3 2 8 1 Alarms 50 3 2 8 2 Bitrate Monitor 52 3 3 Front Panel Operation of LAVISION 868FTA 58 Annex A Technical Specifications of LAVISION 868FTA 60 Annex B Frequently Asked Questions...

Page 5: ...le PT MUX CA4 The product is mainly applied to the DTV network head end room edge of DTV backbone network and DTV branch head end room 1 2 Key Features This product has the following key features Supp...

Page 6: ...zation see section 3 3 for details The POWER LED will be light if the device powers on successfully The STATUS LED will show some working status of the device see section 3 3 for details The ALARM LED...

Page 7: ...test environment The following devices may be able to receive the output signal of LAVISION 868FTA Only TELELYNX products listed 1 IDH2 3000 IP MUX SCR QAM series this devices could make the multiple...

Page 8: ...ASI interface with standard format of 188 byte LAVISION 868FTA may be able to receive multiple transport streams from any devices with the TS format complies with the above mentioned format 2 1 2 Requ...

Page 9: ...directly Otherwise you will need to configure the IP address of management port using front panel control refer to section 3 2 10 1 5 Login to the web browser from the management workstation key in t...

Page 10: ...VISION 868FTA But changing of password for this user is strongly recommended and the new password should be kept safely If you choose remember my proof you needn t input your user and password when yo...

Page 11: ...am scrambling device setting page by clicking different hyperlinks in the area of main menu across the top of this page Remark Device will not auto save your parameters If the device restarts the para...

Page 12: ...ser information in the user management page Click device setting in the home page and then you have the device setting page as shown in the figure below Fig 8 Device setting page Click user management...

Page 13: ...ou add successfully a new user there will show your user information on the right side as shown in the figure below Fig 10 New user information Remark All new users are normal users They are only perm...

Page 14: ...t you can change the password of this user When you use LAVISION 868FTA for the first time you should change admin s password at first and then save this password 3 2 2 3 Delete an user In the user in...

Page 15: ...address MAC address set the IP address of time synchronization server open or close this service and set the UTC time synchronization etc 3 2 3 1 IP Settings In the page of figure 11 input a right IP...

Page 16: ...erver are enabled Set system clock by manual operation In the page of figure 11 you can set manually the system clock in the date time UTC bar And you can also click get UTC time then click submit but...

Page 17: ...software import the authorization document restart the device etc 3 2 4 1 Import export reset the parameters Import the parameters In the page of figure 13 click browse button in the inport export res...

Page 18: ...parameters Remark 1 Please do not turn off the device or pull the power off when the device is importing the parameters 2 The device will restart after importing the parameters 3 Export the parameter...

Page 19: ...device Remark System could only save a unique back up document each time the new back up document will cover the last one Restore the parameters When the device has a back up document click Restore bu...

Page 20: ...nt page System will checkout the uploading document if its format is right there will appear mark in the Uploading bar and document checkout bar Click Submit button you ll have this dialog box Click Y...

Page 21: ...FTA has 4 types of authorization please verify the authorization type before you buy this device After buying this device if you want to get a higher configuration you can also contact with our salesm...

Page 22: ...of the device are listed in the Select Items in the left side of this page as shown below Fig 19 Input Output Setting 3 2 5 1 TUNER settings Input output settings interface shows the link of Tuner by...

Page 23: ...light shows green the signals is locked if the lock light shows red the signals is unlocked Range of the parameter settings Input frequency Local frequency the difference between input frequency and...

Page 24: ...al strength is 42dBuV 82dBuV If the lock light shows green the signals is locked if the lock light shows red the signals is unlocked Range of the parameter settings Frequency 51 000 860 000MHz Symbol...

Page 25: ...ameter settings Protocol UDP RTP DES address 001 000 000 000 126 255 255 255 and 128 000 000 000 239 255 255 255 Source port 1000 65535 Status ON OFF After the configuration click Submit button at rig...

Page 26: ...26 Fig 23 ASI settings Channel parameters the bit rate can be set in this page of the channel settings...

Page 27: ...ams The multiplex parameter configurations are listed in the Select Items in the left side of this page including the general setting manual PID map manual PSI inserter NIT edit input programs and out...

Page 28: ...the received program information over transport stream can be displayed correctly meanwhile ensure this information can be displayed correctly in the next device It can be set in the column of default...

Page 29: ...card the private PID if it cannot be recognized The needed private PID can be mapped by the PID mapping function and mapped private PID can be passed through and transmitted by the device 3 3 2 2 6 6...

Page 30: ...Ds are decimal number 3 3 2 2 6 6 2 2 2 2 D De el le et te e P PI ID D m ma ap pp pi in ng g As shown above select the check box in any column after that click the Delete button in the bottom of this...

Page 31: ...Fig 28 PSI information insertion Click left bottom browse and select the updating file After select click the upload bottom The system will automatically skip to the upload management page as shown be...

Page 32: ...f the file is uploaded correctly and the file layout is correct the column of upload status and file adjust will display this characteristic Click the Submit button below the upload will succeed as sh...

Page 33: ...click the Delete button in the bottom of this page then click Submit the selected PSI information will be deleted 3 2 6 4 NIT edit The NIT of the transport stream of DTV support the information of th...

Page 34: ...er coding FEC outer coding After the configuration click Submit button at right bottom of the page to save the setting LAVISION 868FTA support the edit of NIT Network Descriptor and NIT TS Descriptor...

Page 35: ...T TS descriptor is same as the NIT Network Descriptor the detail please check the specification of the edit of NIT Network Descriptor Remark 1 NIT descriptor utilize hexadecimal number 2 Ensure the De...

Page 36: ...gram menu As shown in figure 33 spread channel 01 menu the number of this type of channel can be checked Fig 35 Input channel list As shown in figure 36 click any hyperlink of channel i e TS 0002 the...

Page 37: ...ormation of the TS is displayed above the program list as shown below Fig 38 TS information Click any button at the right side of the program name the details spread up below Fig 39 Program TS informa...

Page 38: ...at tc ch h p pr ro og gr ra am m m mu ul lt ti ip pl le ex xi in ng g LAVISION 868FTA supports batch program multiplexing It means multiplex all the programs of one channel to another selected channe...

Page 39: ...over the user setting the search will stop Default input character sets detail in 3 2 6 1 1 Switch of deletion after failure when the search failure switch on will delete all the information of curre...

Page 40: ...low Fig 46 Output TS information page 3 3 2 2 6 6 6 6 1 1 O Ou ut tp pu ut t T TS S I In nf fo or rm ma at ti io on n M Mo on ni it to or ri in ng g a an nd d C Co on nf fi ig gu ur ra at ti io on n S...

Page 41: ...n the Descriptor Type box at the bottom of the page will display TS CAT Descriptors shown as below Fig 48 CAT description editing The way to edit CAT descriptor is the same as the way to edit NIT desc...

Page 42: ...value of PMT PID PMT version sending interval in the corresponding boxes and click Submit button to validate the setting PCR PID Users can type the value of PCR PID in the corresponding box and click...

Page 43: ...is the same as the way to edit NIT descriptor see section 3 2 6 4 1 ES information Click button in front of the TS to open the TS information list Users can type the value of ES PID in the correspond...

Page 44: ...To delete all programs check the Service Remove Mark Select All box at the lower left corner shown as below Fig 51 Delete All Programs All programs service remove mark will be automatically checked th...

Page 45: ...age shown as below Fig 52 Scrambling Setting page In Select Items column there are scrambling configuration options including General Setting CAS Configuration and Services Scramble Setting Fig 53 Sel...

Page 46: ...lidate the setting Fixed CW when it is ON CW will be a user defined fixed value despite the default crypto period Click Submit button to validate the setting 3 2 7 2 CAS Configuration 3 3 2 2 7 7 2 2...

Page 47: ...be the legal value which is authorized by the DVB CAS organization EMMG Port the port number of the EMM generator Remark To ensure LAVISION 868FTA can correctly receive the EMM data from the CAS the...

Page 48: ...he AC data in binary form provided by CAS company and copy paste it into the editing box instead of manually typing 3 When the AC information which being used is modified the corresponding scrambled p...

Page 49: ...e original CA descriptors will be persisted 2 LAVISION 868FTA supports up to 4 CAS simul crypt The CAS s AC information is available for use only when the CAS is ON 3 For different CAS AC information...

Page 50: ...ring page shown as below Fig 61 Monitoring Page 3 2 8 1 Alarms Unfold Alarms menu to open the alarming information page shown as below Fig 62 Alarms Menu 3 3 2 2 8 8 1 1 1 1 A Al la ar rm ms s D Di is...

Page 51: ...er will start to count the number of errors occurred shown as below The counter will automatically restore to zero even the error is cleared Users need to click the Reset button to reset the counter t...

Page 52: ...nel switch and the log level Trap when it is ON LAVISION 868FTA will send the trap information to server through SNMP Panel when it is ON the alarm light on the front panel of LAVISION 868FTA will dis...

Page 53: ...lays the real time bit rate of each channel the right column enable users to set the bit rate alarm setting including lower limit upper limit and the enable switch Lower Limit when the real time bit r...

Page 54: ...b menu of Channel 3 3 2 2 8 8 2 2 2 2 O Ou ut tp pu ut t C Ch ha an nn ne el l B Bi it t R Ra at te e Unfold the Output Channel menu to enter the output channel bit rate monitoring page shown as below...

Page 55: ...per limit and the enable switch Lower Limit when the real time bit rate is lower than this lower limit value it will trigger an alarm Upper Limit when the real time bit rate is higher than this upper...

Page 56: ...right column enable users to set the bit rate alarm setting including lower limit upper limit and the enable switch Lower Limit when the real time bit rate is lower than this lower limit value it wil...

Page 57: ...toring of Output Channel 3 3 2 2 8 8 2 2 3 3 S Sy ys st te em m B Bi it t R Ra at te e Shown as figure 74 the lower right corner displays the system input output and insert bit rate shown as below Fig...

Page 58: ...it has no alarm the LED kept red before been cleared 3 After alarms been cleared the alarm LED and status LED turn green if no new alarm occur 4 Maximum occupancy of alarm categories up to 40 variabl...

Page 59: ...ISION 868FTA Press ENTER key to remove cursor Use and keys to switching between different digits of the default gateway Press ENTER key to apply changes 3 3 MAC Address Display the MAC address Read on...

Page 60: ...l interface type RJ45 Physical bandwidth 100Mbps Max signal transmission distance 100M Cable Requirement Cat5e cable or 6e cable Data output interface Standard IEEE 802 3 1000BASE T Physical interface...

Page 61: ...roperties Specification RF Input Input frequency 950 2150MHz EPL 65 25dBm DVB S S2 Demodulation Symbol rate 2 0 45Msym s QPSK 10 0 31Msym s 8PSK Demodulation mode DVB S QPSK DVB S2 QPSK 8PSK Standard...

Page 62: ...nput Check if the cable is properly connected BNC cable problem Check if the cable is properly worked or change the cable Fail to scan programs in specific input Source device is not working properly...

Reviews: