background image

English   

- 87 -

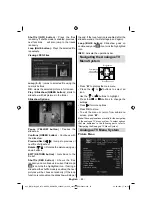
Select PIP Position  item by using the “ ” or 
“ ” buttons. Use the “ ” or “ ” buttons to adjust  
PIP position. 

Positions available are: Bottom Right,Bottom 
Left, Top Left and Top Right. 

 Source 

 PIP Source setting enables you to select the 
source of the sub picture.

Select PIP Source item by using the “ ” or         
“ ” buttons. Use the “ ” or “ ” buttons to set 
 

PIP  source

 Program 

 This setting will be unavailable to be used. 

 Swap 

 Select 

Swap

 item by using the “ ” or “ ” 

buttons. Use the “ ” or “ ” buttons to set. This 
function enables to swap between the main and 
the PIP picture. 

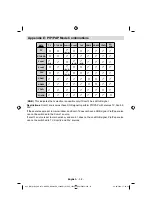
  Note : See Appendix E for all PIP/PAP modes. 

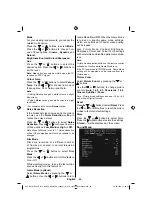
 Sleep Timer 

 Press the “ ” or “ ” buttons to select 

 Sleep 

Timer 

. Use the “ ” or “ ” buttons to set the 


Sleep Timer

The timer can be programmed between  

Off

  and 


120

  minutes in steps of  

10

  minutes. 

If  

Sleep Timer

  is activated, at the end of the 

selected time, the TV goes automatically to 
standby mode. 

 Child Lock 

 Press the “ ” or “ ” buttons to select  

Child 

Lock

 .

Use the “ ” or “ ”  to turn the Child Lock  

On


or  

Off

 . When On is selected, the TV can only 

be controlled by the remote control handset. In 
this case the control panel buttons (except the 
 

STANDBY

  button) will not work.

Hence, if one of those buttons is pressed,  

Child 

Lock On

  will be displayed on the screen when 

the  menu screen is not visible. 

 Language 

 Press the “ ” or “ ” buttons to select  

Language

 . 

Use the “ ” or “ ” buttons to to select the 
 

Language

 .  

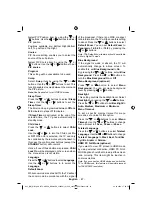
 Default Zoom 

 While zoom mode is set as  AUTO , the TV will set 
the zoom mode in accordance with the  signal 

of the broadcast. If there is no WSS or aspect 
ratio information, the TV will then use this setting 
to adopt. Press the “ ” or “ ” buttons to select 
 

Default Zoom

 . You can set  

Default Zoom

  to 


Panoramic

 ,  

16:9

 ,  

4:3

  or  

14:9

  by pressing the 

“ ” or “ ” buttons. 

Note :

The


Default Zoom feature will not be available 

while in Digital Tv mode.

 Blue Background 

 If the signal is weak or absent, the TV will 
automatically change to a blue screen. To 
enable this, set  

Blue Background

  to  

On

 .

By pressing the “ ” or “ ” buttons, select  

Blue 

Background

 . Press the “ ” or “ ” buttons  to 

turn the  

Blue Background


On

  or  

Off

 . 

Menu Background (optional)

 Press “

” or “

” button to select  

Menu 

Background

 . You can set menu background 

level by pressing “ ” or “ ” button. 

   Backlight 

 This setting controls the backlight level. Select 
 

Backlight 

 by pressing the “ ” or “ ” buttons. 

Press the “ ” or “ ” buttons to set  

Backlight 

 to 


Auto, Medium 

,  

Maximum 

 or  

Minimum 

 Menu Timeout 

 To set a specific display timeout for menu 
screens, set a value for this option.

Press the “ ” or “ ” buttons to select  

Menu 

Timeout 

. Use the “ ” or “ ” buttons to change 

menu timeout to  

15 sec

 ,  

30 sec

  or  

60 sec

 . 

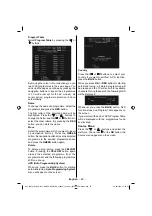
 Teletext Language 

 Press the “ ” or “ ” buttons to select  

Teletext 

Language

 . Use the “ ” or “ ” buttons to change 


Teletext Language

  to  

West, East

 ,  

Turk/Gre 

Cyrillic, Arabic

 or 

Persian


   .


 HDMI PC Full Mode (optional)

If you want to view PC screen in HDMI mode 
by using external connection, HDMI PC FULL 
MODE option should be On to adjust the screen 
ratio correctly. This item might be inactive in 
some resolutions.

Note: If you connect an HDMI device and switch the 
TV to HDMI mode, this feature will be visible (except 
for 1080i/1080P resolution).

A02_[GB]_MB36_HDIDTV-MPEG4_BRONZE8_32880W_1810UK_10065239-50156446.indd   36

A02_[GB]_MB36_HDIDTV-MPEG4_BRONZE8_32880W_1810UK_10065239-50156446.indd   36

26.09.2009   17:00:38

26.09.2009   17:00:38

Summary of Contents for TF3236HX880LU

Page 1: ...MODE D EMPLOI OPERATING INSTRUCTIONS TELEVISEUR COULEUR A TELECOMMANDE COLOUR TELEVISION WITH REMOTE CONTROL 32 Wide Screen LCD DIGI TV TF3236HX880LU TF3236HX880LU 32 32...

Page 2: ......

Page 3: ...50156446...
Page 4: ...direct 19 R glages initiaux 20 Fonctionnement g n ral 21 Bandeau d information 21 Guide de programme lectronique EPG Electro nic Programme Guide 21 Options du programme 22 S lectionner une cha ne 22 T...

Page 5: ...ontale 41 Position V Verticale 42 Phase 42 Fr quence pilote 42 Menu image PC 42 Menu Audio 42 Menu fonctionnel 42 Menu Source 42 Menu Navigateur m dia 42 Affichage des informations TV 42 Fonction Muet...

Page 6: ...utomatique du son en cas d absence de transmission Lecture NTSC Fonctions PIP PAP PAT Ajustement automatique du volume AVL Automatic Volume Limiting Lorsqu aucun signal valide n est d tect le t l vise...

Page 7: ...ccordement endommag peut causer un incendie ou vous infliger une d charge lectrique Lorsque endommag le cordon doit tre remplac ceci doit tre effectu par un personnel qualifi Humidit et eau N utilisez...

Page 8: ...sateurs des pays de l union europ enne Ce symbole sur l appareil ou sur son emballage indique que votre appareil lectrique ou lectronique doit tre jet la fin de sa dur e de vie s par ment de vos d che...

Page 9: ...XT 13 Muet 14 Baisser le volume 15 Programme suivant Page pr c dente en 16 mode DTV Guide de programme lectronique en 17 mode DTV Programme haut Page suivante en mode 18 DTV Minuteur de mise en veille...

Page 10: ...Boutons programme haut 3 bas Boutons de volume haut bas 4 Remarque Appuyez sur les boutons au m me moment pour afficher le menu principal A01_ FR _MB36_HDIDTV MPEG4_BRONZE8_32880W_1810UK_10065239 501...

Page 11: ...le d codeur un VCR ou un lecteur de DVD Remarque Si un p riph rique externe est branch l aide des prises P RITEL le t l viseur passe automatiquement en mode AV Si les deux prises sont utilis es au m m...

Page 12: ...un c ble optique num rique pour transf rer des signaux audio en direction d un p riph rique disposant d une entr e S PDIF 9 L entr e RF se branche une antenne ou un c b Remarquez que si vous utilisez...

Page 13: ...rancher les signaux vid o 4 d appareils externes Branchez le c ble vid o entre la prise ENTREE VIDEO du t l viseur et le port SORTIE VIDEO de votre appareil Les entr es audio servent brancher les sign...

Page 14: ...ncher la prise de courant Branchez le c ble d alimentation la prise secteur Branchement de l antenne Branchez l antenne ou le c ble du t l viseur la prise d ENTR E DE L ANTENNE situ e l arri re du t l...

Page 15: ...EMENT Il est tr s dangereux de brancher et de d brancher les p riph riques USB avec une certaine rapidit vitez surtout de le brancher et de le d brancher avec une certaine rapidit Ceci peut physiqueme...

Page 16: ...e branchement effectu passez la source du PC Voir la section S lection d entr e R glez la r solution qui correspond vos besoins d affichage Pour les informations relatives la r solution se reporter l...

Page 17: ...ch s via des PRISES EN COMPOSANTES Utilisez un c ble en composantes pour connecter l entr e vid o Pour activer le son utilisez un c ble audio en composantes ainsi qu illustr ci dessous Une fois le bra...

Page 18: ...scope aux prises VIDEO IN au m me moment dans la mesure o ce branchement peut entra ner des bruits dans l image Pour s lectionner la source correspondante se reporter la section S lection d entr e dan...

Page 19: ...le t l viseur LCD et les haut parleurs externes une fois tous les branchements effectu s Reportez vous au manuel de votre jeu de haut parleurs pour en savoir davantage Pour un branchement un p riph ri...

Page 20: ...c bles pr sent s dans l illustration ne sont pas fournis Eteignez le t l viseur et les p riph riques avant d effectuer tout branchement Pour plus d informations reportez vous au manuel d utilisation...

Page 21: ...tion la prise de courant alternatif 220 240V AC 50 Hz de la prise secteur Appuyez sur la touche VEILLE Le T MOIN de mise en veille s allume Pour allumer le t l viseur partir du mode veille vous pouvez...

Page 22: ...utons ou Pour vous familiariser avec l utilisation des menus consultez les sections consacr es au syst me de menu Mode AV Pressez le bouton TV AV sur le panneau de contr le de la TV pour commuter entr...

Page 23: ...t l viseur vous pouvez activer cette option L alimentation de l antenne doit tre D sactiv e lorsqu une antenne standard est utilis e plut t qu une antenne active Reportez vous au menu Configuration d...

Page 24: ...ussi tre affich en appuyant sur la touche INFO tout moment En appuyant de nouveau sur le bouton INFO la banni re dispara t Le ruban d information fournit des informations sur la cha ne s lectionn e et...

Page 25: ...ait e ou de la cha ne voulue MAINTENANT Affiche le programme en cours Options du programme Dans le menu EPG appuyez sur la touche OK pour acc der au menu Options du programme S lectionner une cha ne D...

Page 26: ...4 9 Cin ma Zoom ou Sous titre En s lectionnant Auto le format affich est d termin par l image transmise NB La taille du menu varie selon la taille de l image choisie Syst me de menu IDTV Le menu IDTV...

Page 27: ...nel List Supprimer Delete s affiche pr s de OK en bas de l cran pour vous inviter appuyer sur la touche OK afin de supprimer la cha ne en surbrillance dans la liste des cha nes Appuyez sur OK pour sup...

Page 28: ...ir dans le sous menu Mode Pr f r du menu Configuration vous activez uniquement les cha nes contenues dans la liste s lectionn e L OSD Liste des cha nes ressemblera ceci Comment ajouter une cha ne une...

Page 29: ...rrage est saisie via les boutons gauche droite ou via les boutons num riques Fin L heure de fin est saisie via les boutons gauche droite ou via les boutons num riques Dur e Affiche la dur e de l enreg...

Page 30: ...bouton OK pour afficher la fen tre de configuration du t l viseur TV Setup Des informations d taill es sur toutes les rubriques de menu sont dans la section Syst me de menu TV analogique R glage Les a...

Page 31: ...oriser les modifications r centes et quitter appuyez sur le bouton M Antenne active Utilisez les boutons ou pour s lectionner l option Antenne active Lorsque l option Alimentation de l antenne est act...

Page 32: ...r ajuster la fonction de verrouillage pour le Menu Principal Main Menu ou le Menu Installation Installation Menu afin d en limiter l acc s Si le verrouillage du menu est d sactiv l acc s au syst me de...

Page 33: ...bouton ou La langue choisie sera vue dans les sous titres Remarque Si l option Pays est r gl e sur l une des optionsDanemark Su de Norv geouFinlande leMenu Param tres linguistiques fonctionnera comme...

Page 34: ...s ces programmes Si vous n tes pas d accord avec l emplacement et ou les noms des programmes vous pourrez les changer via le menu des programmes Reportez vous la section Tableau des programmes Toutes...

Page 35: ...z lancer une recherche automatique Mettez Oui en surbrillance l aide des touches ou puis appuyez sur OK pour lancer l installation Une fois la recherche des cha nes num riques termin e un message vous...

Page 36: ...pause ou reprend la lecture Pr c dent Suivant passe la lecture du fichier pr c dent ou suivant Al atoire Touche INFO Lit les fichiers au hasard Si le mode de lecture al atoire est activ les fonctions...

Page 37: ...s dans les paragraphes suivants reportez vous Navigation dans le syst me de menu TV analogique Syst me de menu TV analogique Menu Image Mode Pour vos besoins de visualisation vous pouvez r gler l opti...

Page 38: ...t que le mode Jeu est activ Remarque Le bouton de s lection du mode Image qui se trouve sur la t l commande n aura aucune fonction tant que le mode Jeu est activ Si la t l est r gl e sur le mode PIP P...

Page 39: ...e Mono St r o Mixte I ou Mixte II si la cha ne s lectionn e supporte ce mode AVL La fonction de limitation automatique de volume AVL Automatic Volume Limiting ajuste le son dans le but d obtenir un ni...

Page 40: ...conque et r glez la D tection de Mouvement sur Activ e le Mode Jeu sera automatiquement d sactiv Pip Pap Dans le menu Fonctions s lectionnez la rubrique PIP en appuyant sur les touches ou Appuyez sur...

Page 41: ...langue Zoom par d faut Lorsque le mode Zoom est r gl sur AUTO le t l viseur r glera le mode Zoom conform ment au signal de la diffusion S il n existe pas de WSS ou d information de format d image le...

Page 42: ...um riques sur la t l commande Vous pouvez m moriser jusqu 200 programmes entre 0 et 199 Bande La bande C ou S peut tre s lectionn e en pressant les boutons ou pour r gler la bande Cha ne La cha ne peu...

Page 43: ...e Pressez le bouton ou pour changer cette lettre et le bouton ou pour s lectionner les autres lettres En pressant le bouton ROUGE vous pouvez stocker le nom D placer S lectionnez le programme que vous...

Page 44: ...l viseur Pour basculer vers la source PC pressez le bouton SOURCE sur votre t l commande et s lectionnez l entr e PC Vous pouvez galement utiliser le menu Source pour passer en mode PC Notez que les...

Page 45: ...l Les param tres du menu fonctionnel sont identiques aux r glages expliqu s dans la section Menu fonctionnel du Syst me de menu Menu Source Les param tres du menu Source sont identiques aux r glages e...

Page 46: ...et HDMI en r solutions 720p 1080i seul le mode 16 9 est disponible En mode PC seul le format 16 9 est disponible Auto Lorsqu un signal WSS Wide Screen Signalling Signalisation d cran large qui indiqu...

Page 47: ...ormations cach es par ex solutions de jeux OK Retenir Garde une page de texte selon convenance Pressez nouveau pour reprendre Pages de signaux d affichage S lectionne les pages de signaux d affichage...

Page 48: ...fr quence correcte Veuillez r gler nouveau les cha nes La qualit d image peut se d grader lorsque deux p riph riques sont connect s la TV en m me temps Dans un tel cas d connectez l un des p riph riq...

Page 49: ...800 600 72 48 1 VESA 16 9 4 3 13 800 600 75 46 9 VESA 16 9 4 3 14 800 600 85 53 7 VESA 16 9 4 3 15 832 624 75 49 7 MAC 16 9 4 3 16 1024 768 43 35 5 VESA interlace 16 9 4 3 17 1024 768 60 48 4 VESA 16...

Page 50: ...6P 50Hz O 720P 50Hz O 720P 60Hz O 1080I 50Hz O 1080I 60Hz O 1080P 50Hz O 1080P 60Hz O 1080P 24 HZ O X Non disponible O Disponible Remarque Dans certains cas un signal sur l cran de la TV LCD peut ne p...

Page 51: ...s de la prise HDMI Broche Signal d entr e Broche Signal d entr e 1 TMDS Dati2 11 Blindage horloge TMDS 2 Blindage TMDS Data2 12 Horloge TMDS 3 TMDS Data2 13 CEC 4 TMDS Data 1 14 R serv N C sur p riph...

Page 52: ...a source P ritel 1 doit disposer d un signal RGB pour effectuer les combinaisons du mode PIP PAP avec les sources TV P ritel 2 FAV Si ces sources sont d finies sur la fen tre principale et P ritel 1 n...

Page 53: ...48KHz D bit binaire 32K 320Kbps Photo jpg Pour JPEG WxH 14592x12288 jusqu 179 Mega pixel Format du support 444 440 422 420 Echelle de gris JPEG Progressif Jusqu 4 mega pixels Format du support 444 440...

Page 54: ...6 x 524 Poids en Kg 11 60 R ception num rique Normes de transmission DVB T MPEG2 DVB T MPEG4 HD i DEMODULATION D bit symbole COFDM avec mode 2K 8K FFT Modulation 16 QAM 64 QAM FEC pour tous les modes...

Page 55: ...ramme Selection Direct Access 70 Initial Settings 71 General Operation 72 Information Banner 72 Electronic Programme Guide EPG 72 Programme Options 73 Select Channel 73 Over Air Download 73 Displaying...

Page 56: ...PC Mode Menu System 90 PC Position Menu 90 Autoposition 90 H Horizontal Position 90 V Vertical Position 90 Phase 90 Dot Clock 90 PC Picture Menu 90 Sound Menu 91 Feature Menu 91 Source Menu 91 Display...

Page 57: ...matic sound mute when no transmission NTSC playback PIP PAP PAT functions AVL Automatic Volume Limiting When no valid signal is detected after 5 minutes the TV switches automatically to standby mode P...

Page 58: ...ld be done by qualified personnel Moisture and Water Do not use this device in a humid and damp place avoid the bathroom the sink in the kitchen and near the washing machine Do not expose this device...

Page 59: ...vice should be disposed at the end of its service life separately from your household wastes There are separate collection systems for recycling in EU For more information please contact the local aut...

Page 60: ...in 21 DTV mode Hold in TXT mode Cursor Down 22 Exit in DTV mode Return Index page 23 in TXT mode Cursor Right Subpage in TXT mode 24 Cursor Up 25 Previous programme 26 Yellow Feature Menu Currrent 27...

Page 61: ...n 2 Programme Up Down 3 buttons Volume Up Down buttons 4 Note Press buttons at the same time to view main menu A02_ GB _MB36_HDIDTV MPEG4_BRONZE8_32880W_1810UK_10065239 50156446 indd 7 A02_ GB _MB36_H...

Page 62: ...will automatically switch to AV mode If both sockets are employed at the same time SCART 1 will override SCART 2 unless manually selected Note You should connect the decoder to EXT 1 if you are planni...

Page 63: ...able Note that if you use a decoder or a media recorder you should connect the aerial cable through the device to the television with an appropriate antenna cable as shown in the illustrationin the fo...

Page 64: ...eo signals of external 4 devices Connect the video cable between the VIDEO IN socket on the TV and the VIDEO OUT jack on your device Audio Inputs are used for connecting audio signals of external 5 de...

Page 65: ...t the set to the mains Plug the power cable to the mains socket outlet Aerial Connection Connect the aerial or cable TV plug to the AERIAL INPUT socket located at the rear of the TV REAR VIEW A02_ GB...

Page 66: ...and unplugging USB devices is a very hazardous operation Especially do not repeatedly quickly plug and unplug it This may cause physical damage to the USB input and especially the USB device itself S...

Page 67: ...ion is made switch to PC source See section Input selection Set the resolution that suits your viewing requirements Resolution information can be found in the appendix parts REAR VIEW PC audio cable n...

Page 68: ...rough COMPONENT SOCKETS Use a component video cable to connect to the video input For enabling audio use a component audio cable as illustrated below When the connection is made select the source as Y...

Page 69: ...ect the camcoder to the VIDEO IN socket at the same time since it can cause noise in the picture For selecting the related source see the section Input selection in the following parts To listen the T...

Page 70: ...Turn on the LCD TV and external speaker set after all connections are made Refer to your speaker set s manual for further queries For connecting to a device that has SPDIF support use an appropriate S...

Page 71: ...lustration are not supplied Power off both the TV and the devices before making any connections For more information refer to your device s own instruction book REAR VIEW Scart sockets Decoder DVD Rec...

Page 72: ...o Switch the TV On Connect the power cord to the 220 240V AC 50 Hz mains socket Press STANDBY switch Then the standby LED lights up To switch on the TV from standby mode either Press the button P P or...

Page 73: ...AV button in the control panel on the TV to switch between AV modes Operation with the Remote Control The remote control of your TV is designed to control all the functions of the model you selected...

Page 74: ...guration Menu in the following sections for more information Press OK button on the remote control to continue and the following message will be displayed on the screen To start automatic search selec...

Page 75: ...en with the beginning and ending time The current time information is displayed along with channel name Hint Not all channels broadcast the programme data If the name and times of the programme are no...

Page 76: ...the SUBTITLE Digital Teletext For UK only With digital terrestrial broadcasting DVB T in addition to picture and sound you can also view digital teletext Digital teletext is sometimes broadcasted at...

Page 77: ...ng the channels in the channel list Press the or buttons to select the channel that will be moved Press the or buttons to select the Move item on Channel List menu Following OSD will be displayed next...

Page 78: ...pressing the or buttons Then press the OK button and a password box is displayed Setting Favourites You can set various channels as favourites so that only the favourite channels are navigated To set...

Page 79: ...IDTV Program Guide This section is same with the instructions given in the General Operations page Please see Electronic Programme Guide EPG section in the General Operations part Timers To display ti...

Page 80: ...ress the M button to display the main menu and use or buttons to highlight TV Setup Press the OK button to display the TV Setup menu screen You can find detailed information for all menu items in sect...

Page 81: ...the use of active antenna Note Antenna power should be Off when standard antenna is used instead of the active antenna Receiver Upgrade Over Air Download OAD To ensure that your TV always has the most...

Page 82: ...ges will be updated after exiting Configuration Menu Set PIN Use the or buttons to go to the Set PIN option Press OK to display the Set PIN window Use numeric buttons to enter the new pin number You w...

Page 83: ...cting the soundtrack of a channel Primarysettingsarethefirstprioritywhenmultiplechoices are available on a broadcast Secondary settings are the alternatives when the first options are not available In...

Page 84: ...mark Sweden Norway or Finland Use this setting to clear channels stored Press the or buttons to select Clear Service List and then press OK The following OSD will be displayed on the screen Press OK t...

Page 85: ...ogrammes If you do not accept the locations and or the programme names you can change them via Program Table See section Program Table Media Browser in DTV mode Whenever you pluged a USB flash disk to...

Page 86: ...osen randomly If the loop function is not enabled the slideshow will stop at the end If the loop function is enabled after the slideshow ends it will start again and again Loop BLUE button Slideshow g...

Page 87: ...Press the or buttons to turn this feature On or Off While watching movies to see the fast motion scenes clearly turn this feature on Game Mode optional Select Game Mode by pressing the or buttons Use...

Page 88: ...tional Pressthe or buttonstoselectHeadphone Sound Using the or buttons you can select Main PIP PAP Active or Inactive Main Main window sound PIP PAP PIP PAP window sound Active Sound of the current se...

Page 89: ...ie Sense feature supports SD signals 480i 576i 480p 576p It does not support HD signals 1080p 1080i 720p Movie Sense works while watching 24 frame broadcasts Movie Sense feature will not be available...

Page 90: ...TV will then use this setting to adopt Press the or buttons to select Default Zoom You can set Default Zoom to Panoramic 16 9 4 3 or 14 9 by pressing the or buttons Note The Default Zoom feature will...

Page 91: ...or AUTO Sound System Press the or buttons to select Sound System Press the or buttons to change the sound system to BG DK I L or L Fine Tune Press the or buttons to select Fine Tune Press the or butt...

Page 92: ...sing the YELLOW button again erases the selected programme from the programme list and the following programmes shift one line up APS Auto Programming System When you press the BLUE button for startin...

Page 93: ...hand side of the screen Select the H Position item by using the or buttons Use the or buttons to adjust the value V Vertical Position This item shifts the image vertically towards the top or bottom o...

Page 94: ...pictures with equal sizes are displayed on the screen Aspect Ratios of the windows are fixed When you switch to PAP Mode main window in PIP Mode will be displayed on the right side of the screen The...

Page 95: ...s selected as panaromic 14 9 Cinema or Subtitle Teletext Teletext system transmits information such as news sports and weather on your TV Note that is the signal degrades for example in poor adverse w...

Page 96: ...r TV system has no power please check the main power cable and connection to the mains socket outlet Poor Picture Have you selected the correct TV system Is your TV set or house aerial located too clo...

Page 97: ...3 800 600 75 46 9 VESA 16 9 4 3 14 800 600 85 53 7 VESA 16 9 4 3 15 832 624 75 49 7 MAC 16 9 4 3 16 1024 768 43 35 5 VESA interlace 16 9 4 3 17 1024 768 60 48 4 VESA 16 9 4 3 18 1024 768 70 56 5 VESA...

Page 98: ...6I 50Hz O 576P 50Hz O 720P 50Hz O 720P 60Hz O 1080I 50Hz O 1080I 60Hz O 1080P 50Hz O 1080P 60Hz O 1080P 24 HZ O X Not Available O Available Note In some cases a signal on the LCD TV may not be display...

Page 99: ...les not supplied you can refer to the following resolution information 24Hz 25Hz 30Hz 50Hz 60Hz 480i 480p 576i 576p 720p 1080i 1080p A02_ GB _MB36_HDIDTV MPEG4_BRONZE8_32880W_1810UK_10065239 50156446...
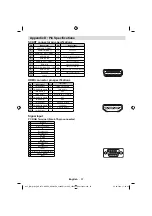
Page 100: ...n Input signal 1 TMDS Data2 11 TMDS Clock Shield 2 TMDS Data2 Shield 12 TMDS Clock 3 TMDS Data 2 13 CEC 4 TMDS Data 1 14 Reserved N C on device 5 TMDS Data1 Shield 15 SCL 6 TMDS Data1 16 SDA 7 TMDS Da...

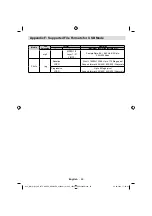
Page 101: ...y if Scart 1 has a RGB signal Restrictions Scart 1 source must have RGB signal to perform PIP PAP with sources TV Scart 2 FAV If these sources are set to main window and Scart 1 does not have a RGB si...

Page 102: ...it Rate 32K 320Kbps Photo jpg Baseline JPEG WxH 14592x12288 Up to 179 Mega pixel Support format 444 440 422 420 Grayscale Progressive JPEG Up to 4 Mega pixel Support format 444 440 422 420 Grayscale A...

Page 103: ...x 776 x 524 Weight Kg 11 60 Digital Reception Transmission Standards DVB T MPEG2 DVB T MPEG4 HD i DEMODULATION Symbolrate COFDM with 2K 8K FFT mode Modulation 16 QAM 64 QAM FEC for all DVB modes auto...

Reviews: