3.4 RST Button
There are two types of Regesta-PRO-ER routers: one has an externally accessible button on the front panel labeled
“RST” and the other has an internally accessible button with no “RST” label on the front panel. This button has two
functions:
• To initiate a restart.
• To restart the device with the default configuration. The default configuration has IP 192.168.1.1 assigned in all the
switch ports.
The external button is physically protected, so it cannot be accidentally pushed. You need a sharp-edged object to
activate it.
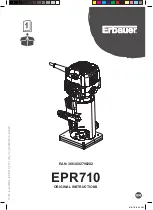
The model with the internal button has to be opened up in order to access the motherboard where the button is
placed. The following figure shows you its location.
Fig. 12:
Position of the internal reset button
3.4.1 Restarting the device
Follow the steps below to restart the device:
(1)
Press the RST internal/external button. Device restart is indicated by the 3 LEDs on the front panel lighting up in
amber.
(2)
Stop pressing the RST internal/external button as soon as the 3 LEDs on the front panel are lit up.
(3)
The device will begin the restart with LEDs S and C off and LED L in green.
3.4.2 Default Configuration
The following procedure allows you to install the default configuration:
(1)
Press the RST internal/external button. Device restart is indicated by the 3 LEDs on the front panel lighting up in
amber.
(2)
Keep pressing the RST internal/external button. The S LED will flash green while you are still pressing the RST
internal/external button. This state implies that the device configuration has changed to the default configura-
tion.
(3)
Stop pressing the RST internal/external button to allow the device to restart.
(4)
The device will begin the restart with LEDs S and C off and LED L in green.
(5)
As the device now has the default configuration, you can access it through the IP bearing in mind that the de-
fault address for the equipment is 192.168.1.1, and that it is accessible from any switch port.
3 Components and Power Supply
Teldat S.A.
14
Regesta-PRO-ER