background image

Getting Started

1- 18

NetTek YBT1E1 T1 & E1 Circuit Tester User Manual

Performing a Functional Check

Following installation and start up of the NetTek YBT1E1 software,
perform the following procedure to verify that the YBT1E1 T1 & E1
Circuit Tester is functioning properly.

1.

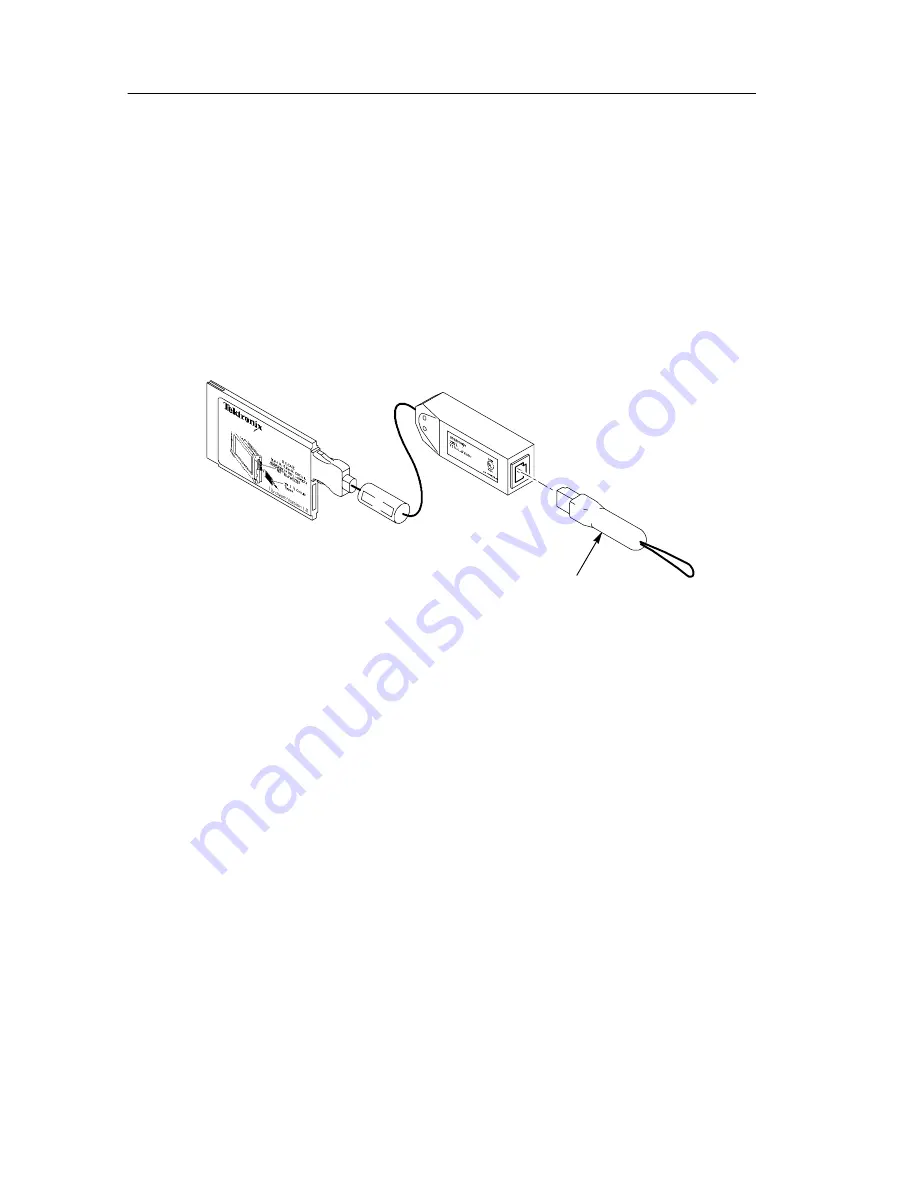
Insert the RJ48 Loopback Plug into the YBT1E1 Line Interface
as shown in Figure 1--14.

Loopback plug

Figure 1- 14: Inserting the Loopback Plug into the T1E1 Line Interface

2.

Perform the diagnostic tests on page C--1.

Powering Off the Instrument

The NetTek Analyzer Platform has standby and power off functions.
You access these functions in the Shut Down dialog.

To display the Shut Down dialog, do one of the following:

H

For Y350C and Y400 NetTek Analyzer Platforms with software
version 1.12 and greater, tap the

Shutdown

icon on the desktop.

H

For all Y350C or Y400 NetTek Analyzer Platforms, select

Start

>

Programs

>

Shutdown

.

Summary of Contents for NetTek YBT1E1

Page 1: ...User Manual NetTekR YBT1E1 T1 E1 Circuit Tester 071 1664 00 This document supports firmware version 2 100 and above www tektronix com...

Page 2: ...foreign patents issued and pending Information in this publication supercedes that in all previously published material Specifications and price change privileges reserved Tektronix Inc P O Box 500 B...

Page 3: ...charges for products returned to any other locations This warranty shall not apply to any defect failure or damage caused by improper use or improper or inadequate maintenance and care Tektronix shall...

Page 4: ......

Page 5: ...Installing or Removing a Battery 1 10 Charging a Battery 1 12 Maximizing Battery Operating Time 1 13 Transporting Lithium Ion Batteries 1 13 Powering On the Instrument 1 14 Calibrating the Touch Scre...

Page 6: ...ay 2 17 The Errors Window 2 18 Errors Rolling Display 2 18 The Alarms and Errors Rolling Display 2 19 History Indicator 2 20 Event Indicator 2 20 Current Indicator 2 21 Limit Alarm 2 21 Event Detail 2...

Page 7: ...ing Audio Data On a DS0 Channel 3 23 Appendices Appendix A Specifications A 1 Appendix B Installing NetTek YBT1E1 Software B 1 PC Requirements B 1 Installing Using an Archive File B 1 Installing Using...

Page 8: ...Table of Contents iv NetTek YBT1E1 T1 E1 Circuit Tester User Manual...

Page 9: ...ee page 1 20 for complete information To Avoid Fire or Personal Injury Use Proper Power Cord Use only the power cord specified for this product and certified for the country of use Observe All Termina...

Page 10: ...ar in this manual WARNING Warning statements identify conditions or practices that could result in injury or loss of life CAUTION Caution statements identify conditions or practices that could result...

Page 11: ...Each NetTek Analyzer Platform lithium ion battery pack contains less than 8 grams of lithium with individual cells each containing less than 1 5 grams of lithium as measured by International Civil Avi...

Page 12: ...General Safety Summary viii NetTek YBT1E1 T1 E1 Circuit Tester User Manual...

Page 13: ...sics section explains how to operate the tester The Reference section explains how to perform tests The Appendices contain reference information you might need occasionally such as specifications or d...

Page 14: ...o accomplish this tap the Start button in the toolbar at the bottom of the desktop window then tap Help in the resulting menu Software Version This manual supports products running YBT1E1 T1 and E1 Ci...

Page 15: ...x com Sales support 1 800 833 9200 select option 1 Service support 1 800 833 9200 select option 2 Technical support www tektronix com support 1 800 833 9200 select option 3 6 00 a m 5 00 p m Pacific S...

Page 16: ...Preface xii NetTek YBT1E1 T1 E1 Circuit Tester User Manual...

Page 17: ...Getting Started...

Page 18: ......

Page 19: ...lyzer Platform Figure 1 1 shows the NetTek Analyzer Platform layout Figure 1 2 on page 1 2 shows the front panel controls and indicators Batteries Application modules PC card slots Front panel Externa...

Page 20: ...perform a hardware reset if a lock up occurs All programs and data loaded into volatile memory since startup are lost 3 Status Indicator Green indicates that the instrument is powered on Amber indicat...

Page 21: ...E1 compliments the functionality of the NetTek YBT250 Field Transmitter and Interference Tester and the NetTek YBA250 Antenna and Transmission Line Analyzer which also operate on the NetTek Analyzer P...

Page 22: ...RC Error Errored Seconds 1 s Density Fail Carrier Loss Frame Loss Frame Errors AIS EB error block RAI Pattern Loss Bit Error BPV BBE background block error CRC Error Errored Seconds SES severely error...

Page 23: ...tests BERT pattern sequence tests Receive signal measure ment Signal level in dBdsx and Vp p Signal level in dBdsx and Vp p for 75 and 120 impedances Transmit levels dBdsx 0 0 7 5 15 0 22 5 N A Trans...

Page 24: ...he YBT1E1 PC Card and Line Interface See Figures 1 4 through 1 7 for how to assemble and install the YBT1E1 Tester components T1E1 Line Interface YBT1E1 PC card Connector fits only one way into PC car...

Page 25: ...YBT1E1 PC card in the NetTek Analyzer CAUTION To meet the electromagnetic emissions standards specified for this product install the NetTek YBT1E1 PC card in the rear slot of the NetTek Analyzer Plat...

Page 26: ...s here Secure the line interface to the side of the NetTek Analyzer Platform with hook and loop fastener strips Figure 1 6 Attaching the line interface to the NetTek Analyzer Platform Connect an RJ48...

Page 27: ...atform from AC mains or DC vehicle voltage or recharge installed batteries connect the Desktop Power Supply or the In Vehicle Adapter to the NetTek Analyzer Platform as shown in Figure 1 8 The Desktop...

Page 28: ...an use two batteries Refer to Figures 1 9 through 1 11 for battery installation or removal steps NOTE Disconnect the power supply cables from the NetTek Analyzer Platform before installing or removing...

Page 29: ...attery retainer tab down and towards the back of instrument then lift 2 Rotate the battery retainer upward Figure 1 10 Opening the battery retainer Battery retainer in open position Lift battery by th...

Page 30: ...alled in the NetTek Analyzer Platform connect the instrument to an external power supply see Figure 1 8 on page 1 9 and let the battery or batteries recharge in the instrument Table 1 2 lists the appr...

Page 31: ...nal power source and let the battery or batteries recharge in the instrument for eight hours For more information select Start Help Settings Power Management Charging Batteries Maximizing Battery Oper...

Page 32: ...1 12 Power switch Calibrating the Touch Screen Display For the touch screen display to respond correctly to your taps you must set the stylus centering and double tap speed before installing and runn...

Page 33: ...ow the procedures in Appendix D Installing NetTek YBT1E1 Software to install upgrade or reinstall the NetTek YBT1E1 Option T1 or Option E1 software on the NetTek Analyzer Platform Starting the NetTek...

Page 34: ...ollowing procedure to set the software to run automatically when you power on your NetTek Analyzer 1 Select Start Programs Tektronix Utilities System Configuration 2 On the Software tab select the Sta...

Page 35: ...t the software to run automatically when you power on your NetTek Analyzer 1 Select Start Programs Windows Explorer 2 Navigate to the Windows Programs NetTek directory 3 Select YBT1 in the NetTek dire...

Page 36: ...Figure 1 14 Loopback plug Figure 1 14 Inserting the Loopback Plug into the T1E1 Line Interface 2 Perform the diagnostic tests on page C 1 Powering Off the Instrument The NetTek Analyzer Platform has s...

Page 37: ...Analyzer Platform press the front panel power switch The instrument returns to the state that existed before suspend mode was invoked Shutdown Mode To completely power down the NetTek Analyzer Platfor...

Page 38: ...hut down powers on the instrument H If the NetTek Analyzer Platform is operating initiates Suspend mode H If the NetTek Analyzer Platform is in Suspend mode cancels Suspend mode and activates the soft...

Page 39: ...ore the cloud is close enough for you to hear thunder or see lightning H When lightning strikes a structure or facility current travels through the rebar concrete pipes cables vent stacks and electric...

Page 40: ...Getting Started 1 22 NetTek YBT1E1 T1 E1 Circuit Tester User Manual...

Page 41: ...Operating Basics...

Page 42: ......

Page 43: ...esktop The NetTek Analyzer Platform desktop shown in Figure 2 1 is your primary workspace Use the desktop to configure hardware and software adjust settings establish communications and access built i...

Page 44: ...re running a status area and a desktop icon Desktop button Program button Status area Start menu Figure 2 2 The Microsoft WindowsCE Taskbar Start Menu Use the Start menu shown in Figure 2 3 to load an...

Page 45: ...minimize all open applications and display the desktop Getting Help To open the WindowsCE Help window and access the YBT1E1 topics select Start Help Then select YBE1 or YBT1 There are three ways to d...

Page 46: ...ault and a smaller keyboard do the following 1 Select Start Settings Control Panel 2 Double tap the Input Panel icon to open the Input Panels Properties dialog Application User Interface Elements Figu...

Page 47: ...See Tables 2 1 and 2 2 starting on page 2 6 for a description of these elements H Test Configuration The Test Configuration area sets the instrument test settings See Table 2 3 on page 2 9 for a descr...

Page 48: ...which lets you edit the application setup parameters Open button Displays the Open dialog box which lets you load a saved application setup Replaces the Edit button when Hide Setup Controls is select...

Page 49: ...ults of the previous test or data collected since the last Restart Save Results Saves the results of the current test Uses identical settings as the previous Save Results As and Settings Save and Expo...

Page 50: ...to save current instrument settings as a sav file Preset Returns the NetTek YBT1E1 to factory default settings Tools Options Opens the Setup Menu dialog box to show hide and protect instrument setting...

Page 51: ...es at DSX monitor ports The YBT1 transmitter is disabled in Bridge mode T1 and E1 Provides a nominal 1 k input impedance and compensates for up to 10 dB cable losses Sets the instrument for out of ser...

Page 52: ...from the receiver back to the transmit ter Loopback is useful when testing from the far end of a line The YBT1E1 transmitter is enabled in Terminate mode See page 3 19 for more information T1 and E1...

Page 53: ...m for the selected setting s Indicates the status of received signal pulses Green pulses have been detected White searching for pulses Displays Receiving when searching for pulses Displays Weak Signal...

Page 54: ...signal level in dBdsx and Volts peak to peak Select Done to return to the main application window Detects and displays the detected receive signal line code Select Done to return to the main applicat...

Page 55: ...on Changes the Configuration Test area contents to allow setting a length of time to acquire measurements with the current instrument settings See page 3 11 for additional information Opens the Bert P...

Page 56: ...Operating Basics 2 14 NetTek YBT1E1 T1 E1 Circuit Tester User Manual...

Page 57: ...ults including any alarm or error events To open the Summary window tap the Summary tab on the left side of the display This is the default test window when you open the application If no alarms or er...

Page 58: ...or since the last Restart then the Summary window displays a summary of the measurement errors as shown in Figure 2 7 Figure 2 7 The Summary window with errors Alarm Error Type Lists the type of alar...

Page 59: ...the Alarms tab on the left side of the display Figure 2 8 shows an example Alarms window for the Option T1 application This window uses a rolling event display to show alarm events collected during t...

Page 60: ...ng Display operates the same as the Alarms Rolling Display see page 2 20 for a description of the Rolling Display elements The Errors Rolling Display also provides BER error rate measurement and error...

Page 61: ...erting errors See page 3 3 for instructions The NetTek YBT1E1 transmits a single error immediately You must loop the far end connection to monitor errors at the Rx Receive input of the NetTek YBT1E1 S...

Page 62: ...ndicates that an event has occurred white indicates that no events have occurred Once an event has occurred the History indicator stays red until you change test parameters or restart the test Event I...

Page 63: ...nformation on each event of the currently selected alarm type Display Time Span The Updates button sets the collection resolution and data collection time of the Rolling Display To set the time span a...

Page 64: ...o defined by the data collection resolution consisting of the most recent 30 time intervals You can scroll beyond the 30 most recent time intervals and access historical data by tapping and dragging t...

Page 65: ...button Information includes the alarm error type number of occurrences count and the start time and stop time if relevant of each event You can sort the information in this window by tapping the colu...

Page 66: ...The Measurement Results Windows 2 24 NetTek YBT1E1 T1 E1 Circuit Tester User Manual...

Page 67: ...Reference...

Page 68: ......

Page 69: ...ure 3 1 Typical base station showing network interfaces Making a Monitor Connection This is the most common type of connection to a DSX service panel With this configuration you can use the YBT1E1 to...

Page 70: ...Connect the RJ48 to Bantam Y Cable to the YBT1E1 Line Interface 3 Connect the Bantam Receive plug to the MON monitor jack on the DSX1 service panel as shown in Figure 3 2 4 Refer to Testing a Circuit...

Page 71: ...1E1 to test CSU equipment that is off line do the following 1 Select the Terminate radio button 2 Connect the RJ48 to Bantam Y to the YBT1E1 Line Interface 3 Connect the Transmit Bantam plug to the IN...

Page 72: ...do the following 1 Select the Loopback radio button 2 Connect the RJ48 to Bantam Y cable RJ48 to Alligator Clip Cable or RJ45 to BNC cable to the YBT1E1 Line Interface 3 Connect the Transmit Bantam pl...

Page 73: ...h as bipolar violations and CRC errors or to perform bit error rate testing if a known test pattern is being received To connect the NetTek YBT1E1 to a line without loading the circuit do the followin...

Page 74: ...Connecting to a Signal 3 6 NetTek YBT1E1 T1 E1 Circuit Tester User Manual 66 Block RJ48 Alligator clip cable Spade lug Figure 3 5 Typical connections for bridge monitoring...

Page 75: ...correct for the type of signal you are testing Automatic Measurement Setup The NetTek YBT1E1 can automatically detect most of the parameters necessary to test a circuit However the instrument Line Co...

Page 76: ...etTek YBT1E1 detected an alarm or error in which case the Circuit Test Summary results are displayed The Circuit Test Summary lists all of the alarms or errors detected since the last restart See Figu...

Page 77: ...st a circuit However you can override any or all of the automated settings to speed up synchronization or to perform specialized tests The Instrument Settings dialog allows you to configure the NetTek...

Page 78: ...ests you want to make H Option T1 Line Coding Framing Receive transmit Clock BER Pattern and Transmit Level H Option E1 Line Coding Framing Receive transmit Clock and BER Pattern NOTE The Transmit Lev...

Page 79: ...he keypad icon to enter a test time duration The minimum time unit is one minute Figure 3 8 shows a time setting of one hour and 30 minutes Tap the Start Test button to start the timed test Tap Pause...

Page 80: ...st H Emit a Beep H Pause the measurement acquisition H Export the screen image to a file as set in the Setup Edit Save and Export tab H Save the measurement results to a file as set in the Setup Edit...

Page 81: ...onfigured for AMI line coding H B8ZS Stress ber Option T1 only Contains a sequence of BER patterns designed to stress equipment configured for B8ZS line coding H HDB3 Stress ber Option E1 only Contain...

Page 82: ...quence Dialog The Create Edit button opens the Pattern Sequence dialog box that lets you create edit and save test patterns and test sequences See Figure 3 10 Figure 3 10 The Create Edit Pattern Seque...

Page 83: ...e sequence you have just edited created by selecting this button and typing in your new sequence name Cancel Select this button to cancel and close the Create Edit a Pattern Sequence dialog box Creati...

Page 84: ...Pattern To edit an existing BERT pattern sequence do the following 1 Select the Auto Test button to open the Bert Pattern Selection dialog box 2 Select the BERT pattern you want to modify in the drop...

Page 85: ...t See Figure 3 11 on page 3 18 H Pattern The BER test pattern used in this section of the test H Duration The programmed duration for the transmission of this test pattern The format is hh mm H Patter...

Page 86: ...t Tester User Manual H CRCs The number of CRC Errors received during the pattern duration H Frame Errors The number of Frame Errors received during the pattern duration Select Run Again to repeat the...

Page 87: ...side the problem exists However loopback testing can offer enough information to determine a general fault location such as in telephone company lines or the base transceiver station site There are s...

Page 88: ...H Line Loopback generates a full 1 5444 Mbps stream looping back from the receiver to the transmitter including the framing bits H Payload Loopback the equipment performing the loopback generates the...

Page 89: ...at a far end loop has been established Tap the Loop Down button to remove the loopback mode and return the NetTek YBT1E1 to a standard Terminate configuration NOTE The Loop Down button appears after y...

Page 90: ...the top as the new row is added to the bottom The DSO display is useful in detecting H DS0 muxing problems H Identifying PRI control channels H Identifying concatenated DS0 data pipelines H Aural iden...

Page 91: ...ue You can also tap the keyboard icon in the taskbar or attach an external PS2 keyboard to enter a specific value The DS0 Activity Graph time span data record full screen is shown in the scroll box 4...

Page 92: ...Testing a Circuit 3 24 NetTek YBT1E1 T1 E1 Circuit Tester User Manual...

Page 93: ...Appendices...

Page 94: ......

Page 95: ...T1E1 operating within the environmental conditions listed in Table A 3 on page A 3 Table A 1 Electrical characteristics Characteristic Description Transmitter Tx Characteristics Pulse Shape T1 Compati...

Page 96: ...requirements for T1 applications PUB 62411 TRNWT 000499 Cat II CCITT G 823 ITU TI 431 E1 400 to 100 000 Hz complies with ITU T I 431 for CEPT applications CCITT G 823 ITU T I 431 Jitter Transfer Curve...

Page 97: ...form with NetTek YBT1E1 PC card installed Table A 3 Environmental characteristics Characteristic Description Temperature Range Operating 0 to 50 _C 32 to 122 _F Nonoperating 40 to 60 _C 40 to 140 _F H...

Page 98: ...Electrostatic discharge immunity Performance criterion C IEC 61000 4 3 RF electromagnetic field immunity Performance criterion A IEC 61000 4 4 Electrical fast transient burst immunity Performance cri...

Page 99: ...ratory Listing UL 60950 3rd edition Safety of Information Technology Equipment 1 Emissions that exceed the levels required by this standard may occur when this equipment is connected to a test object...

Page 100: ...Appendix A Specifications A 6 NetTek YBT1E1 T1 E1 Circuit Tester User Manual...

Page 101: ...orm H USB connection method NetTek Y400 only Uses a standard USB connection between a host PC and the NetTek Analyzer Platform PC Requirements This installation requires a desktop PC with CD ROM drive...

Page 102: ...containing the arq file into the NetTek Analyzer Platform 5 Power on the NetTek Analyzer Platform 6 On the NetTek Analyzer Platform select Start Programs Tektronix Utilities Module Upgrade 7 Follow th...

Page 103: ...serial connection 1 Right click on the Windows CE Services icon in the desktop PC status area then select Communications 2 In the Windows CE Services Properties dialog box open the Communications tab...

Page 104: ...e H For Option E1 H CD Upgrade E1 Serial ybe1setup_vx xxx exe where CD is the CD ROM drive letter and xxx is the software version information 4 Follow the on screen instructions provided by the upgrad...

Page 105: ...o free up flash memory space to run other NetTek products such as the NetTek YBT250 Field Transmitter and Interference Tester or the NetTek YBA250 Antenna and Transmission Line Analyzer module To unin...

Page 106: ...Appendix B Installing NetTek YBT1E1 Software B 6 NetTek YBT1E1 T1 E1 Circuit Tester User Manual...

Page 107: ...hown in Figure 1 14 on page 1 18 2 Power on the NetTek Analyzer Platform 3 Select File Exit in the YBT1E1 application if the T1 E1 Circuit Tester is running 4 In the taskbar select Start Programs Tekt...

Page 108: ...nostic settings 11 Select the LOOP option button 12 Set the loop count to 1 with the up down arrow buttons 13 Select Run to start the diagnostics 14 Verify that each test executes and passes 15 Select...

Page 109: ...e loaded onto the NetTek Analyzer Platform is communicat ing with the YBT1E1 PC card Line Port Tests Verifies that the Line port is functioning properly in both transmit and receive modes through the...

Page 110: ...Appendix C Diagnostic Self Tests C 4 NetTek YBT1E1 T1 E1 Circuit Tester User Manual...

Page 111: ...ght wired cable 1 ea 020 2629 XX NetTek YBT1E1 T1 E1 Circuit Tester Documentation kit Includes software installation CD ROM and User manual Components And Accessories Table D 2 contains general inform...

Page 112: ...ovides a connection between the YBT1E1 Line Interface and the internal wiring of base station equipment Tektronix part number 174 4630 XX RJ48 Loopback Plug Connects the NetTek YBT1E1 receive input to...

Page 113: ...Index...

Page 114: ......

Page 115: ...13 automatic measurement 3 7 automatic testing 3 12 automatically start software 1 17 B base transceiver station BTS connecting to 3 1 BATTERIES indicator 1 2 battery charging 1 12 charging times 1 1...

Page 116: ...lligator clip to 66 block 3 5 bridge 3 5 loopback 3 4 monitor 3 1 terminate 3 3 to end of service line 3 3 connector loopback D 2 contacting Tektronix xi controls front panel 1 1 user interface 2 4 co...

Page 117: ...rror insertion 2 19 rolling display 2 19 event detail 2 21 errors summary 2 16 Errors window open 2 18 tab 2 18 event indicator 2 20 external power supplies 1 9 F failure log C 2 far end loop set up 3...

Page 118: ...2 input panel enter keyboard charac ters 2 3 install batteries 1 10 software 1 15 B 1 from archive file B 1 from serial cable B 3 from USB cable Y400 only B 5 installing other PC cards 1 7 instruction...

Page 119: ...ustomer side 3 1 high impedance connection 3 5 network side 3 1 E1 data 3 1 input configuration connecting to a circuit 3 1 input configuration impedance 2 10 T1 data 3 1 Monitor mode 2 9 N NetTek Ana...

Page 120: ...r alarms 2 20 History indicator alarms 2 20 limit alarm indicator 2 21 Rx Level button 2 12 Rx Status icon 2 11 Rx status indicators 1 4 S safety lightning v summary v save results button 2 6 sensitiv...

Page 121: ...r Windows desktop 2 2 technical support contact informa tion xi Tektronix contacting xi terminate input configuration connecting to a circuit 3 3 Terminate mode 2 9 test automated 3 12 automatic measu...

Page 122: ...receive signal level 3 7 test descriptions C 3 YBT1E1 operation C 1 verify YBT1E1 1 18 version software hardware x View DS0 activity 3 8 W web site address Tektronix xi weight A 3 window alarm error c...

Reviews: