background image

AALTO CONTROL WMU USER GUIDE

VOT97, Rev 1.1, 1.3.2017

15

5. 

Tap APPLY, and approve the changes by tapping OK.

6. 

Tap < in the right upper corner of the screen to return to Install view

2. 6. 

Using Action tab (REPORTS view) 

From the Action tab, you can set luminaires to BLINK state, remove the luminaires from the system 

and all locations, or set the Exit lights OFF or ON. Note that switching an Exit light OFF or ON must be 

enabled from SETTINGS -> User, and can be done only when logged in as an administrator user.
To use these actions, first create a Luminaires list in LOCATIONS view, as desribed earlier, then go 

to REPORTS, choose Action, select the luminaires to be targeted, and tap the corresponding button 

(BLINK or REMOVE). 
Using the BLINK function, will make the selected luminaires blink for 1-5 minutes, depending of the 

system layout and luminaire model.
Using the REMOVE function will delete the selected luminaires from the system. This cannot be 

undone.

2. 7. 

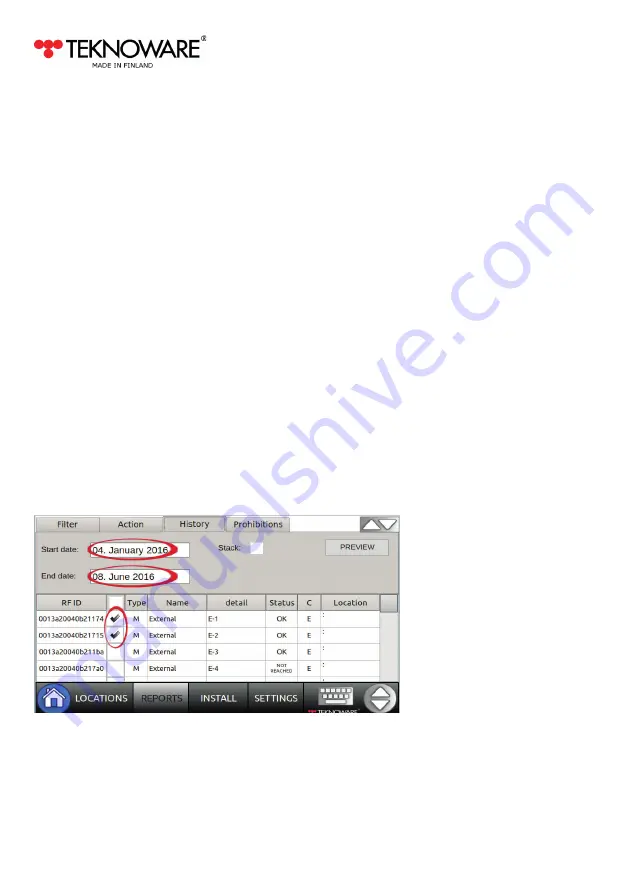
Using History tab to create a test log (REPORTS view)

In the History tab, you can view the test history of the luminaires, and export the history log to a CSV 

file. To do so: 

1. 

Create a Luminaires List to REPORTS view, as described in 

Chapter 2. 2

.

2. 

Go to REPORTS, and tap the History tab. Select the luminaires you wish to include to the 

History report.  

Summary of Contents for AALTO WMU TST5108

Page 1: ...Wireless Monitoring Unit U s e r G u i d e...

Page 2: ...orting settings 10 1 10 Updating the Aalto WMU Software 10 2 Basic functions 11 2 1 Checking faulty luminaires 11 2 2 Quick Guide for using basic functions in REPORTS and INSTALL views 11 2 3 Using Fi...

Page 3: ...es to the system Chapter 1 7 7 Create the user accounts Chapter 1 8 8 Set up email addresses for the email reporting function Chapter 1 9 9 Place the luminaires into the Locations created previously C...

Page 4: ...r EXPORT TO FILE buttons You can also import or export the entire Aalto Control WMU database by tapping the IMPORT DATABASE or EXPORT DATABSE buttons It is recommended that after all the settings are...

Page 5: ...that can be used for adding relevant information about the coordinator If an internet connection is not needed i e the email reporting is not in use or connection to an enterprise LAN Local Area Netwo...

Page 6: ...e the categories you can later add the luminaires into There are three different levels of Locations Site is the root level Location which includes the entire Aalto Control WMU system There is only on...

Page 7: ...3 2017 7 3 Type the Site name for example the company name and tap Enter and then Apply 4 Tap the menu icon again and select Add Building Name the Building e g BUILDING1 tap Enter and then Apply 5 If...

Page 8: ...ires is displayed 3 To install a luminaire manually click ADD MANUALLY and fill in the data fields RF ID and Type are mandatory NOTE The ADVANCED SETTINGS are for authorized maintenance use only Do no...

Page 9: ...aire notes place Luminaires into Locations etc Administrator user can also access the SETTINGS view to change software settings create user accounts etc 3 To change a password for an existing user acc...

Page 10: ...tem Reports sends an email report according to the set Time interval even if there are no fail ures and all luminaires have been reached normally by the Aalto Control WMU Time interval defines how oft...

Page 11: ...a text box SHOW FAILURES in the main screen Tapping the text box will automatically display a list of faulty luminaires If there is only one faulty luminaire detailed information about it will be show...

Page 12: ...the corresponding buttons 4 To filter the luminaires tap REPORTS and select Filter tab Note 1 and Note 2 Filters the luminaires according to the Note data fields A wildcard can also be used e g in Not...

Page 13: ...the table will display additional luminaire information on the screen 8 Whenever you wish to target another group of luminaires always go to LOCATIONS first and after that filter the desired luminaire...

Page 14: ...he screen to return to Install view 2 5 Adding Notes to luminaires INSTALL view 1 Create a Luminaires List to INSTALL view as described in Chapter 2 2 2 To add a Note to an individual luminaire tap th...

Page 15: ...s list in LOCATIONS view as desribed earlier then go to REPORTS choose Action select the luminaires to be targeted and tap the corresponding button BLINK or REMOVE Using the BLINK function will make t...

Page 16: ...option if you wish to stack all events by an individual luminaire into a single row I e if this option is not selected each individual event will create a row In stacked view tapping the symbol will...

Page 17: ...ew as described in Chapter 2 2 2 Go to Prohibitions tab and tap the ADD RULE button 3 Type a name for the prohibition rule Set up the time period on which you want to prohibit luminaire self testing S...

Page 18: ...uminaires and now need to know when the emergency luminaires in the front lobby have test prohibitions To create a detailed list of the test prohibition rules and the luminaires they affect you can us...

Page 19: ...way to add or edit the luminaire info is by using a CSV compatible spreadsheet software such as OpenOffice Calc or Microsoft Excel Exporting a CSV file If you are setting up the system add the luminai...

Page 20: ...add to the system copying the RFIDs here will add the luminaires Column B in the table below Type M a maintained luminaire an exit light N a non maintained luminaire an emergency light 3rd a third pa...

Page 21: ...umi naire type In C Note 1 is used to describe the location in more detail and Note 2 for describing the luminaire type in plain language The luminaires are located in four different Building Location...

Page 22: ...R GUIDE VOT97 Rev 1 1 1 3 2017 22 Remove the USB drive insert it back into the Aalto Control WMU console and import the CSV file back to the system The information added in the spreadsheet software is...

Page 23: ...AALTO CONTROL WMU USER GUIDE VOT97 Rev 1 1 1 3 2017 23...

Page 24: ...oware Oy PL 19 FI 15101 Lahti Ilmarisentie 8 FI 15200 Lahti Tel 358 0 3 883 020 Fax 358 0 3 8830 260 Email Emergency lighting sales emexit teknoware com After Sales Product support aftersales teknowar...

Reviews: