background image

7

98-05204 R1 UK

OVER

VIE

W

SE

TUP

APPENDIX

GE

TTING ST

AR

TED

OPER

ATION

ISOBUS Job Computer : IC18 Sprayer

Main Setup Menu Icons and Section Overviews

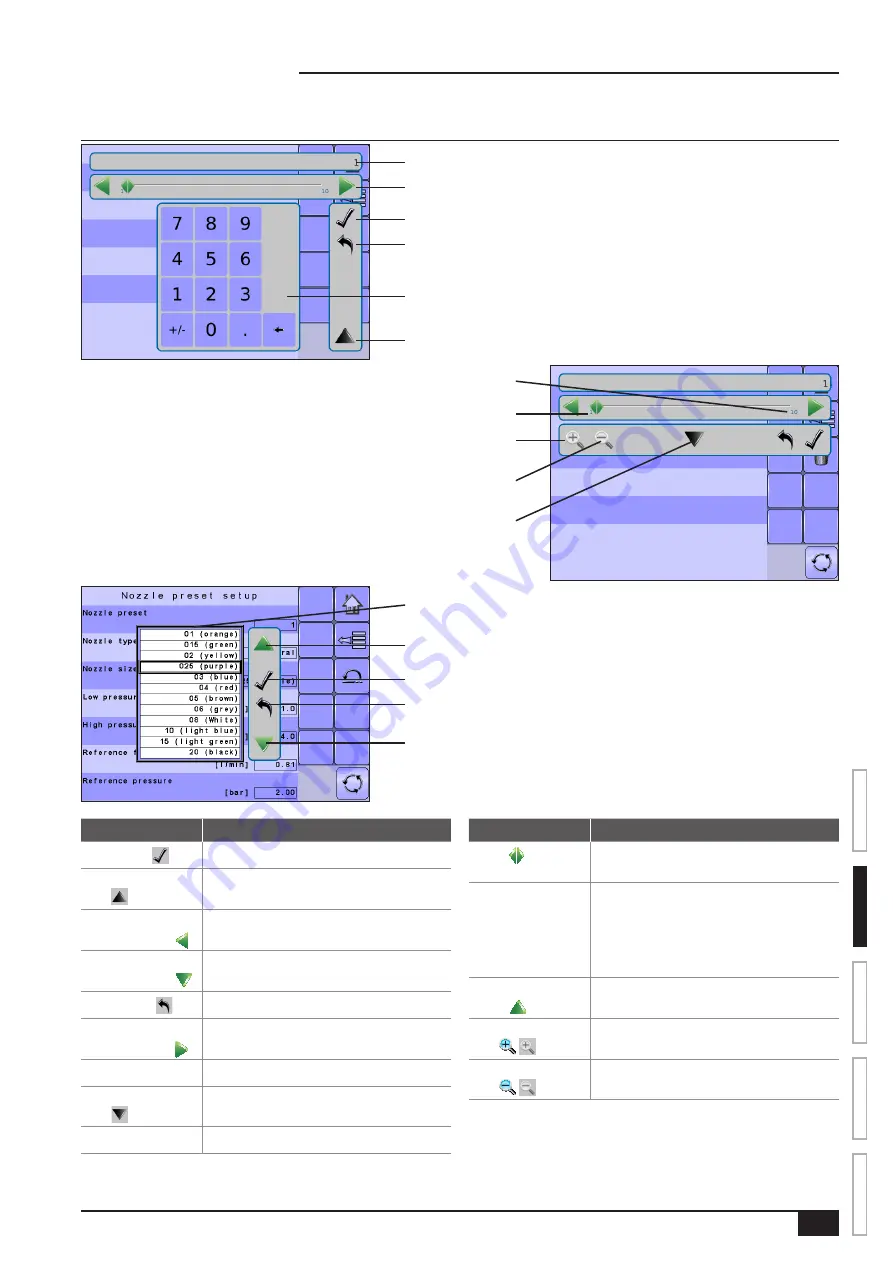
Figure 2-8: Enter Selection Screens 

Selection
Slide Bar with Decrease One Selection


and Increase One Selection Arrows

Escape Key

Number Pad

Close Number Pad Key

Accept Key

Zoom Out Key

Open Number Pad Key

Zoom In Key

Range Minimum

Range Maximum

Escape Key

Down One Selection

Available Selections

Accept Key

Up One Selection

Section or Icon

Description

Accept Key 

Accepts the new selection

Close Number Pad 

Key 

Minimizes the number pad

Decrease One 

Selection Arrow 

Decreases the setting

Down One 

Selection Arrow 

Highlights the selection below

Escape Key 

Escapes without saving changes

Increase One 

Selection Arrow 

Increases the setting

Number Pad

Use the numbers to set the selection value

Open Number Pad 

Key 

Maximizes the number pad

Selection

Displays the current or new selection

Section or Icon

Description

Slider 

Slide to the left to decrease or right to 

increase the selection

Slide Bar

Selects the setting by pressing and 

releasing on the slide bar or pressing and 

dragging the Slider to a designated value.  

Range for a specific setting is displayed on 

the slide bar.

Up One Selection 

Arrow 

Highlights the selection above

Zoom In  

Key   

Narrows slide bar range.  Gray = maximum 

zoom level.

Zoom Out  

Key   

Expands slide bar range.  Gray = minimum 

zoom level.

Summary of Contents for ISOBUS IC18

Page 1: ...U S E R M A N U A L IC18 SPRAYER JOB COMPUTER Software version 1 06 ...

Page 2: ...his manual thoroughly Please contact TeeJet Technologies Customer Support or an authorized TeeJet Technologies dealer if additional support is required RESPONSIBILITY FOR USE OF THIS PRODUCT Regarding responsibility for use of this product we refer to our sales and delivery terms which states Product Usage Any use of the product is at the sole risk of the buyer The buyer is therefore not entitled ...

Page 3: ...8 Master Screen 9 Home Screen 9 COUNTERS 10 Trip Counters 11 Active Trip Counter 11 Area Counter 11 Distance Counter 11 Time Counter 11 Volume Counter 11 Campaign Counters 11 Area Counter 11 Volume Counter 11 Time Counter 11 Total Counters 12 Area Counter 12 Volume Counter 12 Time Counter 12 Export Counters 12 JOB PARAMETERS 13 Active Trip Counter 13 Preset Application Rates 13 Nozzle 13 MACHINE 1...

Page 4: ...utomatic Calibration 19 Alarm Configurations 20 CAN Speed Source Timeout 20 Active Trip Count Information 20 Tank Content Minimum 20 OEM 20 USER INTERFACE 21 Use Preferred VT 21 This IC18 21 Pair with Switchbox 21 Pair with BoomPilot ECU 21 Currently Paired With Information 21 Show Number on Soft Key 21 Sprayer Number FI 21 COMMUNICATION 22 HELP 22 Diagnostic 23 Test Input 23 Test Output 23 Liquid...

Page 5: ......

Page 6: ...en Close 29 Target Rate 30 With Switchbox 30 Without Switchbox 30 BOOM SECTIONS 31 On Off Sections from the Left or Right 31 Without Switchbox 31 With Switchbox 31 Start Stop Application 32 Without Switchbox 32 With Switchbox 32 Master Stop Key 32 With Switchbox 32 INFORMATION KEY 33 TRANSPORT MODE 34 APPENDIX A FACTORY SETTINGS RANGES 35 APPENDIX B UNIT SPECIFICATIONS 37 ...

Page 7: ...plays on any ISOBUS VT Easy navigation menu and data rich display IC18 Sprayer ECU suitable for use with NH3 and liquid fertilizer Automatic boom section control upgrade option Variable rate control available providing your VT has GPS and task control capability Easy navigation menu and data rich display Add additional ISOBUS ECUs as your needs change Provides basic rate control Standardized plugs...

Page 8: ...T has variable rate task control capabilities Standardized plugs cables and software simplify installation and connectivity and result in true plug and play technology IC18 ECU resides on the implement reducing hardware in the cab Figure 1 4 IC18 Spreader Electronic Control Unit BoomPilot Electronic Control Unit for IC18 BoomPilot automatic boom section control is possible in combination with soft...

Page 9: ...ual terminal will give access to the job computer options and operation Figure 2 1 Master Screen Crop Sprayer Mode Matrix VT Setup Key IC18 Crop Sprayer Master Screen Key Other options as available on ISOBUS system APPLICATION MODE The IC18 job computer is programed to be either a sprayer or NH3 applicator This setting has been established before leaving the factory but it can be changed after pur...

Page 10: ...gives access to the IC18 s available functions Operation Mode Transport Mode and Main Setup Figure 2 4 Home Screen Crop Sprayer Mode Operation Mode Regulation Mode Current selection Auto Manual is highlighted with a green dot Main Setup Mode Toggle Preset Target Rate Quick View Information Based on Current Active Trip Master Screen Key Transport Mode Transport Mode While in Transport Mode all oper...

Page 11: ...Applied Volume Applied Area Target Rate Percentage Increase Decrease NH3 Mode Active ECU ID Number Target Rate Indicator Current Working Pressure Current Pressure Rate C n t 5 5 0 0 2 8 3 4 0 7 0 g a l 0 p s i 1 1 4 a c 5 1 3 11 G PA m p h Next Page Key Left Boom Sections On Key Right Boom Sections On Key Right Boom Sections Off Key Left Boom Sections Off Key C n t 5 5 2 2 8 3 4 0 7 0 g a l 0 p s ...

Page 12: ...arameters pages 13 Machine pages 14 20 User Interface pages 21 Communication pages 22 Help pages 22 24 Trip Filling Diagnostic Campaign Operation Section width About Total Implement parameters Nozzle preset setup Export Counters Implement speed sensor Calibrations Regulation parameters Flow sensor Alarm configurations OEM Sensor presence Implement parameters Valve setup Tank setup Regulation detai...

Page 13: ...ection Arrow Decreases the setting Down One Selection Arrow Highlights the selection below Escape Key Escapes without saving changes Increase One Selection Arrow Increases the setting Number Pad Use the numbers to set the selection value Open Number Pad Key Maximizes the number pad Selection Displays the current or new selection Section or Icon Description Slider Slide to the left to decrease or r...

Page 14: ...escape without saving settings and return to the previous menu To access the Main Setup screens 1 Select IC18 SPRAYER KEY from the Master Screen 2 Select MAIN SETUP SCREEN KEY from the Home Screen 3 Select from Counters used to provide an overview of various system counters Trip used to display information regarding area distance time and amount applied Campaign used to display information regardi...

Page 15: ... to provide information on the console such as software version build number etc NOTE The menu structure on your display might vary from the one displayed in this User Guide depending on the virtual terminal being used This User Guide will display all possible options Master Screen The Master Screen gives access to the systems currently available on your VT To view the Master Screen options select...

Page 16: ... 3 4 Counters 1 From the Main Setup Screen select COUNTERS 2 Select from Trip used to display information regarding area distance time and amount applied Campaign used to display information regarding area amount applied and time for all trips Total used to display information regarding area amount applied and time for all activity Export Counters allows counter information to be exported in HTML ...

Page 17: ...nter use the number pad or slide bar To clear the Trip Counters select TRASH CAN KEY A confirmation screen will be displayed Area Counter Displays applied coverage area for the selected Active Trip Distance Counter Displays distance traveled for the selected Active Trip Time Counter Displays time traveled for the selected Active Trip Volume Counter Displays volume of material applied during the se...

Page 18: ...a for all trips Volume Counter Displays total volume of material applied during all trips Time Counter Displays total time traveled for all trips Export Counters Export Counters allows counter information to be exported in HTML or CSV format HTML files can be viewed from an internet browser CSV files can be viewed as Excel sheets To export a HTML file select HTML KEY A confirmation screen will be ...

Page 19: ...tive on the Operation Screen To select the Active Trip Counter use the number pad or slide bar NOTE The selected trip counter will have all data modified added too when additional operations are activated If current trip counter is not cleared the new data will be added to the existing data Preset Application Rates Preset Application Rates define up to five 5 target rates of product being applied ...

Page 20: ...t Active Trip Count Information mode and Tank Content Minimum OEM The OEM setup menu is password protected and the settings in this menu are directly related to the fitted OEM equipment Refer to the OEM Manual for information regarding OEM settings NOTE Settings are NOT automatically saved when selected The ACCEPT KEY must be selected to save the setting Select the ESCAPE KEY to escape without sav...

Page 21: ...ration establishes Application Rate Step Speed Source and Simulated Speed Application Rate Step Application Rate Step is the percent of increase decrease boost of the active application rate at which the product is being applied To select the percentage use the number pad or slide bar Speed Source Speed Source selects whether to base the machine s speed on input from the CAN an Implement or a Simu...

Page 22: ...Equal Widths sets all boom section widths to the value set for 1 Boom Section To set all boom section widths press the EQUAL SECTION WIDTH KEY Nozzle Preset Setup Figure 3 18 Nozzle Preset Setup Figure 3 19 Nozzle Size on the Operating Screen Nozzle Preset Setup establishes up to five 5 sets of nozzle options setting the nozzle type size low high pressure limit reference flow and reference pressur...

Page 23: ...igure 3 21 Confirm Factory Settings High Pressure Limit establishes the limit for the highest allowed operating pressure for the selected nozzle type To select the High Pressure Limit use the number pad or slide bar Reference Flow Reference Flow establishes the value for the volume applied over a specific time GPM or LPM To select the Reference Flow use the number pad or slide bar Reference Pressu...

Page 24: ...d or eliminated Conversely a higher number will increase the valve response time and speed up the rate of adjustment Valve Calibration Fine Fine regulation value calibration allows you to regulate the setting of the regulating valve to accommodate different application needs Operating conditions may necessitate a higher or lower response setting for the regulating valve This digit adjsuts the sett...

Page 25: ...llow the series of instructions displayed Select the ACCEPT KEY to complete the calibration The counted wheel pulses will be displayed during the automatic calibration Flow Sensor The Flow Sensor establishes the pulses per gallon liter This value can be established manually or calibrated automatically Manual Calibration Manual calibration establishes the calibration and limits based on user entere...

Page 26: ...directly related to the sensor reading To select the minimum volume use the number pad or slide bar OEM The OEM setup menu is password protected and the settings in this menu are directly related to the fitted OEM equipment To obtain an access code contact your local dealer or TeeJet Technologies Customer Service To access the OEM screens 1 From the Main Setup Screen select MACHINE 2 Select OEM 3 ...

Page 27: ...a switchbox can be set to be done automatically not at all or to a specific switchbox ECU ID number on the CAN network To set the Switchbox pairing select an option from the drop down menu or use the UP DOWN ARROWS to highlight the option Pair with BoomPilot ECU The pairing of a BoomPilot ECU can be set to be done automatically not at all or to a specific BoomPilot ECU ID number on the CAN network...

Page 28: ...n about serial number CAN BUS information etc These menus are typically accessed upon Customer Service personnel request only MAIN SETUP MODE MENU STRUCTURE Counters Job Parameters Machine User Interface Communication Help Diagnostic About Figure 3 32 Help 1 From the Main Setup Screen select HELP 2 Select from Diagnostic used to troubleshoot input output of the controller sensor or actuator About ...

Page 29: ... Dutycycle Liquid Valve PWM Dutycycle is used to test the regulating valve at different percentages of duty cycle To set the Liquid Valve PWM Dutycycle use the number pad or slide bar Liquid Valve Direction Liquid Valve Direction is used to verify the option of the Liquid valve direction is correct to a specific duty cycle Set the Liquid Valve PWM dutycycle to the percentage to be tested Change th...

Page 30: ...O NEXT VT KEY Press the DELETE OBJECT POOL KEY to delete saved information on the VT This forces the VT to upload all information from the IC18 on the next power cycle NOTE Restart the IC18 Job Computer to implement and display changes TECU The TECU is a control unit residing on the tractor that performs basic functions such as power handling speed info etc The TECU data are displayed on this page...

Page 31: ...duct being applied per hectare acre These can be toggled using the Toggle Preset Target Rate Key on the Operation Screen or Home Screen Manual regulation mode will retain an established regulation valve setting regardless of speed The regulation valve setting can be adjusted using the Regulation Valve Open Close Keys on the Operation Screen If a switchbox is being used to control the boom sections...

Page 32: ...ange Applied Volume Applied Area Target Rate Percentage Increase Decrease NH3 Mode Active ECU ID Number Target Rate Indicator Current Working Pressure Current Pressure Rate C n t 5 5 0 0 2 8 3 4 0 7 0 g a l 0 p s i 1 1 4 a c 5 1 3 11 G PA m p h Next Page Key Left Boom Sections On Key Right Boom Sections On Key Right Boom Sections Off Key Left Boom Sections Off Key C n t 5 5 2 2 8 3 4 0 7 0 g a l 0...

Page 33: ...tions On Off Keys Press to turn on sections to left turn off sections from left turn on sections to right or turn off sections from right Section and Icon Descriptions Section or Icon Description Job Information This information bar displays the active count number applied volume and applied area C n t 1 0 l 0 0 0 h a Count Number Displays the current active trip or job number Applied Volume Displ...

Page 34: ...U Nozzle Information This information section displays the nozzle type recommended pressure range current working pressure and high pressure limit 2 8 b a r Nozzle Type Displays the selected nozzle type Recommended Pressure Range Displays the recommended pressure range for the selected nozzle the green area indicates the pressure range The pressure range will change depending upon the selected noz...

Page 35: ...e Percentage Increase Decrease Keys increase decrease the application target rate per the established percentage set in the Machine Operation setup screen under Application Rate Step Automatic regulation mode will automatically adjust the application rate based on the current speed in reference to the target rate Preset Application Rates define up to five 5 target rates of product being applied pe...

Page 36: ...tchbox is being used to control the boom sections current target application rate can be set on the Operation Screen When a switchbox is not connected to the system current target application rate needs to be established on the Home Screen before entering Operation Mode With Switchbox Figure 4 7 Target Application Rate C n t 1 5 0 4 2 4 7 0 l 0 b a r 1 1 4 h a 5 1 3 11 l h a k m h To toggle betwee...

Page 37: ...r Right When a switchbox is not connected for boom section control booms sections are controlled using the Boom Sections On Off Keys Without Switchbox Figure 4 10 Left Off C n t 1 0 0 1 6 5 0 l 0 b a r 0 0 0 h a 1 3 11 l h a k m h C n t 1 0 0 1 6 5 0 l 0 b a r 0 0 0 h a 1 3 11 l h a k m h Figure 4 11 Right Off C n t 1 0 0 1 6 5 0 l 0 b a r 0 0 0 h a 1 3 11 l h a k m h C n t 1 0 0 1 6 5 0 l 0 b a r...

Page 38: ...tion will be controlled by the switchbox Figure 4 15 Operations Screen With Switchbox C n t 1 0 0 2 5 0 l 0 b a r 0 0 0 h a 1 3 11 l h a k m h Master Stop Key Figure 4 16 Spraying In Progress C n t 1 5 0 2 6 7 2 0 l 3 8 b a r 0 2 5 h a 1 3 11 l h a k m h Figure 4 17 Master Stop Pressed C n t 1 5 0 2 5 2 0 l 0 b a r 0 2 5 h a 1 3 11 l h a k m h Master Stop Key is used to stop all application close ...

Page 39: ...o be covered based on current speed target rate and tank level Projected total area remaining to be covered based on current target rate and current tank level Figure 4 18 Information Key C n t 1 0 0 0 0 l 0 b a r 0 0 0 h a 1 3 11 l h a k m h C n t 1 0 0 0 0 l 0 b a r 0 0 0 h a 1 3 11 l h a L P M C n t 1 0 0 0 0 l 0 b a r 0 0 0 h a 1 3 11 l h a h a h C n t 1 0 0 0 0 l 0 b a r 0 0 0 h a 1 3 11 l h ...

Page 40: ... Mode all operation functions are locked off and cannot be activated Transport Mode displays the speed in analogue mode Figure 4 19 Transport Mode Home Key Gives access to the IC18 s available functions Operation Mode Transport Mode and Main Setup Speedometer Master Screen Key Gives access to the systems currently available on your VT ...

Page 41: ...ation Rate 3 3 Preset Application Rate 4 4 Preset Application Rate 5 5 Nozzle Established under Machine Implement Parameters Nozzle Preset Setup MACHINE Tank Filling Description Factory Setting Range Options User Setting Actual Content 0 lbN US 0 kgN 0 lbN UK 0 12000 0 5443 0 12000 Density Water Water Fertilizer Density Factor 6 68 Lb Gal US 0 80 kg l 8 02 Lb Gal UK 6 68 16 69 US 0 80 2 00 8 02 20...

Page 42: ... Range User Setting Section Width 118 in 300 cm 1 9999 Nozzle Preset Setup Description Factory Setting Range Options User Setting Nozzle Preset 1 1 5 Nozzle Type General General User Tip Nozzle Size 025 purple 01 Orange 015 Green 02 Yellow 025 Purple 03 Blue 04 Red 05 Brown 06 Grey 08 White 10 Light Blue 15 Light Green 20 Black Low Pressure Limit 14 psi 1 0 bar 0 369 0 0 25 5 High Pressure Limit 5...

Page 43: ... Minimum 0 GAL US 0 liters 0 GAL UK 0 2641 US 0 9999 0 2199 UK USER INTERFACE Description Factory Setting Range Options User Setting Use Perferred VT Off Off On Pair with Switchbox Auto Auto None specific ID Pair with BoomPilot ECU Auto Auto None specific ID Show Number on Soft Key No No Yes Sprayer Number FI 1 1 9 APPENDIX B UNIT SPECIFICATIONS Dimensions 19 05 x 18 42 x 6 03 cm Weight 0 644kg Co...

Page 44: ......

Page 45: ...IC18 SPRAYER JOB COMPUTER U S E R M A N U A L TeeJet Aabybro Mølhavevej 2 DK 9440 Aabybro Denmark 98 05204 R1 UK TeeJet Technologies 2012 Software Version 1 06 ...

Reviews: