96
User’s manual
9.1. PRELIMINARY CHECKS
Check that there is a pressure of at least 8 bar on the filter regulator pressure gauge.
If the pressure is below the minimum level, some machine operations may be limited
or insufficient.
After the correct pressure has been restored, the machine will operate properly.
Check that the machine has been adequately connected to the electric mains and the
pneumatic supply.
9.2. DECIDING FROM WHICH SIDE OF THE WHEEL THE
TYRE MUST BE REMOVED
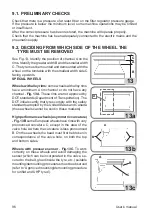
See Fig.13. Identify the position of channel A on the
rims. Identify the greater width B and the smaller width
C. The tyre must be mounted and demounted with the
wheel on the turntable with the smallest width side C
facing upwards.
SPECIAL WHEELS
Wheels with alloy rims:
some wheels with alloy rims
have a minimum A rim channel or do not have any
channel -
Fig. 13A
. These rims are not approved by
DOT standards (Department of Transportation). The
DOT initials certify that tyres comply with the safety
standards adopted by the United States and Canada
(these wheels cannot be sold in these markets).
High performance wheels (asymmetric curvature)
- Fig. 13B
some European wheels have rims with very
pronounced curvature C, except in the area of the
valve hole A where the curvature is less pronounced
B. On these wheels the bead must first be broken in
correspondence of the valve hole, on both the top
and bottom sides.
Wheels with pressure sensor
-
Fig.13C.
To work
correctly on these wheels and avoid damaging the
sensor (which can be incorporated in the valve, se
-
cured to the belt, glued inside the tyre, etc.) suitable
mounting/demounting procedures must be observed
(refer to “Approved mounting/demounting procedure
for runflat and UHP tyres”).
A
B
C
13b
A
B
C
13
A
13a
A
B
C
13c
Summary of Contents for TECO 36 TOP
Page 14: ...14 Manuale Operatore 01 05 02 18 04 08 06 07 10 11 12 14 15 16 16 19 17 ...
Page 66: ...Note ...
Page 67: ...Note ...
Page 80: ...80 User s manual 01 05 02 18 04 08 06 07 10 11 12 14 15 16 16 19 17 ...
Page 132: ...Note ...
Page 133: ...Note ...
Page 146: ...146 Manuel d utilisation 01 05 02 18 04 08 06 07 10 11 12 14 15 16 16 19 17 ...
Page 198: ...Note ...
Page 199: ...Note ...
Page 212: ...212 Betriebsanleitung 01 05 02 18 04 08 06 07 10 11 12 14 15 16 16 19 17 ...
Page 264: ...Note ...
Page 265: ...Note ...
Page 278: ...278 Manual de uso 01 05 02 18 04 08 06 07 10 11 12 14 15 16 16 19 17 ...


