6
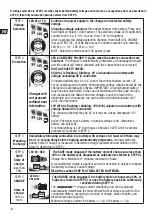
If voltage selection in STEP 1 matches the expected battery voltage and there are no connection errors as described in
STEP 2, then fully automatic operation starts from STEP 3.
STEP 1
Voltage
Selection
LED #1a / 1b
4
3
1a
2
5
6
1b
24-7
24-7
Ca/Ca
Confirms AC power supply to the charger and selected battery
voltage.
Changing voltage selection:
Disconnect charger from battery. Place and
hold finger on Select-TOUCH sensor. The selected voltage LED brightens to
confirm touch. (i.e. if ‘12V’ was on, then ‘12V’ will brighten).
After 3 seconds the voltage selection changes, then SAVE (#3), CHARGE
(#4) and TEST (#5, 6) LEDs flash twice to confirm selection is in memory.
LED #1a => 6V LED #1b => 12V
NOTE: Selection remains even if AC power is lost.
STEP 2
Protection
4
3
1a
2
5
6
1b
24-7
24-7
Ca/Ca
Charger will
not proceed
without user
interaction.
4
3
1a
2
5
6
1b
24-7
24-7
Ca/Ca
LED #2 REVERSE POLARITY: Lights when the battery connections are
incorrect.
The charger is electronically protected so no damage will result,
and the output will remain disabled until the connections are corrected.
VOLTAGE SAFETY CHECK:
6V (#1a) is flashing / blinking:
6V is selected and a battery with
voltage exceeding 8V is connected.
Connected battery may be 12V. Action: Disconnect battery, select 12V.
For an overcharged 6V battery: When battery voltage reduces below 8V the
charger will automatically activate.
IMPORTANT: an overcharged battery
may have lost electrolyte. In the case of batteries with filler caps on each
cell, disconnect the battery from the charger, check the level of the
electrolyte and if necessary, top up the cells (with distilled water, NOT
acid), then reconnect.
12V (#1b) is flashing / blinking:
12V (#1b) selected and a battery with
voltage below 8V is connected:
The connected battery may be 6V or it may be a deep discharged 12V
battery.
Action: Physically check battery. If nominal voltage is 6V, disconnect
battery and select 6V.
If nominal voltage is 12V, hold finger on Select-TOUCH. After 5 seconds
program will proceed to STEP 3.
STEP 3
Preparing
to charge
Immediately following connection to a battery with voltage of at least 0.5V there may
be a 1-2 second delay before charging automatically progresses,
during which time
battery State Of Charge is measured to determine charge requirement and duration of the
State Of Health test in STEP 7.
STEP 4
SAVE
State of
charge:
less than
50%
LED #3 : RED
4
3
1a
2
5
6
1b
24-7
24-7
Ca/Ca
The SAVE mode engages if the battery state of charge was less than
50% or the battery was diagnosed as sulphated (as tested in STEP 3).
Charge time: Minimum 15 minutes, maximum 2 hours.
A reconditioning charge is applied; current is delivered in pulses to prepare
the battery to accept normal charge.
READ the section VERY FLAT NEGLECTED BATTERIES.
STEP 5
CHARGE
State of
charge:
50% or
more
LED #4 :
YELLOW
4
3
1a
2
5
6
1b
24-7
24-7
Ca/Ca
The CHARGE mode engages if the battery state of charge was 50% or
higher (as tested in STEP 3) or once the battery has been sufficiently
recovered during STEP 4.
The
ampmatic
™ charge current monitoring and control program
automatically determines the most efficient rate of charge current for the
connected battery, according to its state of charge, state of health, and
electrical storage capacity.
Maximum charge current: 6V battery => 4A 12V battery => 3A.


