4. Inserting and Defining Filter Slides
4.2 Inserting the Filter Slides
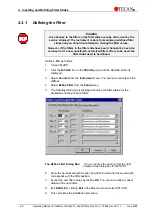
The filter slides are fitted with up to four interference filters which have a fixed
wavelength and are specially designed for fluorescence. Additionally there are
filter slides which are specially designed for absorbance measurements. Do not
use fluorescence filters for absorbance measurements.
Excitation and Absorbance Filters
Emission Filter
To insert a filter slide, open the filter compartment manually and slot it in so that the
filter end of the slide is inserted first. The filter is then inserted automatically if it is
equipped with the automatic insertion code.
If the filter slide is not equipped with the automatic insertion code start the
XF
LUOR
program and click the
Filter in
button in the
Movements
dialog box. The filter slide
is then inserted.
(You may have to push the filter slide gently).
The excitation filter is
located on the left and
the emission filter on
the right side of the
instrument.
Ensure that the filter slides are only inserted into their respective
compartments and that they do not get mixed up.
Depending on the measurements that are to be performed, the appropriate filter
slide containing the required wavelength filters, must be inserted into the
instrument. The instrument can store the data for up to eight excitation and eight
emission filter slides.
The filter slides have a specific code which enables the instrument to distinguish
between the filter slides.
Please note
A
ex. & em.
Fitted with standard filters - see specifications for values.
D
ex.
Fitted with standard absorbance filters.
B, C, E, F, G & H
For free configuration.
When a wavelength is selected, the instrument compares the entered wavelength
against the list of entered filter values for this filter carriage.
If the required filter is fitted in the filter slide, the instrument then moves the filter
slide so that the required filter is in the light beam.
June 2002
Operating Manual for GENios, GENios FL, and GENios
Plus
No: I 112 904 Rev No: 1.1
4-3


