background image

2800 Laura Lane  •  Middleton, WI 53562  |  800.288.9383  |  www.tcsbasys.com  

3

Using the Startup Wizard

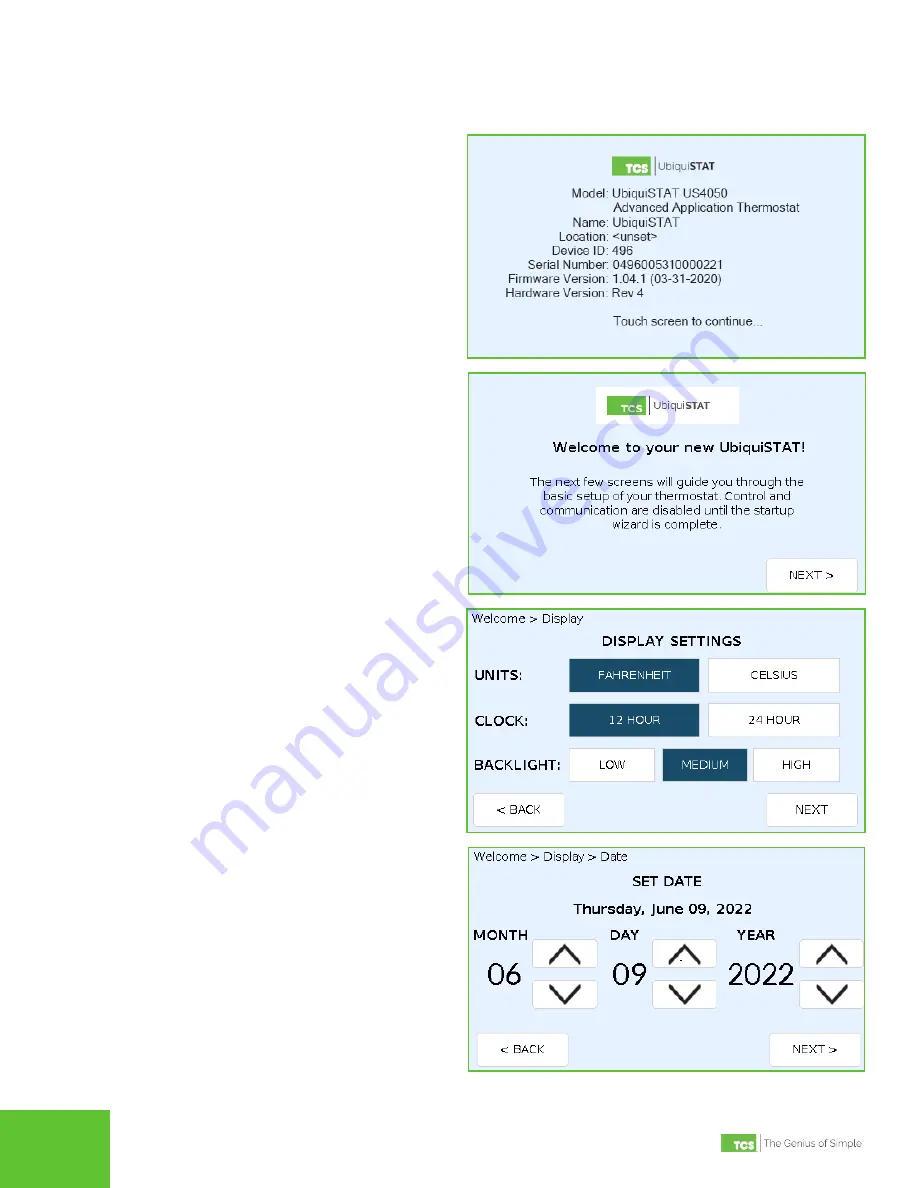
After applying power to the UbiquiSTAT and assembling it for the first time, you will see the INITIAL SETUP screen 

directing to you touch the screen in order to continue.

STEP 2  On the WELCOME screen, press the NEXT

 button 

to advance you to the next screen.

STEP 3  On the DISPLAY SETTINGS screen, select the 

desired Temperature

 UNITS

 (Fahrenheit or 

Celsius), 

CLOCK configuration (12-hour or 24-

hour), and 

BACKLIGHT setting (Low, Medium, 

or High). Press the 

NEXT

 button to save the 

settings and advance you to the next screen.

STEP 4 

On the SET DATE screen, advance the settings 

to reflect the current date (MONTH

DAY

YEAR

). 

Press the 

NEXT

 button to save the settings and 

advance you to the next screen.

STEP 1  Touch the INITIAL SETUP screen. This will 

advance you to the next screen.

Summary of Contents for UbiquiSTAT

Page 1: ...2800 Laura Lane Middleton WI 53562 800 288 9383 www tcsbasys com 202211 Quick Setup Guide UbiquiSTAT Commercial BACnet Controller...

Page 2: ...ry defaults All controls are disabled until after completing the Startup Wizard The Startup Wizard will guide you through the following settings Display Settings Select temperature measurement Fahrenh...

Page 3: ...to the next screen STEP 3 On the DISPLAY SETTINGS screen select the desired Temperature UNITS Fahrenheit or Celsius CLOCK configuration 12 hour or 24 hour and BACKLIGHT setting Low Medium or High Pre...

Page 4: ...creen STEP 6 On the THERMOSTAT TYPE screen select whether the UbiquiSTAT is controlling a CONVENTIONAL equipment or a HEAT PUMP Press the NEXT button to save the settings and advance you to the next s...

Page 5: ...t Wi Fi pressing the NEXT button will save the settings and advance you to STEP 12 If you selected NONE pressing the NEXT button will save the settings exit the Startup Wizard and return you to the HO...

Page 6: ...exit the Startup Wizard and return you to the HOME screen If you selected BACnet MS TP or BACnet Wi Fi in STEP 9 pressing the NEXT button will save the settings and advance you to the DEVICE INSTANCE...

Page 7: ...ur changes STEP 15 After pressing the OK button in the previous screen you will see the CONNECTION STATUS screen When the UbiquiSTAT has successfully connected to the network a DONE button will appear...

Page 8: ...button to advance you to the ADVANCED 2 2 Screen STEP 4 On the ADVANCED 2 2 screen press the FACTORY DEFAULTS button You will then be prompted with a warning message advising you that loading the fact...

Reviews: