


Sevcon Troubleshooting
Page 7
Electrical Troubleshooting
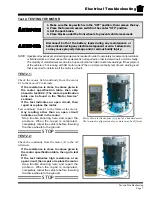
Test 2. TESTING THE MOTOR
Disconnect both of the battery leads during any maintenance or
before disconnecting any electrical component or wire. Failure to do
so may cause property damage and/or serious bodily injury.
NOTE: Special and expensive motor testing equipment is required in order to accurately measure motor armature
or field resistance. In most cases, this equipment is not required in order to determine if a motor is faulty.
The majority of motor failures are due to an open circuit in the field or armature windings. If the symptom
of the vehicle is “not running with NO motor current” then a simple continuity test of each winding is all
that is required to determine if the motor is at fault.
TEST 2.1:
Check the motor field continuity from the motor
F1 to the motor F2 terminals.
If the resistance is close to values given in
the motor specification table, then skip
ahead to test #2.2. (The motor specification
table can be found in the “Motor Service”
section).
If the test indicates an open circuit, then
repair or replace the motor.
Test continuity from F1 to the frame of the motor.
Any reading other than an open circuit
indicates a short in the motor.
Stop trouble shooting here and repair the
problem. When the repair is completed,
completely retest the vehicle before lowering
the drive wheels to the ground.
STOP
TEST 2.2:
Check the continuity from the motor A1 to the A2
terminals.
If the resistance is close to values given in
the motor specification table, then go to test
#2.3.
If the test indicates high resistance or an
open circuit, then repair or replace the motor.
Stop trouble shooting here and repair the
problem. When the repair is completed,
completely retest the vehicle before lowering
the drive wheels to the ground.
STOP
1. Make sure the key-switch is in the “OFF” position, then remove the key.
2. Place the forward-reverse switch in the center “OFF” position.
3. Set the park brake.
4. Place blocks under the front wheels to prevent vehicle movement.
Motor shown in illustrations is typical of a standard motor.
The terminal configuration of your motor may be different.
Summary of Contents for RE-380-36
Page 12: ...TAYLOR DUNN...
Page 30: ...TAYLOR DUNN...
Page 50: ...TAYLOR DUNN...
Page 64: ...Maintenance Service and Repair Steering Page 14 Exploded View of Steering Gear...
Page 90: ...TAYLOR DUNN...
Page 128: ...TAYLOR DUNN...
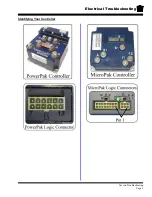
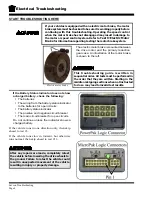
Page 143: ...Sevcon Troubleshooting Page 3 Electrical Troubleshooting Identifying Your Controller...
Page 162: ...TAYLOR DUNN...
Page 185: ...Wire Diagrams...
Page 190: ...Illustrated Parts Parts Page 4 Steering Linkage...
Page 192: ...Illustrated Parts Parts Page 6 Steering Gear 4 1 6 8 7 5 9 10 2 3 14 17 12 11 13 15 16...
Page 194: ...Illustrated Parts Parts Page 8 Front Suspension...
Page 196: ...Illustrated Parts Parts Page 10 Transmission primary reduction...
Page 198: ...Illustrated Parts Parts Page 12 Transmission secondary reduction Rear Axle...
Page 200: ...Illustrated Parts Parts Page 14 Rear Brakes Front Brakes optional Brake Body...
Page 202: ...Illustrated Parts Parts Page 16 Rear Suspension...
Page 204: ...Illustrated Parts Parts Page 18 Motor...
Page 206: ...Illustrated Parts Parts Page 20 Deadman Seat Brake...
Page 214: ...Illustrated Parts Parts Page 28 Wheels and Tires Ref wheel hub 1 2 5 assembly 4 3 6 7 8 9 10...
Page 218: ...Illustrated Parts Parts Page 32 Speed Control Panel R 3 80 36 1 2 4 5 6 6 7 8 3 9 10 11 12 13...
Page 220: ...Illustrated Parts Parts Page 34 Miscellaneous Electrical Miscellaneous Frame...
Page 222: ...Illustrated Parts Parts Page 36 Seat Cushions and Lights 1 2 3 4 5 6 7 8 9...
Page 230: ...Illustrated Parts Parts Page 44 Batteries 36 Volt 48 Volt...
Page 232: ...Illustrated Parts Parts Page 46 Decals Front Cowl Tray Battery Compartment...
Page 234: ...Illustrated Parts Parts Page 48 Trailer Hitch...
Page 236: ...Illustrated Parts Parts Page 50 Strobe Light Other Front End Options...
Page 238: ...Illustrated Parts Parts Page 52 Cab Cowl With Windshield Options...
Page 240: ...Illustrated Parts Parts Page 54 Optional Cab Accessories...
Page 242: ...Illustrated Parts Parts Page 56 Cab Door Options...
Page 244: ...Illustrated Parts Parts Page 58 Optional Top Cover...
Page 246: ...Illustrated Parts Parts Page 60 Rear Seat Rear Gate and Rear Deck...
Page 248: ...Illustrated Parts Parts Page 62 9 Side Panels...
Page 250: ...Illustrated Parts Parts Page 64 Front Bumper and Splash Pan...
Page 252: ...TAYLOR DUNN...