background image


5 - Moving an A-B point


  TASCAM MD-801R/P Mk II 


5–5


If the A point is set at the start of a track, and the B 
point at the end of another track, the whole of the 
tracks containing and between these points will be 
erased (in the example above, tracks 2 and 3 will be 
erased.

The remaining tracks will be automatically renum-
bered to form a continuous sequence.


NOTE


It is not possible to erase the last track on the 
disc using this method. You must use the 
track erase function (see 5.3, "Erasing a 


track") for this purpose.


5.6.5 Retaining a track title for use by the 

second track after a division


As explained earlier (5.2, "Dividing tracks"), when a 
track is divided, the earlier of the newly-created pair 
of tracks contains the song title. If you are using the 
track division to eliminate lead-in times, this would 
mean that the unwanted lead-in kept the title and the 
program material was untitled. To avoid this, use the 
A-B erase function (without setting the A point) to 
retain the title for the remaining part of the track.


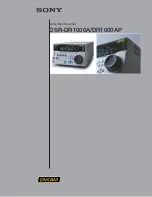
5.7 Moving an A-B point


This is the electronic equivalent of a razor-blade and 
splicing tape. A section of material can be marked, 
and moved to almost any part of the disc.

After the operation, the layout will be:

This operation can be performed in stop. play ready, 
or play modes.

The same conditions apply with regard to the A and 
B points as apply when erasing material betwen 

them:

• Point A must not be at the same location as point B

• At least one of the two points must be marked

• Point B must come after point A

If any of these conditions are not met, the display 
will show 


A-B Error!


.


1


Mark the A and B points.


2


Press the 


EDIT


 key, and turn the 


DATA


 dial 

until the display shows


3


Turn the 


SHUTTLE


 wheel clockwise. The dis-

play will change:

The MD-801 will keep looping the point at 
which the insertion is to take place (the inser-
tion point is at the end of the loop). Use the 


JOG


 dial (it is not a data dial at this point) to 

alter the position of the insertion point.


4


Turn the 


SHUTTLE


 wheel clockwise once 

more, and the display will change (alternating 
with the word 


Rehearsal


, while the 


E D I T


 indicator lights in the display:

The playback will now loop from a point about 
four seconds before the insertion point to a 
point about four seconds after the A point. This 
allows you to preview the effect of the “punch-
in” join between the original material and the 
A-B portion being moved.


5


Press the 


LOC B


 key 


[24]


 while this rehearsal 

process is taking place. The display will change:

The playback loop now changes so that the loop 
starts about four seconds before the B point, and 
ends about four seconds after the insert point. 
This allows you to preview the effect of the 
“punch-out” between the A-B portion being 
moved and the original material.


6


Turn the 


SHUTTLE


 wheel clockwise to make 

the edit. The display will show 


Now 

Editing


, followed by 


Complete


The A-B section becomes a new track. The 
point from which the A-B section was moved 
also becomes a track break, and all track num-

Track number

1

2

Formerly tracks 4 and 5

3

Track number

1

2

3

4

A

B

4

A-B portion
to be inserted here

Track number

1

2

3

6

New track from A-B portion

Track 2 split into two
at cut point

4

5


I N S E R T

A - B

?

I N S R

P T

O K

?

I N

P T

O K

?

O U T

P T

O K

?

Summary of Contents for MD-801RmkII

Page 1: ...terature accompanying the appliance The lightning flash with arrowhead symbol within an equilateral triangle is intended to alert the user to the presence of uninsulated dangerous voltage within the p...

Page 2: ...2 5 5 DATE indicator 2 5 6 TRACK TITLE indicator 2 5 7 DISC TITLE indicator 2 6 8 TRACK NO display and indicator 2 6 9 Time display and indicators 2 6 10 PGM NO 2 6 11 Dot matrix alphanumeric display...

Page 3: ...Erasing a track 5 2 5 4 Combining tracks 5 2 5 5 Moving tracks 5 3 5 6 A and B point erase operations 5 3 5 6 1 Normal A B erase 5 4 5 6 2 Erasing to the end of a track 5 4 5 6 3 Erasing from the star...

Page 4: ...of the MD together with an area reserved for user recording Full explanations of the principles of magneto opti cal recording may be found in a number of excellent reference works but briefly during t...

Page 5: ...he shutter and touch the surface of the disc Do not keep MiniDiscs in excessively dusty loca tions in direct sunlight in areas subject to high temperatures or high levels of humidity If the cartridge...

Page 6: ...erial 1 3 1Unpacking the unit When you unpack the unit as well as the unit itself and this manual you should find Power cord Rack mount kit Warranty card If any items are missing contact your TASCAM d...

Page 7: ...kup time This indicates how long There are no features which are unique to the MD 801P model only When characters are shown on the unit s dot matrix display the following typeface is used Input Mon Al...

Page 8: ...nu has been opened with the SHUTTLE wheel the display changes See 4 2 13 Varispeed mode for details of pitch control operations 3 3 Auto cue The auto cue facility allows you to cue the playback positi...

Page 9: ...After the menu has been opened with the SHUTTLE wheel the display changes The time may be set from 1 to 99 seconds in 1 sec ond steps or set to off NOTE The EOM tally signal is always transmitted whe...

Page 10: ...ow the sub menus SHUTTLE wheel to open them 3 11 1Baud rate From the main menu the first sub menu allows the setting of the communications speed baud rate When this sub menu is opened the baud rate ca...

Page 11: ...value is 54 dB 3 14Copy ID When recording an MD on the MD 801 the copy ID of the recorded MD can be set for different purposes The three settings available are Copy Free Free allows unlimited digital...

Page 12: ...ing of the disc Stop playback with the STOP key 5 Pause playback with the READY key 7 and restart it with the PLAY key NOTE If the tracks being played back are less than three seconds in length playba...

Page 13: ...indicator goes out 4 2 6Playback between two location points 1 Enter the location points as described above 2 Press the PLAY MODE key 22 so that the display shows A B 3 Press LOC A DEL 24 The unit wi...

Page 14: ...taken place If repeat is active the unit will enter play ready mode at the start of the next track REPEAT continue the start of the track which is being repeated REPEAT SINGLE or the A repeat point RE...

Page 15: ...y mode press the MEMO IN CAPS key 23 so that the indicator is lit 2 Press theTITLE key 16 The word DATE will light in the display and the date will be shown for example 98y 12m 25d followed by the tim...

Page 16: ...ows Complete and theTOC WRITE indicator 19 lights press the TOC WRITE key to write the new TOC to disc NOTE Depending on the condition of the disc how many edits have been performed etc it may take a...

Page 17: ...the next TRACK key 4 Recording will continue but the track number is incremented by one and the track division is written at the point where the next TRACK key was pressed 4 3 5 Post Script recording...

Page 18: ...ying the source As soon as the signal level goes above the threshold the MD 801 will go from record ready to record mode If the MD 801 is in record mode it will drop back to record ready mode as soon...

Page 19: ...s is a special case when making copies between two MD 801 units Titles may be copied in either the analog or the digital copying modes A special optional cable PW 1XMD is required to link the two seri...

Page 20: ...ion to disc by press ing the TOC WRITE key 19 NOTE A disc must not be write protected when sav ing edits to disc The display shows W_Protected if you attempt to write a U TOC to a protected disc By ej...

Page 21: ...theTRACK keys or any other con venient way of locating to the track 2 After pressing the EDIT key turn the DATA dial until the display shows 3 Turn the SHUTTLE wheel clockwise to change the display 4...

Page 22: ...operty of the MD recording system 5 5 Moving tracks This function allows you to edit the running order of the tracks and re place a track in a different position This can also be used with the combine...

Page 23: ...the A point has been set it is erased the indicator goes out The B point will be at the position where the erase took place 5 6 1Normal A B erase In this editing operation both the A and B points are...

Page 24: ...int A If any of these conditions are not met the display will show A B Error 1 Mark the A and B points 2 Press the EDIT key and turn the DATA dial until the display shows 3 Turn the SHUTTLE wheel cloc...

Page 25: ...which this function does not restore such data and the Not Execute message will appear NOTES Tracks and sections of less than 12 seconds in length may not be restored When restoring a track or tracks...

Page 26: ...ach title can be up to 99 characters long and titles too long to fit on the display are scrolled The total number of characters which can be included as titles on a disc disc and track titles is 1 792...

Page 27: ...r following the position where a character is to be inserted 2 Press the LOC B INS key 24 A space will appear into which you can enter a character 5 11 3Changing characters If a character has been wro...

Page 28: ...aster MD 801 is in stop mode the DISC TITLE indicator will light in the display and you can copy the title for the whole disc If the master MD 801 is in play or play mode the TRACK TITLE indicator wil...

Page 29: ...Centre Watford Herts WD1 8YA U K TEAC DEUTSCHLAND GmbH Phone 0611 71580 Bahnstrasse 12 65205 Wiesbaden Erbenheim Germany TEAC FRANCE S A Phone 01 42 37 01 02 17 Rue Alexis de Tocqueville CE 005 92182...

Reviews: