


Up to 25 tracks can be programmed in the
desired order and played.
ª
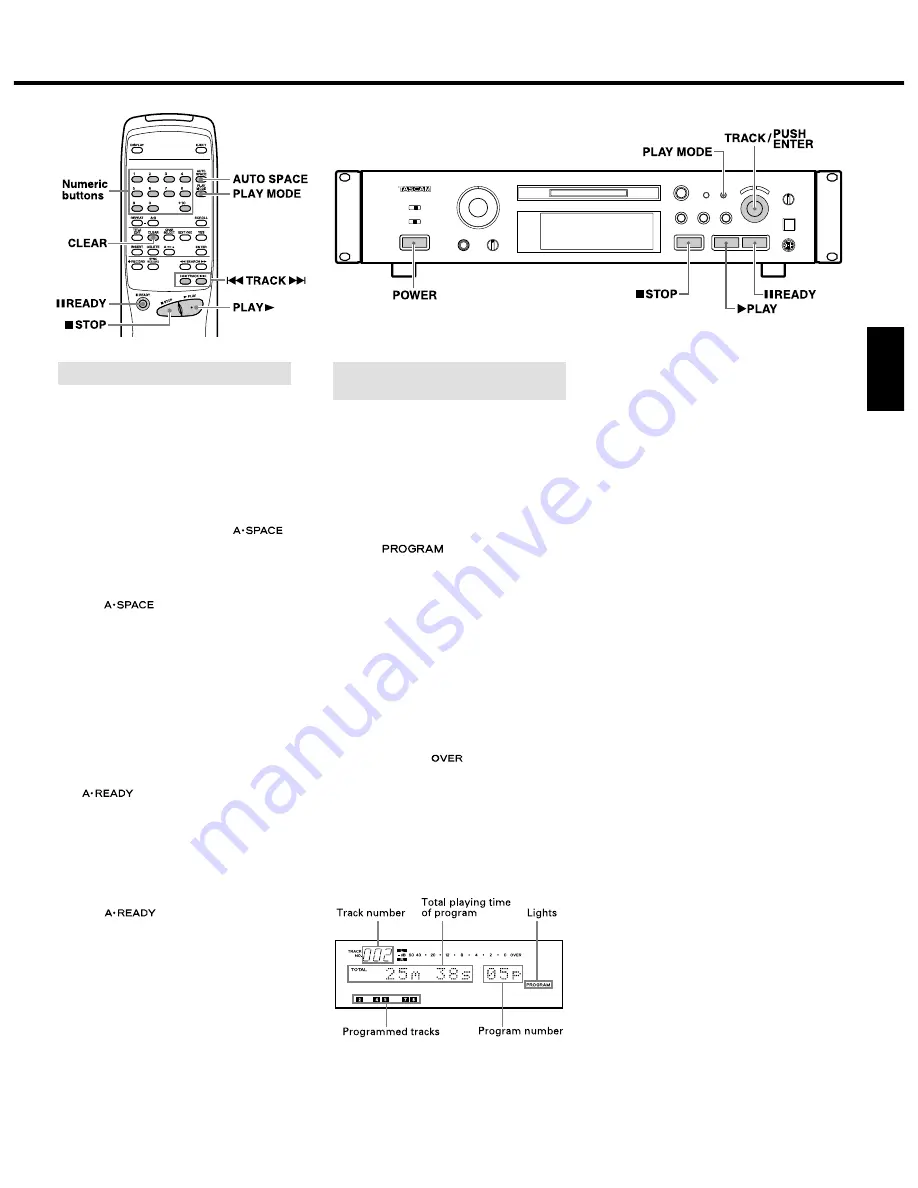
To program tracks
1. In the Stop mode, press the [PLAY
MODE] button repeatedly until "PGM
MODE" appears in the display. After
"PGM MODE", the display shows "0m 00s
00p" ("
" lights up).
2. Turn the [
µ
TRACK
≤
] dial so that the
desired track number indicator lights on
the music calendar, and press [PUSH
ENTER] on the dial.
…
The track number blinks.
…
Repeat this operation to program other
tracks.
…
Tracks can be programmed automatical-
ly by simply pressing the numeric
buttons (1 to 9, 0, +10) on the remote
control unit to display their numbers
sequentially.
…
When a track number of 21 or more is
selected, the "
" indicator blinks.
However, the track number can still be
checked on the TRACK NO. display.
…
The same track can be programmed
repeatedly.
…
If you make a mistake in the track
number entry, press the [CLEAR] button.
Each press clears the current last track
in the program.
Playing Tracks in the Desired
Order (Program Playback)
3. Press the [
¥
PLAY] button to start
Program playback.
…
The program is held in memory after
Program playback has been stopped by
pressing the [
ª
STOP] button or it has
stopped automatically at the end.
…
Pressing the [
ª
STOP] button in the Stop
mode clears the program memory.
…
When the total program playback time is
longer than 159 minutes and 59 seconds,
"---m--s" appears on the time counter.
…
When the 25th track has been
programmed, "PGM Full !!" is displayed
and no more tracks can be programmed.
…
Pressing the [PLAY MODE] button in the
Stop mode cancels the Program Play
mode and clears the program memory.
…
The Program mode will not be canceled
even when the power is turned off, and
the programmed data will remain in the
deck.
…
If you attempt program playback when
no programmed data is entered, normal
playback will start after "PGM Empty !!"
is displayed.
ª
To check the program contents
In the Play or Play-Ready mode, turn the
[
µ
TRACK
≤
] dial or press the [
µ
] or
[
≤
] button on the remote control unit to
display the program contents.
ª
To delete a programmed track
In the Stop mode, press the [CLEAR] button.
Each press clears the current last track in
the program.
ª
To add a track to the program
In the Stop mode, turn the [
µ
TRACK
≤
]
dial to select the desired track number and
press [PUSH ENTER] on the dial.
A track can also be added from the remote
control unit by simply entering the track
number with the numeric buttons
(1 to 9, 0, +10).
…
The new track is appended to the end of
the existing program.
– 13 –
ENGLISH
ª
To play tracks with spaces inserted
after every track (Auto Space playback)
The Auto Space playback function inserts a
3-second blank space between each track.
This makes possible music scan operations
when recording from MDs to analog tape.
1. Press the [AUTO SPACE] button on the
remote control unit once so that
"A_SPACE ON" is displayed. ("
"
lights up.)
2. Press the [
¥
PLAY] button.
…
To release Auto Space Playback, press
the [AUTO SPACE] button repeatedly
until "
" disappears.
ª
To pause after each track
(Auto Ready playback)
The deck can enter the Ready mode after
playing each track. This feature is
convenient when copying a single MD track
onto tape or when the tracks to be copied
are not continuous.
1. Press the [AUTO SPACE] button on the
remote control unit twice so that
"A_READY ON" is displayed.
("
" lights up.)
2. Press the [
¥
PLAY] button.
…
When playback is finished, the deck
pauses at the beginning of the next track.
3. Press the [
¥
PLAY] or [
π
READY] button
to start playing the next track.
…
To release Auto Ready playback, press
the [AUTO SPACE] button repeatedly
until "
" disappears.
…
A.SPACE and A.READY playback cannot
be used together.
When Recording to Analog Tape
Buttons used on this page


