background image

Useful Tips for Playback

Each track on the disc is played once in
random order.

1. In the Stop mode, press the [PLAY

MODE] button repeatedly until "SHUFFLE
MODE" is displayed ("

" lights

up).

2. Press the [

¥

PLAY] button. 

To play the next track, turn the
[

µ

TRACK

] dial clockwise (or press

the [

] button on the remote control

unit) during shuffle playback.

To play from the beginning of the current
track, turn the [

µ

TRACK

] dial

counterclockwise (or press the [

µ

]

button on the remote control unit) during
shuffle playback.

The Shuffle mode will not be canceled
even when the power is turned off.

To cancel the Shuffle mode, press the
[PLAY MODE] button repeatedly until
"CONTINUE MODE" is displayed.

Playing Tracks in Random Order
(Shuffle Playback)

ª

Playing a track by direct search

Specify the desired track by pressing the
numeric buttons (1 to 9, 0, +10) on the
remote control unit. The specified track
starts to play.

Examples of operation for direct search
of track number 10 or more:
To search track number 10: 

Press +10 once then 0.

To search track number 25: 

Press +10 twice then 5.

Press the [CLEAR] button while "TRACK
NO." is blinking to cancel it.

ª

To skip to the previous or next track

Turn the [

µ

TRACK

] dial clockwise 

or counterclockwise (or press the
[

µ

TRACK

] buttons on the remote

control unit) during playback to skip to a
track located after or before the current
track.

ª

To search a desired section

During playback, press and hold the
[

/

˚

] (or [

SEARCH

˚

]) buttons to

search the desired section.

In the Play-Ready mode, the desired
section can be searched by observing
the elapsed playing time or remaining
playing time on the display.

Normal search may not be possible if
there are several successive short
tracks of only a few seconds in length.

Selecting the Desired Track

– 12 –

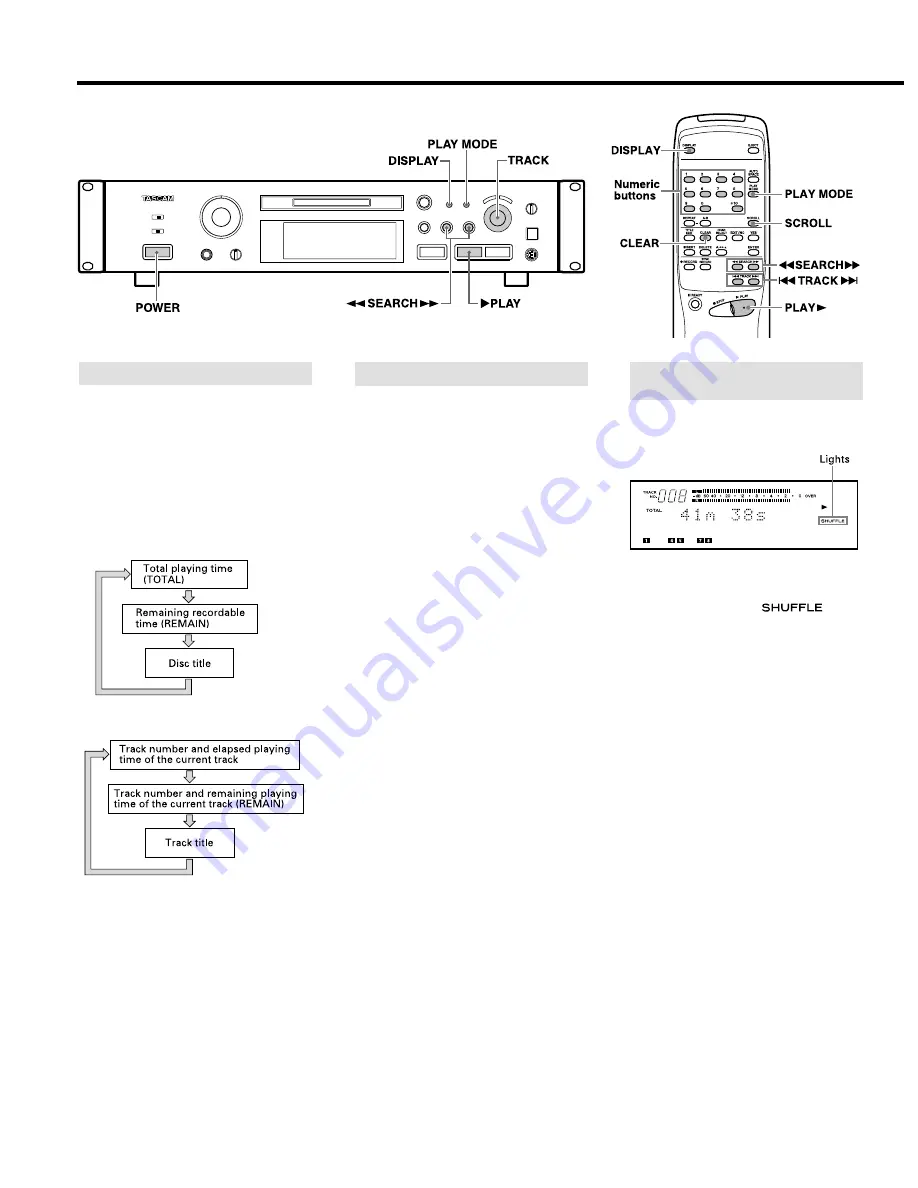
The information shown on the display
allows you to check the disc title, track title,
the total track number in an MD, total
playing time, remaining recordable time of
the MD.

Each press of the [DISPLAY] button
changes the display as shown below.

In the Stop mode:

In the Play mode:

The total number of tracks appears on
the TRACK NO. display.

The disc title and track titles are
displayed only when they have been
recorded onto the MD.

When a track has been selected in the
Stop mode ("TRACK" is lit), pressing the
[DISPLAY] button displays the track title.

When a track title is composed of more
than 100 characters, the 100th character
and beyond cannot be displayed.

The disc or track title can be scrolled on
the display with the [SCROLL] button on
the remote control unit. After scrolling,
the title returns to its original display.  

Using the Display Window

Buttons used on this page

Summary of Contents for MD-301mkII

Page 1: ...important operating and maintenance servicing instructions in the literature accompanying the appliance The lightning flash with arrowhead symbol within an equilateral triangle is intended to alert th...

Page 2: ...the mast and supporting structure grounding of the lead in wire to an antenna discharge unit size of grounding conductors location of antenna discharge unit connection to grounding electrodes and re...

Page 3: ...D LASERKOMPONENT 1DETTE M RKAT ER ANBRAGT SOM VIST I ILLUSTRATIONEN FOR AT ADVARE BRUGEREN OM AT APPARATET INDEHOLDER EN LASERKOMPONENT 2DETTE M RKAT ER SOM VIST P ILLUSTRATIONEN ANBRAGT P INDERSIDEN...

Page 4: ...k MOVE Function 16 Assigning Titles TITLE Function 17 Assigning Titles to the Disc and All Tracks Successively TITLE AUTO INC Function 17 18 Changing entered characters 18 Copying a Title TITLE COPY F...

Page 5: ...may not be written correctly on the MD If the power is turned off with the MD left in the deck lights up after recording the UTOC cannot be recorded Turn the power back on within 3 or 4 days and eject...

Page 6: ...ted DIGITAL INPUT 1 OUTPUT terminals Use these terminals to connect the deck to a digital component such as a CD player DAT deck digital amplifier or another MD deck Use a digital optical TOS cable op...

Page 7: ...e EDIT NO button r YES button t INPUT SELECTOR switch y PHONES jack u PHONES level control i Display window o STOP button p PLAY button a READY button s DIGITAL IN 2 terminal d KEYBOARD terminal f Num...

Page 8: ...ecording the track number increases by one To eject the MD Press the EJECT button If the power is turned off with the MD left in the deck lights up after recording the UTOC cannot be recorded Turn the...

Page 9: ...just been recorded from the beginning If ten seconds or more have passed after recording is stopped or if the PLAY button is pressed after pressing the STOP button playback starts from the first trac...

Page 10: ...ly according to the CD or MD data Once the Auto Track function is ON this mode will not be released even after the power is turned off Press the YES button after selecting A_TRACK OFF to release it To...

Page 11: ...st been recorded will be played from the beginning To play from the first track of the MD after recording Press the STOP button again immediately after stopping recording then press the PLAY button PL...

Page 12: ...press the TRACK buttons on the remote control unit during playback to skip to a track located after or before the current track To search a desired section During playback press and hold the or SEARCH...

Page 13: ...playback when no programmed data is entered normal playback will start after PGM Empty is displayed To check the program contents In the Play or Play Ready mode turn the TRACK dial or press the or but...

Page 14: ...unavailable in the SHUFFLE MODE or PGM MODE To repeat a section within a track A B repeat A specified portion between A and B of a track can be played repeatedly 1 During playback press the A B butto...

Page 15: ...he record protect tab to close the hole While UTOC Writing is blinking This message indicates that the recorded data is being written on the MD Do not pull out the power cord or vibrate the deck Other...

Page 16: ...moved by turning the TRACK dial 2 Press the EDIT NO button until MOVE is displayed 3 Press the YES button Move to 001 is displayed 001 blinks Track number Destination track to be moved number 4 Selec...

Page 17: ...e SHUFFLE MODE or PGM MODE 17 Titles can be assigned to each disc or each track using uppercase and lowercase letters numbers Katakana and symbols 1 Press the EDIT NO button so that TITLE is displayed...

Page 18: ...right after selecting a character Deck Press PUSH ENTER on the dial Remote Control Unit Press the ENTER button To erase all the characters at once Deck Unavailable Remote Control Unit Press the CLEAR...

Page 19: ...e unoperational 19 ENGLISH System Restrictions Because of the different recording systems used by Compact Cassette DAT etc the MD Mini Disc is subjected to some system restrictions These restrictions...

Page 20: ...noise Since recording is performed on a 6 cluster basis approx 12 seconds over writing a noisy track may erase a part of the track It is not possible to assign a track title during overwrite recordin...

Page 21: ...ital to digital connection Record ing DAT deck MD deck or Record ing DAT deck MD deck or Play ing DAT deck MD deck or Digital output jack Digital output jack Line analog output jacks Audio connec ting...

Page 22: ...please consult your dealer or nearest TEAC service agent Problem Remedy No operations are possible The MD is dirty or damaged If Disc Error is display ed in this case replace the MD with another disc...

Page 23: ...ly approved by TEAC CORPORATION for compliance could void the user s authority to operate this equipment For U S A TEAC CORPORATION 3 7 3 Nakacho Musashino shi Tokyo 180 8550 Japan Phone 0422 52 5082...

Reviews: