background image

Useful Tips for Recording

– 10 –

You can monitor the input signal of the
component connected to each input
terminal before recording.

1. Press the [

ø

EJECT] button to eject the

disc.

2. Select the input source with the [INPUT

SELECTOR].

3. Press the [

º

RECORD] button. 

("Monitor Mode" appears.)

Even when the [REC MODE] is set to
[MONO], the output is sent to both
channels.

Insert an MD or press the [

ª

STOP]

button to cancel the Monitor mode.

When recording with [ANALOG] selected
with the [INPUT SELECTOR] and the signal
input through the [ANALOG INPUT] jacks,
adjust the recording level with the [INPUT]
control.

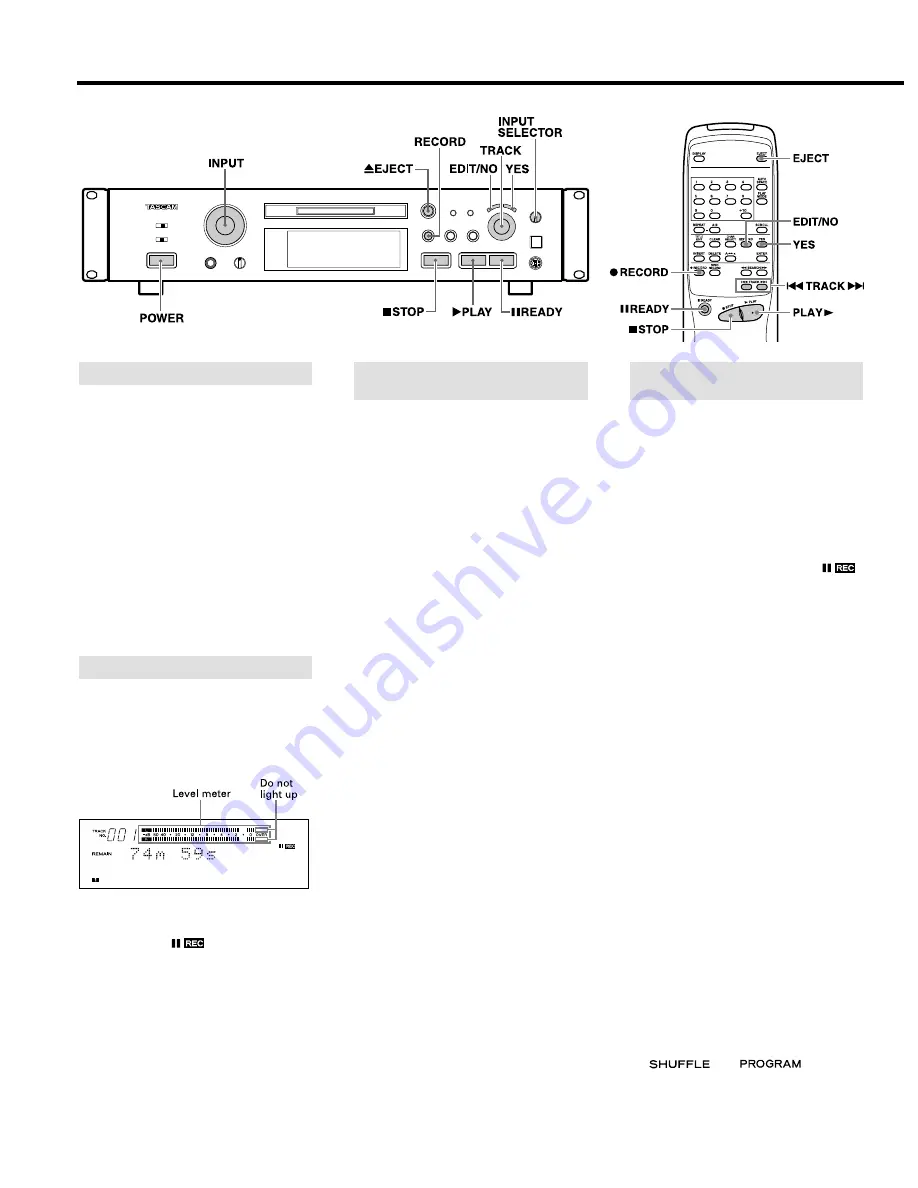
1. Insert a recordable MD and press the

[

º

RECORD] button to enter the Record-

Ready mode ("

" lights up).

2. Play the highest-level section of the

program source and turn the [INPUT]
control so that the "OVER" segments of
the peak level meters do not light.

Recording level adjustment is not
necessary for digital recording.

3. Play the program source again. 

Press the [

¥

PLAY] or [

π

READY] button

to start recording.

Adjusting the Recording Level

Monitoring the Input Signal

Assigning  track numbers at specific points
will make it easy to quickly locate those
points later using the playback or editing
functions. 

ª

To assign track numbers automatically
(Auto Track function)

Track numbers can be assigned automati-
cally during recording by setting the Auto
Track function to ON.

1. In the Record or Record-Ready mode,

press the [EDIT/NO] button until
"A_TRACK >" appears.

2. Turn the [

µ

TRACK

] dial to select 

"A_TRACK > ON".

3. Press the [YES] button to end the setting

function.

While the Auto Track function is "ON", the
signal level must remain low for 2 or
more seconds before a new track
number is advanced.

During digital recording from a CD or
MD, the track numbers are advanced
automatically according to the CD or MD
data.

Once the Auto Track function is "ON", this
mode will not be released even after the
power is turned off. 
Press the [YES] button after selecting
"A_TRACK > OFF" to release it.

ª

To assign track numbers manually

Press the [

º

RECORD] button at every point

where you want to assign a track number
during recording.  Each press of the button
advances the track number.

ª

To assign track numbers after recording

A track number is added when a track is
divided in editing. (See "Dividing a track" on
page 16.)

Note:

Changing the input or mode with the [INPUT
SELECTOR] or [REC MODE] switch during
recording activates the Record-Ready
mode.

Assigning Track Numbers During

Recording

The Over Write function allows you to
record music by erasing a previously
recorded track. 

1. Perform steps 1 to 4 of "Recording an

MD" on page 8.

2. Turn the [

µ

TRACK

] dial (or press

the [

µ

TRACK

] buttons on the

remote control unit) until the track
number to be recorded over appears.

3. Press the  [

º

RECORD] button ("

"

lights up). 

After "Over Write" appears, the remain-
ing recording time is displayed.

The track numbers which come after the
track being recorded over blink on the
music calendar.

4. Adjust the recording  level.

If [ANALOG] was selected above, adjust
the recording level with the [INPUT]
control.

5. Press the [

¥

PLAY] button or [

π

READY]

button to start recording. 

The deck records over the existing track.
The track number is updated.

ª

Recording over an existing track from
the middle

1. Select the track number to be erased

then press the [

¥

PLAY] button to start

playback.

2. Press the [

π

READY] button where you

want to start recording.

3. Press the [

º

RECORD] button.

The track number is updated and blinks
on the music calender.

4. Press the [

¥

PLAY] or [

π

READY] button

to start recording. 

The deck records over the existing track. 

[CAUTION]

It is not possible to record from the
middle of an existing track when
"

" or "

" is lit.

Recording Over Existing Tracks

(Over Write)

Buttons used on this page

Summary of Contents for MD-301mkII

Page 1: ...important operating and maintenance servicing instructions in the literature accompanying the appliance The lightning flash with arrowhead symbol within an equilateral triangle is intended to alert th...

Page 2: ...the mast and supporting structure grounding of the lead in wire to an antenna discharge unit size of grounding conductors location of antenna discharge unit connection to grounding electrodes and re...

Page 3: ...D LASERKOMPONENT 1DETTE M RKAT ER ANBRAGT SOM VIST I ILLUSTRATIONEN FOR AT ADVARE BRUGEREN OM AT APPARATET INDEHOLDER EN LASERKOMPONENT 2DETTE M RKAT ER SOM VIST P ILLUSTRATIONEN ANBRAGT P INDERSIDEN...

Page 4: ...k MOVE Function 16 Assigning Titles TITLE Function 17 Assigning Titles to the Disc and All Tracks Successively TITLE AUTO INC Function 17 18 Changing entered characters 18 Copying a Title TITLE COPY F...

Page 5: ...may not be written correctly on the MD If the power is turned off with the MD left in the deck lights up after recording the UTOC cannot be recorded Turn the power back on within 3 or 4 days and eject...

Page 6: ...ted DIGITAL INPUT 1 OUTPUT terminals Use these terminals to connect the deck to a digital component such as a CD player DAT deck digital amplifier or another MD deck Use a digital optical TOS cable op...

Page 7: ...e EDIT NO button r YES button t INPUT SELECTOR switch y PHONES jack u PHONES level control i Display window o STOP button p PLAY button a READY button s DIGITAL IN 2 terminal d KEYBOARD terminal f Num...

Page 8: ...ecording the track number increases by one To eject the MD Press the EJECT button If the power is turned off with the MD left in the deck lights up after recording the UTOC cannot be recorded Turn the...

Page 9: ...just been recorded from the beginning If ten seconds or more have passed after recording is stopped or if the PLAY button is pressed after pressing the STOP button playback starts from the first trac...

Page 10: ...ly according to the CD or MD data Once the Auto Track function is ON this mode will not be released even after the power is turned off Press the YES button after selecting A_TRACK OFF to release it To...

Page 11: ...st been recorded will be played from the beginning To play from the first track of the MD after recording Press the STOP button again immediately after stopping recording then press the PLAY button PL...

Page 12: ...press the TRACK buttons on the remote control unit during playback to skip to a track located after or before the current track To search a desired section During playback press and hold the or SEARCH...

Page 13: ...playback when no programmed data is entered normal playback will start after PGM Empty is displayed To check the program contents In the Play or Play Ready mode turn the TRACK dial or press the or but...

Page 14: ...unavailable in the SHUFFLE MODE or PGM MODE To repeat a section within a track A B repeat A specified portion between A and B of a track can be played repeatedly 1 During playback press the A B butto...

Page 15: ...he record protect tab to close the hole While UTOC Writing is blinking This message indicates that the recorded data is being written on the MD Do not pull out the power cord or vibrate the deck Other...

Page 16: ...moved by turning the TRACK dial 2 Press the EDIT NO button until MOVE is displayed 3 Press the YES button Move to 001 is displayed 001 blinks Track number Destination track to be moved number 4 Selec...

Page 17: ...e SHUFFLE MODE or PGM MODE 17 Titles can be assigned to each disc or each track using uppercase and lowercase letters numbers Katakana and symbols 1 Press the EDIT NO button so that TITLE is displayed...

Page 18: ...right after selecting a character Deck Press PUSH ENTER on the dial Remote Control Unit Press the ENTER button To erase all the characters at once Deck Unavailable Remote Control Unit Press the CLEAR...

Page 19: ...e unoperational 19 ENGLISH System Restrictions Because of the different recording systems used by Compact Cassette DAT etc the MD Mini Disc is subjected to some system restrictions These restrictions...

Page 20: ...noise Since recording is performed on a 6 cluster basis approx 12 seconds over writing a noisy track may erase a part of the track It is not possible to assign a track title during overwrite recordin...

Page 21: ...ital to digital connection Record ing DAT deck MD deck or Record ing DAT deck MD deck or Play ing DAT deck MD deck or Digital output jack Digital output jack Line analog output jacks Audio connec ting...

Page 22: ...please consult your dealer or nearest TEAC service agent Problem Remedy No operations are possible The MD is dirty or damaged If Disc Error is display ed in this case replace the MD with another disc...

Page 23: ...ly approved by TEAC CORPORATION for compliance could void the user s authority to operate this equipment For U S A TEAC CORPORATION 3 7 3 Nakacho Musashino shi Tokyo 180 8550 Japan Phone 0422 52 5082...

Reviews: