background image


Kanguru Micro MP3 PRO 

USB2.0 

User’s Manual


MP3/WMA  Digital Voice Recorder 

FM Tuner + USB Flash Drive


Copyright 2005, All Rights Reserved. 

This manual applies to 1.1 or later versions of the Kanguru Micro MP3 PRO.


Summary of Contents for Micro MP3 PRO USB2.0

Page 1: ... Micro MP3 PRO USB2 0 User s Manual MP3 WMA Player Digital Voice Recorder FM Tuner USB Flash Drive Copyright 2005 All Rights Reserved This manual applies to 1 1 or later versions of the Kanguru Micro MP3 PRO 1 ...

Page 2: ...All other brand or product names are trademarks of their respective companies or organizations Kanguru Solutions will not be held responsible for any illegal use of this product nor any losses incurred while using this product The user is responsible for the copyright laws and is fully responsible for any illegal actions taken CUSTOMER SERVICE To obtain service or technical support for your system...

Page 3: ...ENTS 7 QUICK START 8 OPERATIONAL NOTES 9 PLAYER CONTROLS 10 FRONT VIEW 10 SIDE VIEW 11 LCD 12 DRIVER UTILITY INSTALLATION 13 MAIN MENU 19 PLAYING MP3 MUSIC 20 VOLUME CONTROL 21 SETTINGS TEMPO RATE 22 SETTINGS EQ EQUALIZER 23 SETTINGS REPEAT 24 SETTINGS REPEAT A B MODE 25 ...

Page 4: ...4 VOICE RECORDING FUNCTION 31 FM RADIO 38 SYSTEM SETTINGS 40 DISCLAIMER 48 WARRANTY 49 TECH SUPPORT 49 ...

Page 5: ...need while on the go The Kanguru Micro MP3 PRO will play all files with an MP3 or WMA extension Plug this mini MP3 player directly into any USB port for quick easy access Simply drag and drop or save your files directly to the drive The Kanguru Micro MP3 PRO will work with Windows Macintosh and Linux and is driverless with most Operating Systems With one AAA battery you can take advantage of 9 hou...

Page 6: ...00 times Support music format MP3 WMA LCD Display 96x32 Dot Matrix Earphone jack 3 5 mm Audio output 5mW 5mW Output frequency range 20Hz 20KHz Battery Life 9 hrs of continuous playback EQ choices Natural Rock Classical Pop Jazz Soft Bass ID3 Tag Display FM Radio Frequency Range 76Mhz 96MHz 87MHz 108MHz Digital voice record in ADPCM 8kbps Repeat read function A B Unit weight approximate 30g not inc...

Page 7: ...Package Contents Installation CD USB Cable Earphones Manual AAA Battery 7 ...

Page 8: ...98SE 3 Connect the drive to an available USB port on your PC and the unit will appear as a Removable Disk under My Computer 4 Double click on the Removable Disk icon to view its contents To load audio files simply save the desired MP3 WMA file to this drive 5 Remove the drive from the USB port and press the Play button to turn on the power 6 Insert the headphones and press the Play button again to...

Page 9: ...ot be turned on if the HOLD switch is in the ON position 4 Please change the battery when the indicator appears and Low Battery is displayed 5 The Mode FF RW button on the side of the player can be scrolled to the left or right and also pushed to make selections in the menus 6 The MP3 player must be formatted FAT or FAT16 to playback audio files NOTE Only the 1GB Micro MP3 Pro must be formatted in...

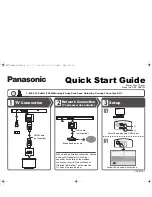
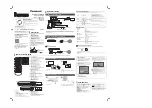
Page 10: ...Player Controls Front View 10 Play pause power LCD A B Repeat FF Mode Rew USB port ...

Page 11: ...Side View Volume Volume Hold button Earphone 11 ...

Page 12: ... repeat mode Hold icon Playback time Type of the song Current operation Song Name Battery indicator Repeat modes Repeat Repeat All Random Preview and Normal Equalizer modes Bass Jazz Classical Soft Rock Pop and Normal 12 ...

Page 13: ...an be used on Windows 98 98SE ME 2000 and XP Please follow these steps to install the drivers and utility on your computer 1 Insert the include Drivers and Manuals CD into your CDROM drive Note Do not insert the disc into slot loading CD drives 2 Browse to your CDROM drive in My Computer and double click on the MP3 Player Utilities and Win98 Driver folder 3 Double click on Setup exe and the instal...

Page 14: ...e directory click the Browse button The Disk Cost button will show you all available drives on your computer and how much storage space is free on each shown below Note Windows XP and 2000 users will be prompted whether to install for Everyone on the computer or Just Me 14 ...

Page 15: ...15 ...

Page 16: ...click Finish to complete the installation Note Windows 98 users will be asked to reboot after installation is complete Upon plugging in the drive after reboot the operating system will auto detect the drive 8 In your start menu there will be a program group for the player labeled MP3 Player Utilities 1 47 16 ...

Page 17: ...ease see the Playback Recorded Files section for more information MP3 Player Update Tool Do not use this function unless instructed to do so by a Kanguru Solutions Technician Doing so can damage your player and or void your warranty 17 ...

Page 18: ...2 seconds Once the player powers on the following image will be displayed on the LCD screen Power On Screen To turn off the MP3 player press and hold the PLAY button for 2 seconds When the player has powered off the following image will be displayed on the LCD screen Power Off Screen 18 ...

Page 19: ...nter the main menu from any mode press down on and hold the Mode button in the middle of the rolling wheel The LCD will display the following Power On Screen The following 5 options are available to select Mode Icon Music Playback Mode Record Mode Record Playback Mode FM Mode System Settings Mode 19 ...

Page 20: ...aded on this particular MP3 player and the current song 2 When you press Play Stop button again the current track will be played as shown above The top left corner is the playback time indicator 3 If you want to select previous next song turn the rolling wheel up and down to get the track The music will stop if you press Play Stop 4 By pressing the Play Stop button for 3 seconds you can turn the p...

Page 21: ...Volume Control The volume steps see illustration will increase or decrease when the VOL VOL button is pressed correspondingly There are 32 volume steps and the volume level ranges from 0 to 31 21 ...

Page 22: ...e not changing the tone of the song 1 While playing a music file press the Mode button to enter the submenu 2 Select the Tempo Rate option by pressing the Mode button 3 Use the Next and Previous track buttons to speed up or slow down the songs Note Changing the speed of songs will apply to all songs and will remain in effect until changed ...

Page 23: ...pressing the Mode Button when a music file is being played 2 Select the Equalizer option 3 Scroll to the desired EQ setting Natural Rock Pop Classical Soft Jazz or Bass and press down on the Mode button to select that setting 4 After selecting the EQ setting you will be returned to the Music Playback Mode 5 The EQ setting will appear in the LCD as show below 23 ...

Page 24: ...eration is performed Random Plays all MP3s at random and then stops Preview Plays the first 10 seconds of all MP3s in order and stops after the last file has been played To change the playback setting please follow these steps 1 Enter the Music Playback Mode and push the Mode button while a music file is being played 2 Select the REPEAT option by pushing down on the mode button 3 Scroll to the des...

Page 25: ...ying the desired track enter the submenu by pressing the Mode button then choose the Replay setting 2 The repeat icon A will begin flashing on the screen waiting for you to set the beginning point To set the beginning point push the A B Button or the Next Track button shown below 3 When the beginning point is selected the repeat icon B flashes waiting for you to set the ending point To set the end...

Page 26: ...and will stop the repeat mode when the preset number of replay times has been reached 5 To cancel the function or move on to the next track select the Repeat A B function again or adjust the rolling wheel to reach the next designated track Replay Times To set how many times the player will repeat the content between the A and B points please follow these steps change the number of times 26 ...

Page 27: ...Replay Gap The replay gap determines how long the player will pause before it replays the A B content measured in seconds Please follow the following steps to change the interval 1 When playing a music file push the Mode button to enter the submenu 2 Select the Replay Gap option and using the scroll wheel set how many seconds you want the player to pause before repeating the A B content Default se...

Page 28: ...or setting an A B Repeat 2 Push the Next Track button to enter the Follow Reading mode The repeat icon changes into the follow reading icon see figure 1 Once the icon appears the player will record your voice for the same amount of time between the A and B points When the recording time is up the player will replay the original audio and the icon will change see figure 2 At this time you can hit p...

Page 29: ...his function does not work with files in the Record Playback Mode The Compare Function allows you hear your recording from the Follow Reading Function replayed after the original audio Please follow the following steps to use this function 29 ...

Page 30: ...nal audio the icon will change to two speakers shown below and will play the user s voice that was recorded during the Follow Reading Function 3 After finishing playing the user s voice the player will play the original audio The process will repeat until you press the Mode button to quit Pushing the Previous Track button will return you the Follow Reading mode 30 ...

Page 31: ... A B button for 3 seconds The LCD will display Initiatilizing and automatically start the recording 2 Pressing the A B button will pause the recording the time display will flash Pressing and holding the A B button for 3 seconds will save the recording and start a new one Record Mode 1 Enter the Main Menu by pressing holding the Mode button 2 Select the Record Mode by pressing the Mode button on t...

Page 32: ...l pause the recording the time display will flash Pressing and holding the A B button for 3 seconds will save the recording and start a new one Note While recording only the Play and A B buttons will respond Note If the LCD displays Memory Full there is not enough memory to save a recording and you will have to delete some files to free up space 32 ...

Page 33: ...he directory and a different directory will need to be selected see Selecting Different Directories for more info Choosing Recording Type 1 When a recording is stopped enter the submenu by pressing the Mode button 2 Select the option REC Type by pressing the Mode button 3 Select the recording type you wish to use by pushing the Mode button to select it see table for details on each mode ...

Page 34: ... operated wav format Long time voice operated act format Voice Operated Record Selecting a VOR record type means sound will control the recording process The player will start recording when there is sound and stop recording when there isn t This will allow for storage to be saved It is recommended using this feature when there is minimal background noise 34 ...

Page 35: ...n the desired track to play Convert ACT recordings to WAV files Recordings recorded in the ACT format with the player can be converted into WAV format with the included program on the CD See Driver Utility Install section for installation instructions 1 Run the Sound Converter Tool that can be found in your Start Menu Programs MP3 Players Utilities 1 47 program group 2 Click the open button to get...

Page 36: ...3 Select the ACT file to be converted 36 ...

Page 37: ...4 Click the Convert button to start converting it to a WAV file In addition to converting ACT files to WAV files the Sound Covert Tool can also play WAV and MP3 files 37 ...

Page 38: ...n it finds a channel 3 Manual Scanning Press the Previous track once and the frequency will decrease by 100KHz Press the Next track once and the frequency will increase by 100KHz 4 Saving Favorite Channels Enter the FM submenu by pressing the Mode button then pressing the Mode button again on Save 5 Selecting Favorite Channels If you have more than one saved channel you can navigate through them b...

Page 39: ...Tuner press the Mode button to enter the submenu 2 Scroll with the Next Track button and select either Fine REC or Long REC by pressing the Mode button 3 The LCD will switch the recording screen and automatically start recording To save the recording press the Mode button and it will save and exit back to the FM Tuner ...

Page 40: ...ttings and press the Mode button to select it Brief Introduction to each setting Backlight How long the backlight will stay lit if no more buttons are pushed after the backlight is activated Language Set players language Power off Set a time to shut down the player automatically Replay Mode Set the work status in repeating Contrast Adjust the LCD contrast 40 ...

Page 41: ...elect the Backlight setting by pressing the Mode button 2 Using the Next and Previous track button select the time in seconds the backlight will stay lit Press the Mode button to save the setting Language Setting 1 In System Settings menu select the Language setting by pressing the Mode button 2 Using the Next and Previous track button select the language of the player Press the Mode button to sav...

Page 42: ...ayer in any mode if there aren t any operations This feature is a one time use and will need to be reset once the player is powered back on Replay Mode 1 In System Settings menu select Replay Mode by pressing the Mode button 2 Manual Mode will not automatically find the end of sentences in A B Repeat mode You will have to set the beginning and end points manually 3 Auto Mode will automatically fin...

Page 43: ...tton to save the setting Storage Status The number on the screen represents the total capacity of the drive in megabytes and the percentage represents the amount used Firmware Version Displays the current version of the player Firmware Update Do not use this function unless instructed to do so by a Kanguru Solutions Technician Doing so can damage your player and or void your warranty ...

Page 44: ...ification and management purposes The player can support up to 99 subfolders Please follow the following steps to use this function 1 With the player in stop status Example shown in Music playback mode you can also select directories in Record and Record Playback modes enter the submenu by pressing the Mode Button 2 Select the Local Folder option by pressing the Mode Button 44 ...

Page 45: ...he Next and Previous track buttons scroll through the subdirectories 4 Select a subfolder by pressing the Mode button Note You can set different directories for Music Playback Record and Record playback mode 45 ...

Page 46: ...files from the drive and saved FM channels in the Music Playback Record playback and FM Mode 1 With the player in stop status enter the submenu by pressing the Mode Button 2 Select the Delete File or Delete All option by pressing the Mode Button 46 ...

Page 47: ... will delete all files in the current mode under the current directory For example if you choose the Delete All function in Music mode only music files will be deleted and not any recordings you ve made Note Deleting saved FM channels requires only steps 1 and 2 Note Deleting files is permanent and they will need to be recopied to the drive from a computer once deleted off the player 47 ...

Page 48: ...ument and shall in no event be liable for any loss of profit or any other commercial damage including but not limited to special incidental consequential or other damages No part of this document may be reproduced or transmitted in any form by any means without the express written permission of the manufacturer All brand names and product names used in this document are trademarks or registered tr...

Page 49: ...xperience any problems installing your Kanguru Micro MP3 PRO player or have any technical questions regarding any of our products please call our tech support department Our tech support is free and available Monday thru Friday 9am to 5pm EST Call 1 508 376 4245 or visit our website at www kanguru com Kanguru Solutions 1360 Main St Millis MA 02054 ...

Reviews: