background image

TASCAM  CD-200SB

 35

6 – Direct folder function

Direct folder playback 

When the main unit TRK SEL indicator is not lit, lit indicators for 

the FOLDER/TRACK SELECT (1–10/0) buttons show they have 

direct folder assignments for the current media (SD card or USB 

flash drive). 
Press a FOLDER/TRACK SELECT (1–10/0) button that has a lit 

indicator to start playback of the folder assigned to that button. 
During direct folder playback, the indicator for the FOLDER/

TRACK SELECT (1–10/0) button of the assigned folder that is 

playing back blinks slowly. 

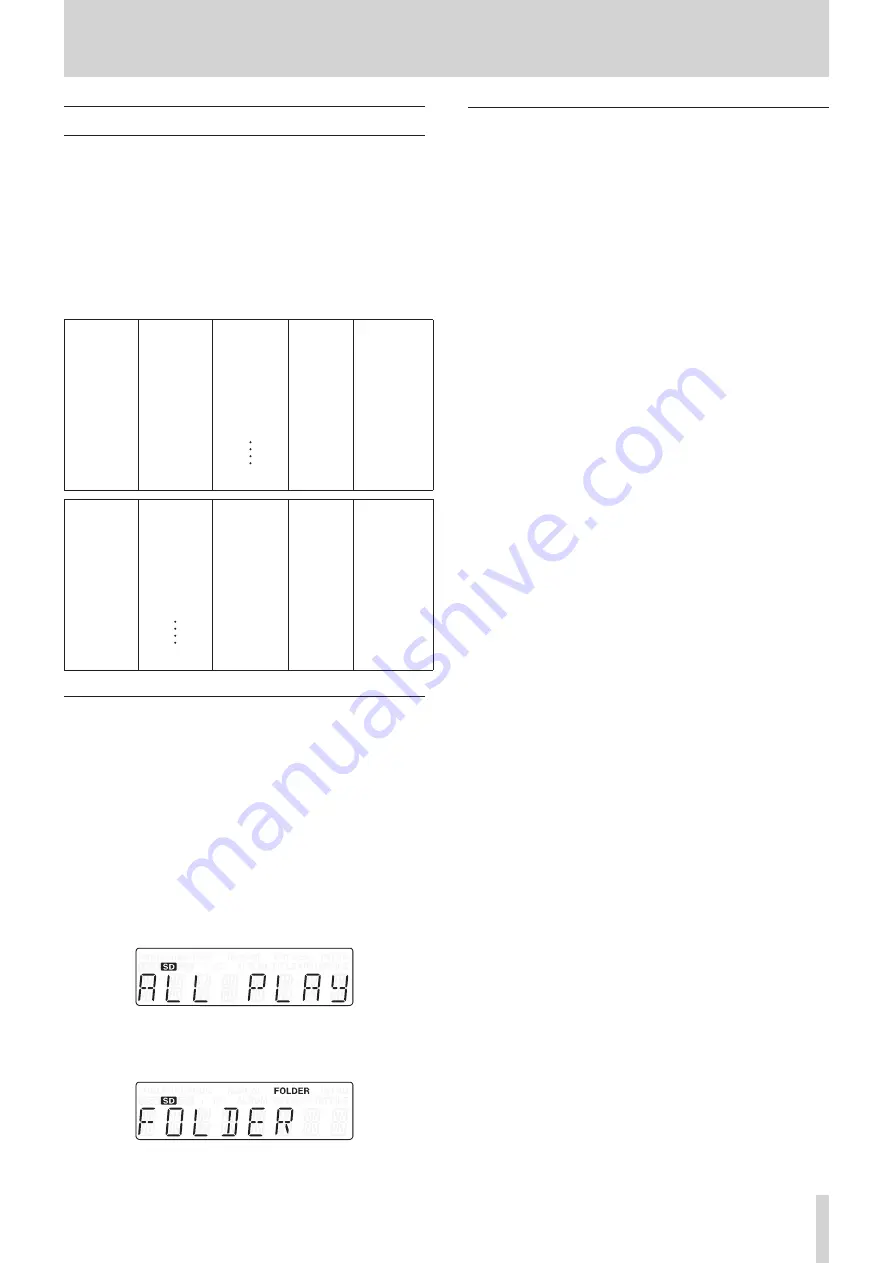
Example of direct folder assignments

Button 1

01_FILE_1-1.wav
02_FILE_1-2.wav
03_FILE_1-3.wav
04_FILE_1-4.wav
05_FILE_1-5.wav
06_FILE_1-6.wav
07_FILE_1-7.wav
08_FILE_1-8.wav
09_FILE_1-9.wav
10_FILE_1-10.wav
11_FILE_1-11.wav
12_FILE_1-12.wav

Button 2

01_FILE_2-1.mp3
02_FILE_2-2.mp3
03_FILE_2-3.mp3
04_FILE_2-4.mp3
05_FILE_2-5.mp3
06_FILE_2-6.mp3
07_FILE_2-7.mp3
08_FILE_2-8.mp3
09_FILE_2-9.mp3
10_FILE_2-10.mp3
11_FILE_2-11.mp3
12_FILE_2-12.mp3

Button 3

01_FILE_3-1.wma
02_FILE_3-2.wma
03_FILE_3-3.wma
04_FILE_3-4.wma
05_FILE_3-5.wma
06_FILE_3-6.wma
07_FILE_3-7.wma
08_FILE_3-8.wma

19_FILE_3-19.wma
20_FILE_3-20.wma

Button 4

No direct folder 

assigned

Button 5

01_FILE_5-1.wav
02_FILE_5-2.wav
03_FILE_5-3.wav
04_FILE_5-4.wav
05_FILE_5-5.wav
06_FILE_5-6.wav
07_FILE_5-7.wav
08_FILE_5-8.wav
09_FILE_5-9.wav
10_FILE_5-10.wav

Button 6

No direct folder 

assigned

Button 7

01_FILE_7-1.3gp
02_FILE_7-2.3gp
03_FILE_7-3.3gp
04_FILE_7-4.3gp
05_FILE_7-5.3gp
06_FILE_7-6.3gp
07_FILE_7-7.3gp
08_FILE_7-8.3gp

23_FILE_7-23.3gp
24_FILE_7-24.3gp

Button 8

No direct folder 

assigned

Button 9

No direct folder 

assigned

Button 10/0

01_FILE_10-1.mp3
02_FILE_10-2.mp3
03_FILE_10-3.mp3
04_FILE_10-4.mp3
05_FILE_10-5.mp3
06_FILE_10-6.mp3
07_FILE_10-7.mp3
08_FILE_10-8.mp3
09_FILE_10-9.mp3
10_FILE_10-10.mp3
11_FILE_10-11.mp3
12_FILE_10-12.mp3

Setting the playback area with direct folders

Direct folders are played back according to the playback area 

setting as follows. Press the main unit PLAY MODE/INTRO 

CHECK [PLAY AREA] button while pressing and holding the 

DISPLAY [SHIFT] button, or press the remote PLAY AREA button 

to set the playback area. (See “Setting the playback area” on 

page 21.)

ALL PLAY

The playback area includes all folders assigned to FOLDER/

TRACK SELECT (1–10/0) buttons (indicators lit). 
For example, after playback of the last track in the folder 

assigned to button 1 (12_FILE_1-12.wav in the illustration 

above) ends, playback continues with the first track in the folder 

assigned to button 2 (01_FILE_2-1.mp3). 

FOLDER (

FOLDER

 appears on display)

The playback area is the folder assigned to the FOLDER/TRACK 

SELECT (1–10/0) button (indicator lit) pushed to start playback. 

Selecting the playback mode with direct 

folders

Direct folders play back according to the playback mode as 

follows. Press the main unit PLAY MODE/INTRO CHECK [PLAY 

AREA] button or the remote PLAY MODE button to select the 

playback mode. (See “Selecting the playback mode” on page 

22.)

Continuous playback mode 

o

  The selected direct folder plays back from its first track to its 

last track. 

For example, if you press button 1, the tracks in the assigned 

folder will be played back from first to last. 

o

  If the playback area is set to 

ALL PLAY

, after the last track 

in a folder plays back, playback of the next direct folder will 

begin. 

For example, after playback of the last track in the folder 

assigned to button 1 (12_FILE_1-12.wav in the illustration 

above) ends, playback continues with the first track in the 

folder assigned to button 2 (01_FILE_2-1.mp3).

o

  If the playback area is set to 

FOLDER

 and the repeat 

playback function is OFF, playback stops after the last track 

plays back. 

For example, after playback of the last track in the folder 

assigned to button 1 (12_FILE_1-12.wav in the illustration 

above) ends, playback stops.

o

  If the playback area is set to 

ALL PLAY

 and the repeat 

playback function is ON, after the last track in the folder 

assigned to the highest-numbered button plays back, 

playback will continue from the direct folder assigned to the 

lowest-numbered button. 

For example, after playback of the last track in the folder 

assigned to button 10/0 (12_FILE_10-12.mp3 in the illus-

tration above) ends, playback continues from the first track 

(01_FILE_1-1.wav) in the folder assigned to button 1

Single playback mode 

o

  The first track in the selected direct folder plays back, and 

then playback stops. 

o

  If you skip tracks during playback, it is possible to move 

to the second and later tracks in the folder. The tracks that 

can be skipped to, however, depend on the playback area 

setting. 

For example, when you skip from the last track in the folder 

assigned to button 1 (12_FILE_1-12.wav in the illustration 

above), if the playback area is set to 

ALL PLAY

, the first track 

in the folder assigned to button 2 (01_FILE_2-1.mp3) will be 

selected. If the playback area is set to 

FOLDER

, the first track 

in the folder assigned to button 1 (01_FILE_1-1.wav) will be 

selected. 

o

  If the repeat playback function is ON, the track that is playing 

will be played back repeatedly. 

Summary of Contents for CD-200SB

Page 1: ...D01174820B CD 200SB CD Solid State Player OWNER S MANUAL...

Page 2: ...erference at his own expense CAUTION Changes or modifications to this equipment not expressly approved by TEAC CORPORATION for compliance could void the user s authority to operate this equipment For...

Page 3: ...feet of the unit before mounting CAUTION Leave 1U of space above the unit for ventilation Allow at least 10 cm 4 in at the rear of the unit for ventilation 1 Read these instructions 2 Keep these inst...

Page 4: ...uid does enter an eye wash it out thor oughly with clean water without rubbing the eye and then consult a doctor immediately If the fluid gets on a person s body or clothing it could cause skin injuri...

Page 5: ...Setting the playback area 21 Playback modes 21 Selecting the playback mode 22 Playback 22 Selecting a track 23 Skipping to the next or previous track 23 Selecting by track number 23 Search forward an...

Page 6: ...Specifications 46 Ratings 46 Output ratings 46 Analog audio output ratings 46 Digital audio output ratings 46 Audio performance 46 Backup memory 46 General 47 Dimensions 47 8 8 For China CD 200SB Pb...

Page 7: ...ubbed copied to SD cards and USB flash drives Direct folder function using the number 1 10 0 buttons on the main unit or the wireless remote control SD card USB flash drive Browse function SD card USB...

Page 8: ...e owners Precautions for placement The operating temperature should be between 5 C and 35 C 41 F and 95 F Make sure that the unit is mounted in a level position for correct operation Do not place any...

Page 9: ...B flash drives that have been written on by a Mac This is an existing problem with Mac system files but it will not affect playback on this unit If the Trash is not emptied on a Mac the open space on...

Page 10: ...e 33 4 CLEAR CLEAR ALL button indicator Use with the direct folder function to clear FOLDER TRACK SELECT 1 10 0 button folder assignments This indicator lights while clearing an assignment See Clearin...

Page 11: ...is pressed the type of information currently displayed is shown for two seconds Press the button again during this time to change the type of infor mation shown The information that can be shown depen...

Page 12: ...equency of this unit s digital output is always 44 1 kHz regardless of the playback media file sampling frequency Digital output is possible when the pitch control function is on with Audio CD or Data...

Page 13: ...s ON 6 Current media indicator This shows the currently selected media type 7 Main display area The track number and time or text information is shown The status of the unit OPEN CLOSE TOC READ etc an...

Page 14: ...function to clear FOLDER TRACK SELECT 1 10 0 button folder assignments See Clearing individual direct folder assignments on page 36 5 AUTO SET button Press to automatically assign folders on the SD ca...

Page 15: ...e 38 i ERASE FOLDER button Press to activate the folder erase mode in which you can erase folders on SD cards and USB flash drives See Erasing folders on page 42 o WAV MP3 button Press when dubbing to...

Page 16: ...device 8 8 Connecting analog audio devices Connect the analog output jacks of this unit to the input jacks of a stereo amplifier mixer recorder or other device with analog inputs NOTE Cables are not...

Page 17: ...trol within the following range Remote Sensor Operation distance Directly in front Within 7 meters 15 left or right Within 7 meters Loading a CD To load a CD press the OPEN CLOSE button on the main un...

Page 18: ...D card etc Doing so could for example cause dubbing to fail data to be lost or sudden loud noises from monitoring equipment which might damage the equipment or harm your hearing 1 Pull the SD card slo...

Page 19: ...t which might damage the equipment or harm your hearing Selecting the playback media Press the MEDIA SELECT button on the main unit or the remote control to select the media played back by the main un...

Page 20: ...se Chinese or other double byte characters can be played back but those characters will be shown as _on the display This unit identifies MP3 and MP2 files by their mp3 and mp2 file extensions This uni...

Page 21: ...setting Tracks on the current media are played back in numerical order NOTE When the current media is a CD SD card or USB flash drive and the playback area is set to FOLDER tracks in the current fold...

Page 22: ...ned off NOTE Immediately after pressing the PLAY MODE INTRO CHECK PLAY AREA button on the main unit or the PLAY MODE button on the remote control the selected mode is shown on the main display area as...

Page 23: ...largest digit To select track 1 Press the 1 button one time To select track 12 Press the 1 button followed by the 2 button 3 Press the PLAY PAUSE button on the main unit or the remote control The sel...

Page 24: ...back random playback will play back all tracks inside the current folder randomly Programmed playback To use programmed playback you must set a program either before or after setting the playback mode...

Page 25: ...ep 01 is shown 2 Use the remote number 1 10 0 buttons or search m SELECT 5 and SELECT b buttons to select a track to set as program step 01 PROG and the track number blink Use the number 1 10 0 button...

Page 26: ...OGRAM EDIT button on the remote control while playback is stopped to activate program setting mode 2 Press and hold the PROGRAM EDIT button until the empty program step where it is possible to add a t...

Page 27: ...ss this button again while this is being shown to change the type of information displayed The types of data that can be shown when changing the display depend on the type and status of the current me...

Page 28: ...l not affect playback on this unit Pitch control with CDs only Using pitch control playback CDs can be played back at a different pitch sound frequency and playback speed Follow the procedures below t...

Page 29: ...check playback press and hold the PLAY MODE INTRO CHECK PLAY AREA button on the main unit or the INTRO CHECK button on the remote to return to ordinary playback mode INTRO disappears from the display...

Page 30: ...s icon appears above the text that shows the audio file name NOTE The folder icon and audio file icon never appear at the same time Requirements for browsing You can only browse the SD card or USB fla...

Page 31: ...a file is selected press the PLAY PAUSE button on the main unit or the remote control to start playback of that file TIP If you enter browse mode during playback the file being played back will be se...

Page 32: ...blems o This file is automatically saved when playback of the media is stopped o If settings are changed when playing back or paused they will be saved automatically when playback is stopped During au...

Page 33: ...write an existing direct folder assignment to change it See Changing individual direct folder assignments on page 34 3 Use the FOLDER g t buttons on the main unit or the remote control to select show...

Page 34: ...ssignments When assigning direct folders indicators light on the main unit FOLDER TRACK SELECT 1 10 0 buttons that already have direct folder assignments To change direct folder assignments you must o...

Page 35: ...ustration above ends playback continues with the first track in the folder assigned to button 2 01_FILE_2 1 mp3 FOLDER FOLDER appears on display The playback area is the folder assigned to the FOLDER...

Page 36: ...k the entire media will begin playing back from the first track o After using the browse function during direct folder playback the file selected using the browse function will begin playing back and...

Page 37: ...SD card is selected and the icon will appear if a USB flash drive is selected NOTE You cannot select media that is not loaded 2 Press the main unit CLEAR CLEAR ALL button while pressing and holding t...

Page 38: ...io of the CD being dubbed is output o SD cards and USB flash drives cannot be played back o Continuous playback mode is used for CD playback regardless of the playback mode setting NOTE Depending on t...

Page 39: ...the USB flash drive the CD will be dubbed to the USB flash drive 3 Press the main unit DUBBING WAV MP3 button while pressing and holding the DISPLAY SHIFT button or press the remote WAV MP3 button to...

Page 40: ...the selected folder of the data CD finishes dubbing FINISHED appears on the display and then the unit returns to the state it was in before dubbing began The folder created at the beginning of dubbin...

Page 41: ...4 GB 8 GB WAV STEREO 16 bit 44 1 kHz 1 34 3 08 6 17 12 35 MP3 STEREO 64 kbps LQ 44 1 kHz 34 42 69 25 138 35 277 29 128 kbps MQ 44 1 kHz 17 21 34 42 69 17 138 44 256 kbps HQ 44 1 kHz 8 40 17 21 34 38 6...

Page 42: ...ons the remote number 1 10 0 buttons and the FOLDER g t buttons on the main unit or the remote control NOTE When the main unit CANCEL indicator is blinking you can press the CANCEL button on the main...

Page 43: ...Do not remove the media TOC READ TOC information is being read WAIT A file is being processed Do not remove the media WRITING Data is being written to the media Do not remove the media Warning message...

Page 44: ...e is not supported or otherwise could not be played Change the disc DISC ERR The TOC or file system could not be read or focus adjustment was not possible Clean or change the disc DRV ERR The CD drive...

Page 45: ...connection to the monitor system again e Check the volume and settings of the amplifier 8 8 There is unwanted noise e Are the connecting cables all properly connected and functioning 8 8 A CD cannot...

Page 46: ...tput Level 4 dBu 1 23 Vrms Maximum Output Level 20 dBu 7 75 Vrms ANALOG OUTPUT UNBALANCED Connector RCA pin jack Output Impedance 200 Reference Output Level 10 dBV 0 32 Vrms Maximum Output Level 6 dBV...

Page 47: ...m 18 94 x 3 72 x 11 73 in Weight 4 7 kg 10 36 lb Operating Temperature 5 to 35 C Inclination of installation 5 or less Dimensions 465mm 481mm 435mm 94 5mm 88mm 76mm 6 5mm 12 5mm 279 1mm 6 4mm Illustra...

Page 48: ...S A de C V http teacmexico net Phone 52 55 5010 6000 R o Churubusco 364 Colonia Del Carmen Delegaci n Coyoac n CP 04100 M xico DF M xico TEAC UK LIMITED http tascam eu Phone 44 8451 302511 Suites 19 2...

Reviews: