14
TASCAM CD-200SB
2 – Names and functions of parts
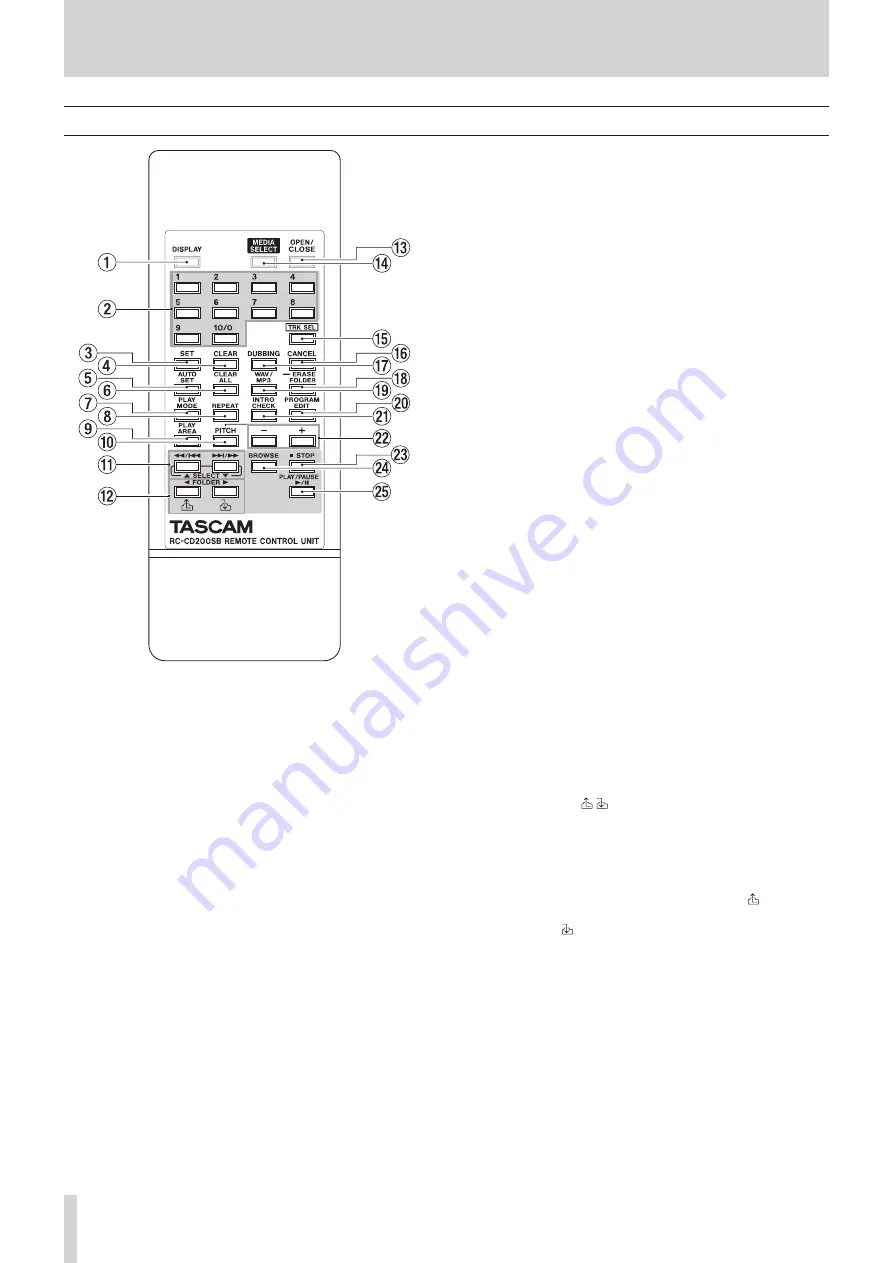
Remote control unit (TASCAM RC-CD200SB)
1
DISPLAY button
Press to change how the time is shown and other infor-
mation. When this button is pressed, the type of information
currently displayed is shown for two seconds. Press the
button again during this time to change the type of infor-
mation shown. The information that can be shown depends
on the type of media and the status of operation. (See “Time
and text information display” on page 27.)
2
Number (1–10/0) buttons
When the TRK SEL indicator on the main unit is not lit, these
buttons can be used for the direct folder function. (See
“Assigning direct folders” on page 32.)
Press the same number button as a lit FOLDER/TRACK
SELECT (1–10/0) indicator on the main unit to begin
playback of the folder that has been assigned using the
direct folder function. During folder playback, that indicator
blinks. (See “Direct folder playback” on page 35.)
When the TRK SEL indicator on the main unit is lit, these
buttons can be used as number (1–10/0) buttons to select
track numbers on the current media. (See “Selecting by track
number” on page 23.)
Track numbers have a maximum of two digits on audio CDs
and a maximum of three digits on data CDs, SD cards and
USB flash drives.
3
SET button
Use with the direct folder function to assign folders on an SD
card or USB flash drive to FOLDER/TRACK SELECT (1–10/0)
buttons. (See “Assigning direct folders” on page 32.)
4
CLEAR button
Use with the direct folder function to clear FOLDER/TRACK
SELECT (1–10/0) button folder assignments. (See “Clearing
individual direct folder assignments” on page 36.)
5
AUTO SET button
Press to automatically assign folders on the SD card/USB
flash drive to the FOLDER/TRACK SELECT (1–10/0) buttons
that have not yet been assigned. (See “Automatically assign
all direct folders (AUTO SET)” on page 33.)
6
CLEAR ALL button
Press to clear all FOLDER/TRACK SELECT (1–10/0) buttons
folder assignments. (See “Clearing all direct folder assign-
ments (CLEAR ALL)” on page 37.)
7
PLAY MODE button
Press to change the playback mode.
The four playback modes are continuous, single, random
and program. (See “Playback modes” on page 21.)
8
REPEAT button
Press to turn the repeat playback function ON/OFF. (See
“Repeat playback” on page 27.)
9
PLAY AREA button
Press to set the playback area during playback of data CDs,
SD cards and USB flash drives to
ALL PLAY
or
FOLDER
. (See
“Setting the playback area” on page 21.)
0
PITCH button
Press this button to turn the CD playback pitch control
function ON/OFF. (See “Pitch control (with CDs only)” on
q
m
/
.
and
/
/
,
, [SELECT
5
/
b
] buttons
Press briefly to select tracks (skip). Press and hold to search a
track.
When in browse mode, use these to change the selection.
(See “5 – Browsing” on page 30.)
w
FOLDER
g
/
t
[ / ] buttons
Use these buttons when the playback area is set to
FOLDER
to change the playback folder. (See “Setting the playback
folder” on page 24.)
Use these buttons when the playback area is set to
ALL
PLAY
to skip between folders.
When in browse mode, press the FOLDER
g
[ ] button to
move to the folder one level higher (parent), and press the
FOLDER
t
[ ] button to enter the currently selected folder.


