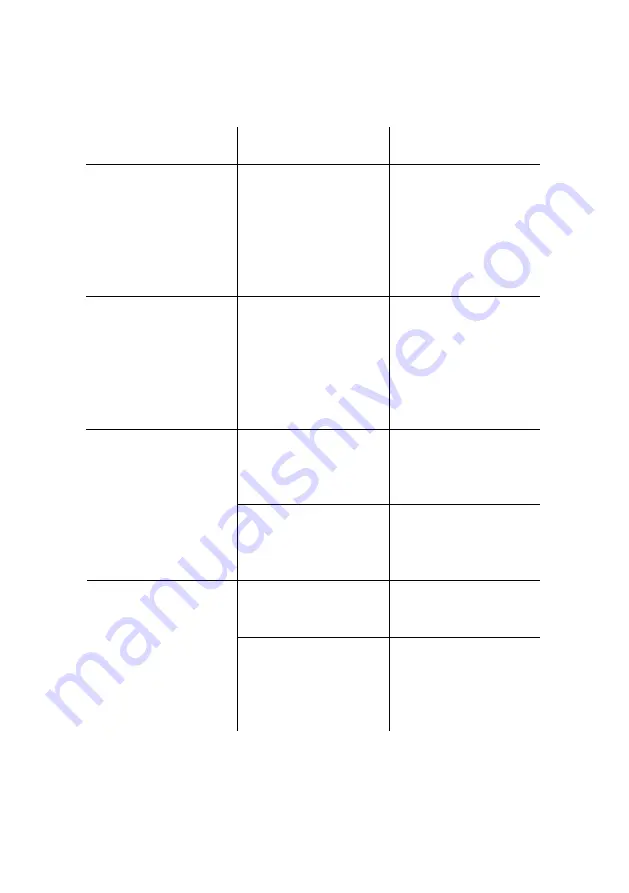
Targetti Chroma-Cue Installation Manual Download Page 14

Troubleshooting 

Problem 

Probable Cause  

Solution 

No response from 
controller when 
on/off button is 
pressed 

Cables reversed 
at power supply 

Verify that patch 
cable from 
controller is 
connected to 
power supply’s 

OUT

 socket 

Dynamic designs 
do not execute 
when a preset 
button is pressed 

Other lighting 
settings have 
been saved in the 
preset memory 

Press and hold 
the preset button 
for about 4 
seconds until the 
controller sounds 
twice 

Interference in 
DMX data line 

Verify that the end 
of the data line is 
terminated 

One or more 
lights has the 
wrong color, 
flashes, or blinks 
randomly 

Data line length or 
fixture limit 
exceeded 

Add a DMX 
splitter/amplifier to 
the data line 

Incorrect fixture 
setup 

Configure 
controller 

Lights do not 
respond to 
controller 

Fixtures 
addressed 
incorrectly 

Verify that fixtures 
are addressed as 
per the 

Fixture 

setup

 dialog 


14 

CHROMA-CUE Installation Guide 

Summary of Contents for Chroma-Cue

Page 1: ...Chroma Cue installation guide WWW TARGETTI COM...

Page 2: ...Dimensions...

Page 3: ...Contents Dimensions 2 Safety Information 4 Introduction 5 Installation 6 Connections 7 Setup 9 Troubleshooting 14 Specifications 15...

Page 4: ...rom AC power and contact Targetti Service for assistance Do not install or use the device outdoors Do not spray with or immerse in water or any other liquid Do not remove any covers or attempt to repa...

Page 5: ...e contents The CHROMA CUE package contains the following items CHROMA CUE Controller 48 V Power over Ethernet POE power supply CD ROM with documentation and Chromatron software 5 m UTP patch cable 1 5...

Page 6: ...up 3 Fasten the bracket to the wall with four suitable screws not included 4 Plug the included 5 m UTP patch cable into the RJ 45 socket on the back of the controller 5 Place the controller on the bra...

Page 7: ...o the power supply all 3 LEDs will light for 2 seconds and then the ON LED will illuminate green The CONNECT LED illuminates green when the controller is connected and receiving power Power supply to...

Page 8: ...ort the signal This is usually accomplished by inserting a suitable 120 ohm termination plug into the DMX output of the last fixture in the line AC power supply cable plug Warning Risk of electric sho...

Page 9: ...e software as follows 1 Place the CD ROM in the drive If autoplay is enabled an installation dialog opens automatically after loading the CD ROM 2 If the installation dialog does not open you must run...

Page 10: ...1 If you have not already done so install the Chromatron software 2 Start Chromatron 3 Connect the CHROMA CUE to any USB port on the computer using the included USB cable Do not connect the controlle...

Page 11: ...ture setup Select Remove all from the dialog menu 8 Add fixtures to the setup Select Add fixture s from the dialog menu Double click the manufacturer name in the Select fixture type dialog then click...

Page 12: ...s and a total of up to 100 lights 11 Optional You can enter names for the fixtures in the Name column to help identify them 12 Optional If you want to save the fixture setup on the computer select Fil...

Page 13: ...saved to the controller Click File in the main window Click Save to device Click Yes at the confirmation prompt 15 The CHROMA CUE is now configured and ready for use Before operation the lights must...

Page 14: ...mory Press and hold the preset button for about 4 seconds until the controller sounds twice Interference in DMX data line Verify that the end of the data line is terminated One or more lights has the...

Page 15: ...wer consumption 2 W Control and programming Control interface DMX 512 Control channels 512 Maximum number of fixture types 10 Maximum number of fixtures 100 Recallable memories presets 4 Connections A...

Reviews: