background image

Connections and settings 

Connecting a digital camcorder 

DRH-5700x  

21 

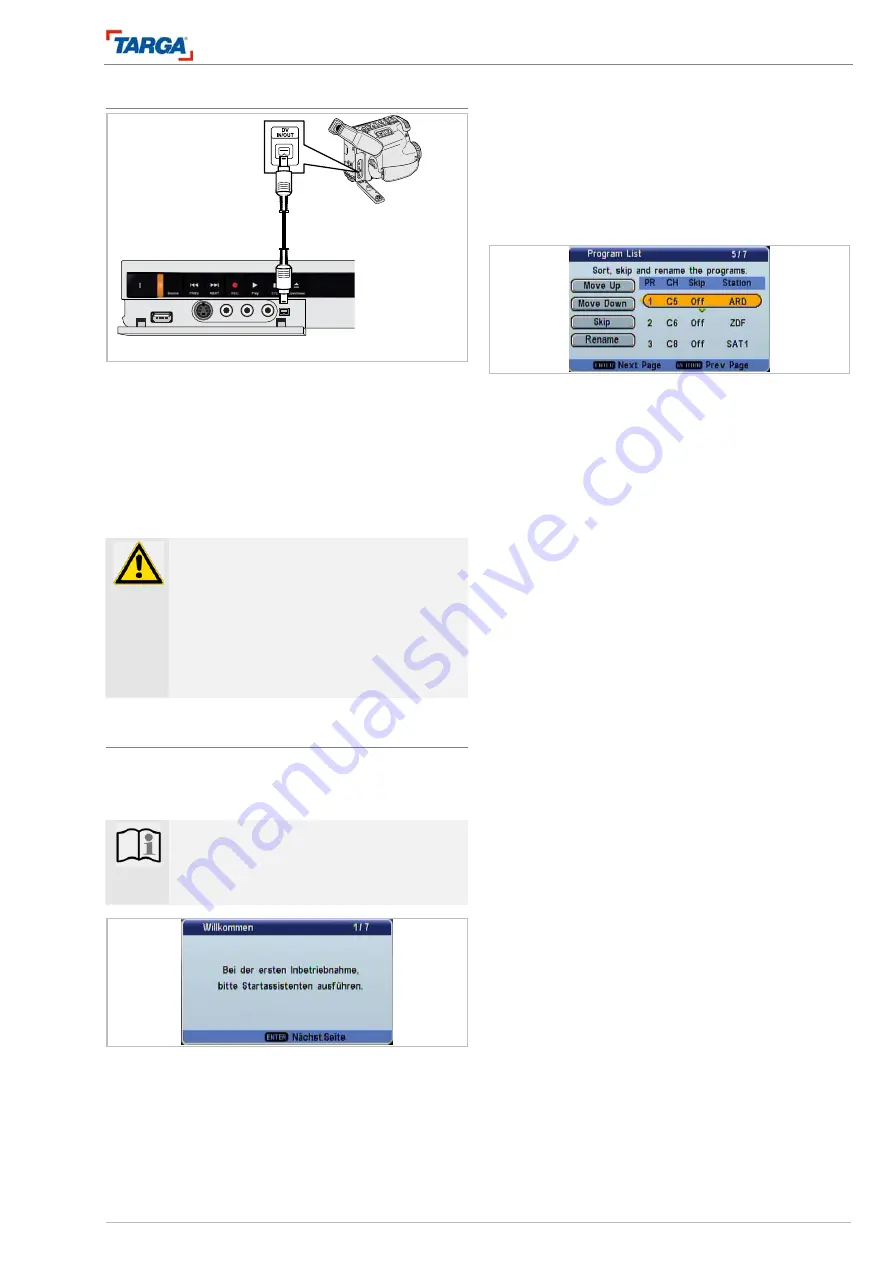
Connecting a digital camcorder 


A digital DV camcorder can be connected to the DV IN 
socket on the control panel in order to copy digital DV 
tape or DVD discs. 

Press the SOURCE button to select the DV source 
(see page 46). 

Use a DV cable (not included in the delivery) to con-
nect the DV input/output socket on the DV camcorder 
to the DV IN socket on the recorder. 


Important! 


This socket is designed exclusively for 
connecting a digital DV camcorder and 
is not compatible with digital satellite re-
ceivers or digital VHS recorders. 


Disconnecting the DV cable while re-
cording from a connected digital cam-
corder can cause malfunctions. 

Automatic setting 

When switching on the unit for the first time or after a 
factory reset, the start-up assistant will help you to set 
the language, country, time and television channels. 


Note 

The automatic time and date setting only 
works if the station search function has 
found at least one station. 


1. Press 

ENTER. 

2. Press 

the 

S

/

T

 buttons to select a language and 

then press ENTER.  

3.  Select a country and then press ENTER. Press 

RETURN to return to the previous screen. 

4.  Please check the antenna socket. 

5.  Press ENTER to start the station search. 


6.  A list of stations appears at the end of the search. 

You can move the stations to the channel posi-
tions of your choice, activate/deactivate or rename 
them (page 22). Then press ENTER. 

7.  Press the numerical buttons or 

S

/

T

/

W

/

X

 to set 

the date and time and then press ENTER. 

The unit is now ready to use. You can now change the 
unit settings in the setup menu to match your own 
personal preferences. 

Summary of Contents for DRH-5700x

Page 1: ...DRH 5700x DVD HDD RECORDER User manual and service information GB IE drh5700x_manualcover_ie_0712 qxp 12 12 2007 16 29 Uhr Seite 1...

Page 2: ...d sound S video 1 CVBS 1 AUDIO signal input 18 Fan The fan provides sufficient ventilation inside the housing Never cover the ventilation openings 19 VIDEO OUT picture VIDEO or S VIDEO signal output a...

Page 3: ...ally from the TV No Designation 46 SETUP Opens the system menu 47 HDD Changes to hard drive mode 48 DVD Changes to DVD mode 49 MUTE Muted sound 50 USB Switches to USB mode MP3 stick card reader 51 53...

Page 4: ...anager opens This area is your private folder on the HDD 4 Press T S to select Picture Audio or Video The data is displayed on the right See page 35 Recording onto DVD hard drive 1 Connect the externa...

Page 5: ...the setup menu 22 Tuner menu 22 Disc menu 23 Playback menu 25 Recording menu 26 Video menu 27 Audio menu 28 System menu 29 General description of the screen menu 30 Playback 30 General playback functi...

Page 6: ...on the unit does not isolate the unit completely from the mains power supply The unit continues to consume electricity in standby mode Pull the plug from the mains so cket to disconnect the unit comp...

Page 7: ...ents public health hazards For more detailed information about disposal of your old appliance please contact your local council office waste disposal service or the shop where you pur chased the produ...

Page 8: ...types listed below DVD RW in VR recording mode DVD RW disc DVD R disc DVD R DL disc DVD video disc Video CDs Audio CDs DivX files MP3 files WMA files JPEG files Disc information Handling discs Never t...

Page 9: ...contents can only be played on DVD RW compatible players once the disc is finalised The name of recording titles chapters can be edited DVD R Digital Video Disc Recordable Data can be recorded onto t...

Page 10: ...be able to play some CD R RW or DVD R RW discs be cause of the recording device used or the actual CD R RW or DVD R RW disc Do not affix stickers or labels to either side of the disc Do not insert CDs...

Page 11: ...der during opera tion Set up the recorder on a solid flat sur face Do not use the recorder in warm or hu mid locations or locations prone to sudden fluctuations in temperature as moisture may condense...

Page 12: ...This unit is compatible with flash USB memory sticks that support USB 1 1 Certain USB memory sticks or memory cards are not supported by this unit Inserting Removing a USB memory stick Inserting a US...

Page 13: ...isc loader Insert the disc here No Designation 11 Display Displays the status of recorder T S Timeshift mode indicator REC A recording is in progress HDD The recorder is in HDD mode DVD The recorder i...

Page 14: ...e DVD title menu 42 DISPLAY Displays the device status and play back information title chapter play time etc 43 TIMER Opens and closes the timer menu 44 VIDEO Enter the VideoPlus code to record auto m...

Page 15: ...EO or S VIDEO signal output analogue for connecting to an S video cable or video cable cinch 20 AUDIO OUT sound 5 1 channel surround sound signal output parallel to the A V amplifier or active speaker...

Page 16: ...ardless of the model of your television or device Only use one of the following connections Before connecting up any equipment read the manuals for the television video recorder stereo system or other...

Page 17: ...20p or 1080i Cables included in the delivery A Stereo cinch cable T Scart cable H HDMI cable V Video cable R Antenna cable Cables not included in the delivery C Component cable S S video cable O Optic...

Page 18: ...mpressed digital video a maximum bandwidth of 5 gigabytes per second a single connection instead of several cables and sockets and communication be tween AV source and AV devices such as digital tele...

Page 19: ...e DTS licence agreement Notes If the receiver does not support the audio format of the digital output the receiver emits a loud dis torted noise or no sound at all Six channel digital surround sound i...

Page 20: ...ODER socket Press the SOURCE button to select SCART see page 46 and play or record a source signal at the SCART IN DECODER socket Tip The recorder does not need to be switched on to play the signals f...

Page 21: ...When switching on the unit for the first time or after a factory reset the start up assistant will help you to set the language country time and television channels Note The automatic time and date se...

Page 22: ...Press ENTER to activate the func tion 5 Press the S T buttons to select and ENTER to activate settings Further steps are required for some options 6 The remote control buttons available for operation...

Page 23: ...MFT Fine channel tuning for a perfect picture Press S T Standard Selects the PAL SECAM or NTSC television system 3 Press ENTER to adopt the settings and return to the Program List menu Country setting...

Page 24: ...te To unfinalise a DVD RW disc insert in the recorder and select Unfinalize from the disc menu You can now edit and record on the disc again You cannot unfinalise DVD R and DVD R discs Finalising is n...

Page 25: ...the preset classification matches the code Note Notes on film approval for children and teenag ers can be found on the DVD case The parental control function can only be used on DVDs that support thi...

Page 26: ...DivX registration code The DivX VOD Video On Demand registration co de for renting and purchasing films is available from the DivX VOD service Visit www divx com vod for more information 1 Select DivX...

Page 27: ...activate the HDMI output If you wish to continue us ing the recorder via a scart cable please do not confirm the query in the message win dow HDMI resolution Select a television resolution to transfer...

Page 28: ...ampli fier IS NOT designed for 96 k signals The unit converts high frequency signals into 48k signals that the system is able to decode 96k Select this setting if your receiver or ampli fier IS design...

Page 29: ...ta copied to the jukebox video pho tos audio data is deleted WARNING Data cannot be recovered once deleted Make a backup DVD of all data copied onto the hard disk before formatting 1 Select the submen...

Page 30: ...r of chapters Time Elapsed play time press the X button to select between the remaining play time total play time and remaining play time in the current chapter Sound audio Selected language DVD VIDEO...

Page 31: ...next chapter track or return to the start of the current chap ter track Press PREV IWW twice in rapid succession to skip to the previous chapter track Tips To skip directly to a chapter during DVD pl...

Page 32: ...press the A B but ton once during playback to set the starting point A and once to set the finishing point B Press the A B button to finish configuring the A B section repeat Note A section must be a...

Page 33: ...numerical buttons to enter the desired start time in hours minutes and seconds from left to right If you make an incorrect entry press W X to move the underscore cursor _ to the incorrect entry and t...

Page 34: ...s S T to select a folder A list of files in the folder appears Press X to access the file list Press W to return to the folder 3 Press S T to select a specific file and then press X A tick appears nex...

Page 35: ...WMA files The recorder can play audio CDs and MP3 WMA files Before playing MP3 WMA files read the section Re quirements for MP3 WMA audio files on the next pa ge 1 HDD Press the JUKEBOX button to pla...

Page 36: ...A CD R format ISO 9660 and JOLIET DVD R RW format ISO 9660 UDF bridge format Maximum number of files discs 1999 total number of files and folders Programmed playback of audio CDs and MP3 WMA files Use...

Page 37: ...s in the play list Rep Group Repeats the group Single Repeats the file Deleting a track from the play list 1 Press the X button to select the title or titles you wish to delete from the play list 2 Pr...

Page 38: ...to exit the menu screen Options in file manager 1 Press S T in the file manager to select a file and then press ENTER The options then appear The displayed options may vary depending on the se lected...

Page 39: ...show Managing MP3 WMA JPEG and DivX files The following descriptions refer to MP3 files but also apply to other file types Note DivX MP3 WMA and JPEG files on a disc cannot be copied or moved to a US...

Page 40: ...oup from the overview and then press ENTER Enter a name and press Finish to confirm The co pying process starts automatically Alternatively select an existing personal directory from the overview and...

Page 41: ...nge the fre quency of these intervals in the Recording Chapter Mark menus Information on recordings The recording time displayed is not exact be cause the recorder uses a video compression technique w...

Page 42: ...ng the current program Skipping to another point in a recording during a timeshift 1 Press the DISPLAY button during the timeshift The Time Shift display appears 2 Press IWW to skip 5 minutes back Pre...

Page 43: ...he screen At the end of the recording the recorder stops and swit ches off Checking the recording time Press DISPLAY to check the recording time The re cording window appears The remaining recording t...

Page 44: ...ly if you enter the right time and date of the program that you wish to record Please note that PDC PDC does not work on every channel Note Stations that use PDC usually display all the relevant PDC i...

Page 45: ...Enter the number of the TV channel Press the ENTER but ton to finish programming 8 The timer recording list appears so that you can check your programs on timer record The display Valid in the timer...

Page 46: ...Note This recorder cannot record from sources that are copy protected by CopyGuard Read the copyright information on page 52 Recording from DV devices Recording from a digital camcorder You can recor...

Page 47: ...the file manager at any time and select another title USB Press the USB button and PLAY to open the file manager 6 HDD You can pause playback by pressing STOP the symbol II appears Press PLAY to re s...

Page 48: ...and back When selecting titles use the buttons W X S T to display the previous next page 3 Press RETURN to exit the title list menu Overview of menu commands Select a title or a chapter and then pres...

Page 49: ...ess ENTER to confirm A deletion confirmation message appears 5 Press W X to select OK and then press ENTER The selected chapter or title is deleted or all titles are deleted An updated menu then appea...

Page 50: ...n to sort lists in the title list menu on the hard disk by date title name or category so that you can locate the title of your choice more quickly 1 Select a title from the title list menu on the har...

Page 51: ...on prevents you from accidentally recording over changing or deleting a title 1 Press MENU PBC to open the title list menu 2 Press S T W X to select a title you wish to pro tect and then press ENTER T...

Page 52: ...nt should be used only for lawful copying and you are advised to check carefully what is lawful copying in the country in which you are making a copy Copying of copy right material such as films or mu...

Page 53: ...TER the menu options are displayed on the left of the screen 2 Press S T to select the option Copy and press ENTER The copying menu opens 3 Press W X to select the copying quality HQ Fast SEP SLP EP L...

Page 54: ...zian 6566 Fijian 7074 Lingala 7678 Sinhalese 8373 Afar 6565 Finnish 7073 Lithuanian 7684 Slovak 8375 Afrikaans 6570 French 7082 Macedonian 7775 Slovenian 8376 Albanian 8381 Friesian 7089 Malagasy 7771...

Page 55: ...ording Recording Quality Determines the quality of DVD and HDD recordings HQ SP LP EP SLP SEP Chapter Mark Sets automatic markers during DVD HDD recordings Video TV Type Television standard Auto NTSC...

Page 56: ...dirty Clean the disc The recorder does not play No disc inserted Insert a disc the disc symbol must ap pear on the display Unplayable disc inserted Insert a playable disc check the disc ty pe colour...

Page 57: ...shed Reprogram the timer Stereo recording and or playback is not possible The television is not stereo compatible No solution The program is not broadcast in stereo No solution The A V output sockets...

Page 58: ...Slide show 39 Thumbnails 38 JUKEBOX 35 Keyboard menu 49 Language 25 Language codes 54 Last memory 25 LP 26 LPCM 28 Maintenance 6 Managing Copying 40 Copying onto USB devices 40 Deleting 39 Hard disk...

Page 59: ...EP mode 683h 24 min SLP mode Video recording format Sampling frequency 27 MHz Compression format MPEG2 Audio recording format Sampling frequency 48 kHz Compression format Dolby Digital Playback Freque...

Page 60: ...GmbH Postfach 2244 D 59482 Soest www targa online com UK 1191514 Important warranty information Dear Customer Thank you for purchasing a TARGA product Please carefully read through the enclosed docum...

Page 61: ...TARGA GmbH Lange Wende 41 D 59494 Soest www targa online com Ready for you www targa online com drh5700x_manualcover_ie_0712 qxp 12 12 2007 16 29 Uhr Seite 3...

Reviews: