


21
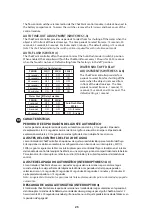
Running Time Range:
Response Time:
Sensing Range:
Power Source:
Low Battery Indicator:
15 seconds - 20 minutes (6 presets selectable)
0.3 seconds
3/4” to 6-11/16” (2-17 cm) from sensor
AC and/or DC
Red LED on
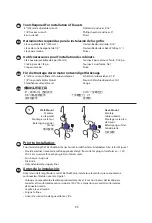
SENSOR RANGE SETUP
The sensor range is preset at the faucet during assembly but can be further adjusted by using the
steps below.
1. The sensing distance is adjustable from ¾” (2cm) to 6 11/16” (17cm). If there is a disruption in
power, the sensor range is saved and will revert to the last setting when power is restored.
2. The faucet sensor range is set by simply using the on/off button on the front of the control
module. Do not attempt to open the control module box.
3. Push and hold the on/off button; water will fl ow. After holding the button 5 to 7 seconds, the
water fl ow will stop and the red LED in the sensor lens will turn on solid.
4. Release the on/off button. The red LED will turn off signaling that the sensor is ready for set-up
for the next 15 seconds.
5. Hold your hand still in front of the sensor at the desired sensor distance. The red LED will fl ash
roughly 5 times then remain on for 2 seconds indicating the new range has been set.
6. If step 5 is not done within 15 seconds, the red LED will blink quickly then stop indicating the
sensor range has NOT been changed. Start over at step 3 to change the sensor range.
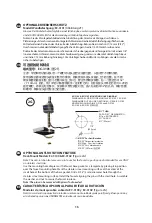
OPERATION
1. Place hands under spout. Water will fl ow for as long as the user’s hands remain within sensor
range and will shut off after 15 seconds (time adjustable).
2. Keep electronic eye cover clean.
3. Red fl ashing in the electronic eye indication low batteries.
(Replacement batteries: Alkaline AA.)
4. Solid red light in the electronic eye and no water fl ow indicated batteries are dead.
5. When used in conjunction with the optional AC adapter, the faucet will automatically switch to
AC power and conserve its battery power.
Fresh alkaline batteries should last 450,000 on/off cycles.
CONFIGURACIÓN DEL RANGO DEL SENSOR
El rango del sensor se ajusta previamente en el grifo durante el ensamblado, pero puede volverlo
a ajustar siguiendo estos pasos.
1. La distancia de detección se puede ajustar desde 2 cm (3/4”) hasta 17 cm (6 11/16”). Si se
presenta una desconexión del suministro eléctrico, se guarda el rango del sensor y regresará al
ajuste previo cuando se restablezca el suministro eléctrico.
2. El rango de detección del grifo se ajusta simplemente con el botón de encendido/apagado ubicado al
frente del módulo de control. No intente abrir la caja del módulo de control.
3. Mantenga presionado el botón de encendido/apagado y el agua fl uirá. Después de mantener
presionado el botón durante 5 a 7 segundos, el fl ujo de agua se detendrá y el LED de color rojo en el
lente del sensor se mantendrá encendido.
4. Suelte el botón de encendido/apagado. El LED de color rojo se apagará para indicar que el sensor
se encuentra listo para la confi guración durante los siguientes 15 segundos.
5. Mantenga fi ja su mano frente al sensor a la distancia de alcance del sensor. El LED de color rojo
parpadeará aproximadamente 5 veces y luego se mantendrá encendido durante 2 segundos
para indicar que se ha confi gurado el rango nuevo.
6. Si no se realiza el paso 5 en 15 segundos, el LED de color rojo parpadeará rápidamente y después
se detendrá para indicar que NO se ha modifi cado el rango del sensor. Comience de nuevo desde
el paso 3 para cambiar el rango del sensor.
FUNCIONAMIENTO
1. Coloque las manos debajo del surtidor. El agua fl uirá mientras las manos del usuario
permanezcan dentro del rango de alcance del sensor y se detendrá después de 15 segundos (el
tiempo se puede ajustar).
2. Mantenga limpia la cubierta del ojo electrónico.
ES
EN
Summary of Contents for ChekPoint EC-3102-HG
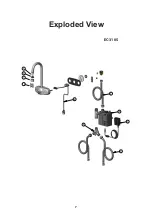
Page 2: ...2 Exploded View EC 3100 4 8 6 7 9 5 3 2 1 10...
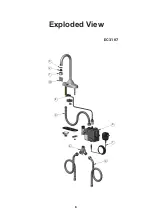
Page 3: ...3 Exploded View EC 3101 4 8 6 7 9 5 3 2 1 10...
Page 4: ...4 2 6 5 7 3 4 1 8 Exploded View EC 3102...
Page 5: ...5 Exploded View EC 3103 2 6 5 7 3 4 1 8...
Page 6: ...6 Exploded View EC 3104 2 6 5 7 3 4 1 8...
Page 7: ...7 Exploded View EC 3105 4 8 6 7 9 5 3 2 1 10...
Page 8: ...8 Exploded View EC 3107...


