Tama STARPHONIC Instruction Manual Download Page 5

Tension Watch TW100

Tension Watch TW200

HOW TO TUNE THE SNARE DRUM

To ensure maximum performance of your snare drum, it must be tuned 
correctly. 
Let’s discuss the optimal tuning method. 
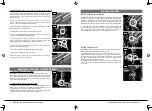
<TENSION ADJUSTMENT>

The standard way to tune a drum head is to tap the head lightly (with a 

finger or a drum key) in front of each tension bolt. As shown in Image 21, 

keep tuning in the order of diagonal lines. If you tighten one spot too much, 

that causes the head tension to be uneven, which makes it difficult to tune 

to balanced tension of the entire head. 

When turning the bolts with a drum key, turn all the tension bolts until you 

begin to feel resistance.  From that point on, give a half or quarter turn to 

each bolt till you get the same pitch from the entire head. To lower the pitch, 

loosen tension bolts more than want and then tighten the bolts to raise the 

tension to obtain a balanced tone. 

Because it is difficult to hear the pitches on specific spots on the head, 

rest fingers on the center of the head to mute when turning the bolts. This 

makes it easier to pick up the pitches close to the tension bolts. 

The shell bottom edge where the snappy snare wires contact are cut more 

deeply than the rest of the edge of the shell. Thus, the bolts adjacent to the 

snare wires require higher tension in order to enhance the response of the 

snare wires. 

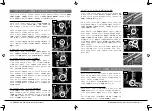
<CHECKING TENSION WITH TENSION WATCH>

For more precise tuning TAMA offers their unique Tension Watch products, 

the TW100 and TW200. They allow tuners to see the degree of tension in 

numbers and help create maximum performance. 

By placing the Tension Watch on the head, you can visually measure the 

tension, which allows easier and faster tuning.

Our snare drums come standard with a REMO Diplomat batter head that is 

set for tension 80, and snare side head set for tension 55. 

<SNARE SIDE HEAD TUNING>

Also, for optimal drum tuning, it is important to balance the batter and snare 

sides. Whenever you tune the batter side make sure you do the same for 

the snare side. 

ご使用になる前に必ずお読みください。

この度は TAMA コンサートスネアドラムをお買い上げ頂き誠にありがとうございます。製品の機能を十分に発揮し、
安全にご使用頂くために、組み立て前に必ず本説明書をお読みください。また本書は大切に保管してください。
TAMA コンサートスネアドラムは、STARPHONIC Bravura シリーズと STARPHONIC シリーズの 2 モデルがラ
インナップされています。それぞれのモデルで調整方法が異なりますので、お持ちのモデルに対応した説明をご覧
ください。

目次

各部名称・・・・・・・・・・・・・・・・・・・・・・・・・・・・・・・9
スネアワイヤーの調整・・・・・・・・・・・・・・・・・・・・・・・・・10-11
スネアワイヤーの交換・・・・・・・・・・・・・・・・・・・・・・・・・12
スネアヘッドの交換・・・・・・・・・・・・・・・・・・・・・・・・・・13
マルチ・スネア・フレームの取り扱い方法・・・・・・・・・・・・・・・・14
チューニングの仕方・・・・・・・・・・・・・・・・・・・・・・・・・・15
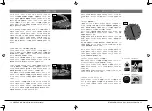
各部名称

[STARPHONIC Bravura モデル ]

[STARPHONIC モデル ]

1

2

3

4

Image21

5

6

9

10

8

7

8

STARPHONIC Snare Drum Instrucion Manual

9

STARPHONIC Snare Drum Instrucion Manual

目次

クローフック

ストレイナー

マルチスネアフレーム

バット

フープ

ファインアジャスター

ハイブリッドスネアワイヤー

ラグ

Summary of Contents for STARPHONIC

Page 1: ...STARPHONIC Concert Snare Drum Instruction Manual ...

Page 2: ...ressure of the snare wires against the snare head is too weak or too strong turn both knobs on the strainer side and the butt side evenly to adjust the height of the wires for your desired position 2 ADJUSTING SNARE WIRE TENSION The Multi Snare Frame can hold full surface contact snare wires with three kinds of materials that create different kinds of sound It allows you to adjust the tension of t...

Page 3: ... turning the knobs all the way there is still no snare wire sound it may be necessary to shorten the snare cords connecting the frame to the shell In order to do this please follow these steps 1 Begin by lifting up the black hooks on the sides of the Multi Snare Frame Image 6 and remove the snare cords 2 Detach the Multi Snare Frame from the snare drum shell 3 Loosen the adjustment knobs on the st...

Page 4: ...justable mechanisms one that tailors the head to wire contact and the other that allows individual tension adjustment of three kinds of wires Each unit comes from Tama manufacturer with three tension adjustment knobs on the strainer side and one knob on the butt side You can choose the positions of the strainer and the butt by removing the frame from the snare drum and turn it around 180 degrees a...

Page 5: ...y than the rest of the edge of the shell Thus the bolts adjacent to the snare wires require higher tension in order to enhance the response of the snare wires CHECKING TENSION WITH TENSION WATCH For more precise tuning TAMA offers their unique Tension Watch products the TW100 and TW200 They allow tuners to see the degree of tension in numbers and help create maximum performance By placing the Tens...

Page 6: ...ができます 上記 2 1 それぞれのスネアワイヤー テンショ ンを調整する の手順にて それぞれのスネアワイヤーのテンションを調整 した後 調整ノブ D を回してテンションバランスを維持したまま 3 本同時 にテンションを調整することができます 10 STARPHONIC Snare Drum Instrucion Manual 11 STARPHONIC Snare Drum Instrucion Manual F スネアワイヤーの調整 STARPHONIC Bravura モデル A B C D 写真 1 写真 2 写真 3 写真 4 写真 5 スネアワイヤーの調整 STARPHONIC モデル E スネアワイヤーのサウンドが得られない場合 ストレイナーをオンにしてもスネアワイヤーのサウンドが得られない場合 は スネアワイヤーがヘッドから離れすぎている可能性があります その場 合 スネ...

Page 7: ...真 13 写真 14 スネアヘッドの交換 STARPHONIC Bravura モデル スターフォニック コンサートスネアドラムでは ドラムヘッドの交換の 際にテンションボルトをフープから抜き取る必要のないフリーダムラグが 採用されています ドラムヘッド交換時には テンションボルトを緩めた後 写真 18 のように フープを固定しているフックごとテンションボルトを斜めに倒し フープ を取り外してください テンションボルトをラグから取り外す必要はあり ません 新しいドラムヘッドに交換した後は再びフープを取り付けて テンション ボルトの先端についたフックをフープの溝にはめ込むように固定します すべてのテンションボルトの取り付けが終わりましたら 通常のスネアド ラムのようにチューニングを行ってください STARPHONIC モデル 1 打面ヘッドの交換 スターフォニック ブラヴーラ コンサートスネ...

Page 8: ...セットすると マルチ スネアフレームを保護するための機能が十分に発揮されないことがありま す これらのテンションボルトは既定の場所以外に使用しないようにして ください マルチスネアフレームは側面 4 か所に スネアコードをひっかけるメタ ルフックと黒いロックレバーが設置されています ロックレバーをオフに してスネアコードを外せば スネアフレーム自体を取り外すことができま す スネアコードを取り外すと再度長さを調整する必要がありますので 必要な時以外はスネアコードを外さないでください 写真 19 写真 20 スネアドラムの性能を十分に引き出すためには正しいチューニングを行う ことが必要です そこでここでは一般的なチューニングの方法を紹介しま す テンション調整の方法 一般的にチューニングは 各テンションボルトの近くのヘッドを指やチュー ニングキーなどで軽く叩き 写真 21 のような対角線の順...

Page 9: ... manual was issued in November 2019 Specifications and design are subject to change without notice この取扱説明書は2019年11 月現在の物です 商品改良のため予告なく仕様を変更するこ とがありますので あらかじめご了承ください 星野楽器株式会社 461 8717 愛知県名古屋市東区橦木町 3 22 http www tama com ...

Reviews: