


F
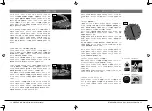
Adjustment of Snare Wires – STARPHONIC Model
Replacing Snare Wires
[STARPHONIC Bravura Model]
STARPHONIC Concert Snare Drums feature Hybrid Snare Wires with two
different materials that provide different kinds of sound.
To replace snare wires, with a drum key, take off the bolts on the cover
plates of both strainer and butt (Image 13-H), and remove the snare wires.
To install new snare wires, fit the end plates on both ends of the wires into
the strainer and butt (Image 14) and then put the cover plates back on
tightening the bolts tight using a drum key.
*The Fine Adjuster is equipped on the strainer side. When replacing snare
wires, make sure to install the Fine Adjuster back onto the strainer side
cover plate.
[STARPHONIC Model]
STARPHONIC Bravura Concert Snare Drums are equipped with three kinds
of snare wires that can be replaced separately. When replacing snare wires,
first switch off the strainer. Then remove the square head bolts on both ends
of the snare wires (Image 11-G) with your drum key and loosen the tension
adjustment knobs on the snare wires and take the wires out the frame itself.
To install new snare wires, place the plates of the snare wires to both ends
on the hooks as seen in Image 12 and connect them with the square head
bolts. Lastly, tighten the three tension adjustment knobs C on the side of
the strainer. Be sure that the snare wires are level to the snare head.
E
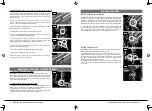
TROUBLE SHOOTING - When you don’t get snare wire sound
If you do not hear the sound of the snare wires when the strainer is on, it is
possible the snare wires are set too far from the head. Continue turning the
adjustment knobs on both the strainer and butt until the snare wires and
head are touching.
If, after turning the knobs all the way, there is still no snare wire sound, it
may be necessary to shorten the snare cords connecting the frame to the
shell. In order to do this please follow these steps:
1. Begin by lifting up the black hooks on the sides of the Multi Snare Frame
(Image 6) and remove the snare cords
2. Detach the Multi Snare Frame from the snare drum shell.
3. Loosen the adjustment knobs on the strainer and butt until you see the
circle marks on the hexagonal shafts (Image 7).
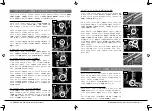
4. Use the provided hexagonal wrench (5mm) to loosen the hexagonal
screws (Image 8-E) to adjust the two snare cords that are fixed on both
strainer and butt sides by pulling them to make them shorter.
5. After making sure that the lengths of each pair of the snare cords are
equal then tighten them both tightly.
6. Then hook the snare cords back onto the Multi Snare Frame
7. Place the black hooks back down. (Image 9)
8. When turning the strainer on, be sure that the Multi Snare Frame is
completely level to the snare side head.
1-1. ADJUSTING WITH THE STRAINER
STARPHONIC Concert Snare Drum model features Hybrid snare wires – A
combination of two different wires, six guitar strings sandwiched with three
nylon coated stainless wires, producing its unique sound. In order to adjust
the tension of the entire snare wires, turn the knobs on the strainer and butt
until you get your desired sound.
1-2. ADJUSTING WITH THE FINE ADJUSTER
In addition to the entire wire adjustment function, STARPHONIC Concert
Snare offers a “Fine Adjuster,” which allows an individual adjustment only of
the 6 guitar strings in the center of the Hybrid Snare Wires.
After adjusting the tension of the entire snare wires, control the tension only
of the middle 6 guitar strings by turning knob F (Image 10).
G
H
Image6
Image7
Image8
Image9
Image10
Image11
Image12
Image13
Image14
4
STARPHONIC Snare Drum Instrucion Manual
5
STARPHONIC Snare Drum Instrucion Manual


