background image

8-16

OPTIONS

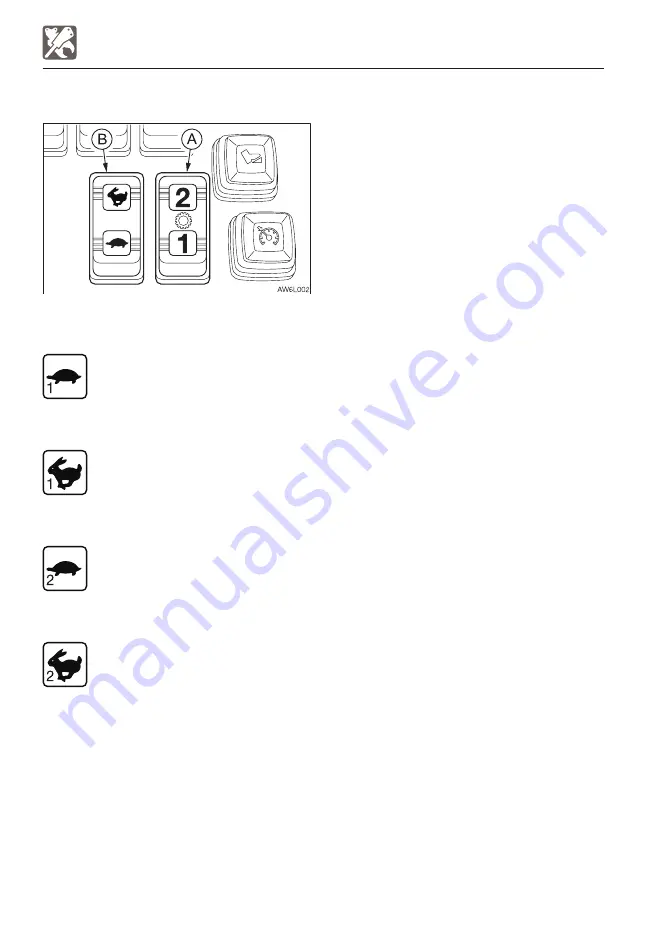
4-SPEED TRAVEL SWITCH

4-SPEED TRAVEL SWITCH

Stop the machine and lock the brake pedal 

before shifting gears between low and high. 

Low-speed travel 1: 0 to 5.1 km/h 

(3.17 mph)

Depress “1” on the switch (A) and 

the “Turtle” symbol on the low/

high-speed travel switch (B).

High-speed travel 1: 0 to 15.2 km/h 

(9.42 mph)

Depress “1” on the switch (A) and 

the “Hare” symbol on the low/

high-speed travel switch (B).

Low speed travel 2: 0 to 9.8 km/h 

(6.09 mph)

Depress “2” on the switch (A) and 

the “Turtle” symbol on the low/

high-speed travel switch (B).

High-speed travel 2: 0 to 29.2 km/h 

(18.14 mph)

Depress “2” on the switch (A) and 

the “Hare” symbol on the low/

high-speed travel switch (B).

Summary of Contents for 190100003

Page 1: ......

Page 2: ...eration inspection and maintenance of this machine can cause injury or death Read and understand this manual before performing any operation inspection or maintenance on this machine Always store this...

Page 3: ...es a hazard with a low level of risk which if not avoided could result in minor moderate injury IMPORTANT The word IMPORTANT is used to alert operators and maintenance personnel about situations which...

Page 4: ...GE COMPARTMENT A compartment for storing this manual is provided at the position shown on the diagram below 1 The storage place is located at the back of the seat 2 After using the manual place it in...

Page 5: ...omounted cab minimizes vibration Low engine noise and exhaust emissions Adopting the larger engine hood and right side cover allows easier maintenance BREAK IN PERIOD When the machine is new operate t...

Page 6: ...s manual may not be applicable to your machine The numbers used in the illustration are with circles around them The same numbers appear between the parentheses in the text Example 1 Symbols used in t...

Page 7: ...1st switches 2 36 Auxiliary 2nd 4th switch If equipped 2 36 Outrigger switches If equipped 2 37 Third auxiliary hydraulic switch and button If equipped 2 37 Auxiliary 2 4 select button If equipped 2...

Page 8: ...4 Fuel and lubricant table 5 4 Regularly replace the hydraulic oil 5 8 List of consumables 5 9 List of tools If equipped 5 10 List of tightening torques 5 11 Safety critical parts 5 12 Maintenance li...

Page 9: ...ng cleaning and checking operation of the engine fuel injectors 5 62 Inspecting and replacing the air filter case for cracking 5 62 Every 4000 hours 5 64 Replacing the hydraulic oil and cleaning the s...

Page 10: ...itching the lever pattern 8 5 Hydraulic breaker 8 6 Cautions on operating 8 6 Replacing the hydraulic oil regularly 8 7 Optional equipment mass 8 8 Biodegradable oil 8 9 Replacing the hydraulic oil wi...

Page 11: ...1 1 SAFETY...

Page 12: ...ol drugs medication fatigue or insufficient sleep GENERAL PRECAUTIONS When a problem is found on the machine If any problem noise vibration smell disorder of instrument smoke oil leak wrong indication...

Page 13: ...n operating the machine Loud prolonged noise can cause hearing impairments even the total loss of hearing GENERAL PRECAUTIONS Install a fire extinguisher and first aid kit Be prepared for fire and acc...

Page 14: ...from the operator s seat to open close the window or remove install the lower window lower the working equipment to the ground raise the safety lock levers to engage the lock and stop the engine If an...

Page 15: ...flammable material are not stored on the machine Handle all solvents and dry chemicals foam type fire extinguisher according to procedures identified on manufacturer s containers Work in a well venti...

Page 16: ...grinding parts containing asbestos For clean up use a vacuum equipped with a high efficiency particulate air filter HEPA Wear the stipulated respirator if there is no other way to control the dust Whe...

Page 17: ...not contacted with other parts before use Do not use attachments that have not been approved by Takeuchi Doing so may compromise safety or adversely affect the machine s operation or service life Tak...

Page 18: ...and vehicles Use a flag person and or a signal Fence off the working area and keep off unauthorized persons When working in water or crossing shallow streams or creeks check the depth of the water the...

Page 19: ...good visibility Adjust the mirror to the best position for the operator to see the rear view blind spot from the operator s seat Wipe off any oil grease mud snow or ice to prevent accidents due to sli...

Page 20: ...Do not bring combustibles or explosives into the operator s compartment After smoking be sure to tightly close the lid of the ashtray to put out the match or cigarette Do not leave the cigarette light...

Page 21: ...cy hammer is installed to be used to escape from the cab in an emergency When escaping break the windows with the hammer When breaking the window pane with a hammer take great care not to injure yours...

Page 22: ...o start the machine by checking the following items Walk around the machine and warn the person who is servicing the machine or is walking near the machine Do not start the machine until you are certa...

Page 23: ...engine and hydraulic oil Check if all gauges and warning devices are properly working Check for any noises Test the engine speed control Operate each control to ensure they are properly working In col...

Page 24: ...the performance limits of the machine Use a signal person at road shoulders narrow places or where your vision is obstructed Never allow anyone to enter the machine s slewing radius and path Signal y...

Page 25: ...move and cause serious injury or death Keep in mind that the steering wheel operation is not possible when the engine is stopped or if the steering pump becomes faulty Before operating the travel ped...

Page 26: ...activates the parking brake and causes the machine to stop suddenly Avoid crossing over obstacles whenever possible If you must do so keep the hoe attachment close to the ground level and travel slow...

Page 27: ...2 in above the ground When climbing a steep slope extend the hoe attachment to the front In emergencies lower the bucket to the ground and stop the machine When traveling on slopes or grades travel sl...

Page 28: ...Be careful not to drive beyond the road shoulder or to get trapped in a snow drift With frozen ground surfaces the ground becomes soft when the temperature rises and this may cause the machine to tip...

Page 29: ...th Always maintain a safe distance between the machine and the high voltage electric cable Check with the local power company about safe operating procedure before starting operations Consider all cab...

Page 30: ...cliff or road shoulder and the dozer blade to the front so that it is easier to escape in case of an emergency Do not enter areas where there is soft ground Doing so could cause the machine to tilt u...

Page 31: ...form demolition above your head There is a hazard of broken parts falling or of the building collapsing and causing serious injury or damage PRECAUTIONS WHEN OPERATING Do not use the impact force of t...

Page 32: ...machine can tip over more easily in the lateral direction than in the longitudinal direction Do not slew sideways with a heavy load at the tip of the hoe attachment In particular do not slew sideways...

Page 33: ...ditions They include soft or uneven ground non level condition side loads dynamic or jerked loads hazardous conditions and experience of personnel The operator and other personnel should fully acquain...

Page 34: ...tractive force Do not use a wire rope that is kinked twisted or otherwise damaged Do not apply heavy loads abruptly to the wire rope Wear safety gloves when handling the wire rope Make sure there is a...

Page 35: ...ound When replacing the attachment or performing the inspection and maintenance on it follow the procedure Releasing the residual pressure from the working equipment circuit described below as necessa...

Page 36: ...bed and loading ramps clean of oil soil ice snow and other materials to prevent the machine from sliding sideways Clean the tires too Chock the transporter wheels to prevent movement Turn off the dec...

Page 37: ...Do not hoist the machine with an operator on it When hoisting hoist slowly so that the machine does not tip Keep everyone out of the area when hoisting Do not move the machine over the heads of the p...

Page 38: ...tools Do not use damaged or weakened tools or tools designed for other purposes Use tools appropriate for the work involved Replace safety critical parts periodically Replace fuel hoses periodically F...

Page 39: ...cuits or malfunctions Do not use water or steam to wash the battery electronic control components sensors connectors or the operator s compartment AG7A068 AG7A070 Precautions on working on top of the...

Page 40: ...t always use wood blocks jack stands or other rigid and stable supports Never get under the machine or working equipment if they are not sufficiently supported This procedure is especially important w...

Page 41: ...bject AG7A078 Cautions when refueling Do not smoke or permit open flames while fueling or near fueling operations Never remove the fuel cap or add fuel when the engine is running or still hot Do not s...

Page 42: ...n loosening the cap or plug Working on the machine under these conditions could result in burns or injuries due to the hot oil spurting out The DPD and the exhaust gas emitted from the exhaust line ca...

Page 43: ...em Immediately after the engine is stopped and while the safety lock lever is in the unlock position turn the starter switch to ON and move all the control levers pedals and auxiliary hydraulic switch...

Page 44: ...im is damaged Replace the tire with a new one if there is a portion with no grooves A rise in tire pressure during operation is normal and should NOT be reduced When putting air in a tire do so from a...

Page 45: ...umulator Be sure to handle the high pressure nitrogen gas enclosed in the accumulator with care If handled incorrectly it could explode and cause serious injury Strictly observe the following precauti...

Page 46: ...engine by turning off the starter switch before inspecting or handling the battery Be careful not to let metal tools or any metal objects come into contact with the battery terminals and cause a short...

Page 47: ...ON MAINTENANCE Jump starting with booster cables When starting the engine using the booster cables be sure to connect the cables in the proper order described below Wrongly connected cables can resul...

Page 48: ...TENANCE Vibrations operators are subject to According to the results of the tests conducted to determine the vibrations transmitted to the operator by the machine the upper limbs are subjected to vibr...

Page 49: ...y signs Review these signs and the operating instructions in this manual with your machine operators Keep the signs clean and legible If any of the safety labels is peeling or damaged and becomes diff...

Page 50: ...1 40 SAFETY SAFETY SIGNS DECALS...

Page 51: ...1 41 SAFETY SAFETY SIGNS DECALS...

Page 52: ...1 42 SAFETY SAFETY SIGNS DECALS...

Page 53: ...2 1 CONTROLS...

Page 54: ...c oil tank Undercarriage 6 Tire 7 Ram lock cylinder 8 Steering device 9 Hub 10 Chassis Working equipment 11 Dozer blade 12 Blade cylinder 13 Bucket 14 Bucket cylinder 15 Arm 16 Arm cylinder 17 Boom 18...

Page 55: ...20 Tilt steering lever NAMES OF COMPONENTS 21 Boom swing Second boom pedal 22 Auxiliary 2nd 4th switch 23 Third auxiliary hydraulic button 24 Third auxiliary hydraulic switch 25 Radio 26 Aux 2 4 selec...

Page 56: ...ical system or window washer open this cover The fuel supply pump is stored under the cover 1 Insert the starter key and turn it counterclockwise to unlock the right side cover 1 2 Push in the key hol...

Page 57: ...place with the engine turned off Clean up spilled fuel immediately Do not fill the fuel tank to capacity Allow room for oil expansion Securely tighten the fuel filler cap Opening 1 Insert the starter...

Page 58: ...rt the starter key and turn it counterclockwise to unlock the engine hood 1 2 Push in the key hole with your thumb and open the engine hood 1 Closing 1 Close the engine hood 1 and press down the edge...

Page 59: ...achine and while in operation Locking and unlocking CAB Insert the starter key and turn it Opening 1 Pull the knob 1 towards you and open the door To open the door from inside the cab push the lever 2...

Page 60: ...right handles 1 and press the knobs 2 with your thumb to release the lock 4 Pull the front window 3 toward you and lift while doing so 5 Release your thumb from the knobs 2 and then lift the front wi...

Page 61: ...7 unlock it and open the side window 2 To close the side window close it until a click is heard EMERGENCY HAMMER OPTIONAL An emergency hammer is installed to be used to escape from the cab in an emer...

Page 62: ...force Release the lever 1 at the desired angle to secure the backrest B Fore and aft adjustment 1 Pull up the lever 2 and slide the seat backward or forward to the desired position for operation of ma...

Page 63: ...ck if the belt is securely locked by pulling it and arrange the belt around your waist Releasing the seat belt 1 Grasp the tongue plate A and press the button C on the buckle B The seat belt retracts...

Page 64: ...s the lumber of the backrest to curve outwards 2 Turning the knob 1 further removes the curve and returns the seat to its original position B Adjusting the backrest angle 1 Sit up and sit back in the...

Page 65: ...e to set the absorber to the soft position 1 when performing the height adjustment IMPORTANT Do not operate the lever 5 compressor for one minute or more Doing so will cause compressor failure To prot...

Page 66: ...sting fore and aft 1 Pull up the lever 8 and slide the seat backward or forward to the optimum position for operation 2 Release the lever 8 at the optimum position to secure the seat Adjustment range...

Page 67: ...ater over an extended period of time may cause burns People feeling ill or having sensitive skin in particular should be careful not to do so Do not use it with a blanket or cushion placed on the seat...

Page 68: ...actual operation if a warning is given or any function is selected the corresponding symbol appears enlarged at the center of the display for approx one second When the starter switch is set to ON th...

Page 69: ...normally low while the engine is running 4 Water separator warning lamp This lamp flashes if the water is detected within the water separator while the starter switch is in the ON position 5 Coolant t...

Page 70: ...urns on when the travel pedal button is pressed The engine RPM can be controlled with the travel pedal while this lamp is on Travel pedal mode Auto cruise is on This lamp turns on when the auto cruise...

Page 71: ...ow Orange Water temperature is too high Blue Water temperature is too low Fuel temperature is too high 16 DPD manual regeneration under way regeneration promoting DPD manual regeneration error indicat...

Page 72: ...0517 or later Traveling mode Digging mode Traveling mode The icon representing traveling is displayed To enter the traveling mode set the creeping travel switch to OFF and release the brake pedal lock...

Page 73: ...lamp Auxiliary 1st auto tank is selected Auxiliary 1st one way is selected No display Two way two way circuit is selected 26 Attachment lock indicator lamp This lamp lights to indicate that the opera...

Page 74: ...ronment The lift load factor is displayed if there is no change in the throttle opening position for five seconds after the lift alarm switch is turned on The throttle opening position is displayed if...

Page 75: ...Hour meter Trip meter Hour meter Displays the total engine running time in hours The rightmost digit indicates tenths of hours 6 minutes Set the inspection and maintenance intervals according to the...

Page 76: ...eter symbol is displayed in the initial screen Pressing this key changes the meter display in the following order Engine load factor Throttle opening position Lift load factor PM accumulation amount U...

Page 77: ...2 25 MEMO...

Page 78: ...ry 1st flow rate setting 4 Auxiliary 2nd 4th flow rate setting 5 Date and time setting 6 Data display 7 Error code display 8 LCD setting Move the cursor with the Up or Down key to go to the desired it...

Page 79: ...the cursor 2 AUXILIARY LINE FLOW RATE DISPLAY Displays the flow rate of the Auxiliary 1st 2nd and 4th The flow rate cannot be changed 3 AUXILIARY 1ST FLOW RATE SETTING Three flow rate patterns can be...

Page 80: ...ration To move the cursor in the direction of the arrow use the Down key To move the cursor in the opposite direction of the arrow use the Up key Pressing the Enter key while the cursor is at Select A...

Page 81: ...change the format of Year Month Date to Date Month Year or Month Date Year Refer to the trip meter setting for the key operation 6 DATA DISPLAY Display items Engine RPM Coolant temperature Hydraulic o...

Page 82: ...f mode day or night The brightness of the LCD is set to between 0 and 100 The brightness changes each time the adjustment is made Day mode initial setting value is 50 Night mode initial setting value...

Page 83: ...ITCHING IMAGES Changing the background color day night When one of the items head light signal light working light high beam switch is turned on the background will always be night mode in any screen...

Page 84: ...el gear from high speed travel to low speed travel It is possible to switch from the low speed travel Turtle to the high speed travel Hare while traveling However switching from the high speed travel...

Page 85: ...omatically activated when the power is turned off 8 Auto cruise button cruise control Do not use this button on the following roads Heavy traffic roads where a safe spacing between vehicles cannot be...

Page 86: ...ment is functional When the coolant temperature is too low the engine is automatically preheated START Position for starting the engine When the key is released the switch automatically returns to the...

Page 87: ...e controller For safety reasons it is designed that the deceleration function is activated to set the engine revolutions to low idling whenever the engine is started Cancel the deceleration mode by pr...

Page 88: ...hydraulic lines A Hydraulic oil flows to the left auxiliary line a B Hydraulic oil flows to the right auxiliary line b Refer to Auxiliary hydraulic lines If equipped on pages 2 64 to 2 68 AUXILIARY 2N...

Page 89: ...dangerous situation Be sure to lock the suspension only when working with the machine Lock the suspension of the front axle wobbling with this switch to prevent the cylinder from moving A C AU TO TE...

Page 90: ...l regeneration inhibit select switch to burn the particulate matter PM when the DPD manual regeneration lamp flashes and an alarm sounds If the machine continues to be operated without performing the...

Page 91: ...e the machine engine is warm rather than cold Note that the manual regeneration does not start unless the coolant temperature is higher than a set value The coolant temperature may increase while manu...

Page 92: ...the neutral position before operating this select switch This switch is used to select either the boom swing operation or the second boom operation When the second boom symbol side of the switch is p...

Page 93: ...se the speed to return to the original engine speed Switching from the deceleration button to the auto deceleration switch will first return to the engine speed set with the throttle controller Then t...

Page 94: ...he overload is not removed after the overload warning horn is sounded the machine may tip over If the horn starts sounding stop operating the machine and lighten the load If a weight greater than the...

Page 95: ...EQUIPPED Pressing this switch while the starter switch is turned on will temporarily lock the differential gear increasing the control capability of the machine over bad roads OFF Unlocked ON Locked...

Page 96: ...evice is for locking the operations of hoe attachment slewing auxiliary hydraulic circuits dozer blade outriggers and traveling When the lever is raised the lever stand springs up to lock the lever SL...

Page 97: ...rking For Germany The machines for the German market are equipped with the emergency steering wheel function which allows steering wheel operation even if the engine is stopped Note that compared to a...

Page 98: ...ate a brake arrow indicates the depression The pedal 1 can be locked by fully depressing it Press on the Release lever 2 to release the lock Locking the brake pedal will cause the machine to enter the...

Page 99: ...lear of any person BOOM SWING SECOND BOOM PEDAL Use this pedal to drive the machine and to control the travel speed This pedal can also be used to control the engine RPM if the travel pedal button has...

Page 100: ...ting the dozer blade and Operating the outriggers If equipped on page 3 17 OPERATING LEVERS Before starting operation carefully check which lever pattern you are going to use It is described using the...

Page 101: ...he air conditioner off or turn the temperature control dial clockwise to increase the internal temperature Mist may blow out of the air outlets This is not a malfunction When moist air passes through...

Page 102: ...2 50 CONTROLS ACCESSORIES NAMES OF COMPONENTS 1 Defroster 2 Condenser 3 Receiver dryer 4 Outlets 5 Compressor 6 Air conditioner unit 7 Circulation filter 8 Ventilation filter...

Page 103: ...sing this switch will turn off the displays of set temperature fan speed and AUTO on the LCD 7 indicating that the operation has been turned off 2 Fan switch Use this switch to select one of the six f...

Page 104: ...utomatic operation procedure 1 Press the AUTO switch 5 to display the settings of temperature fan speed AUTO and air outlet mode on the LCD 7 2 Use the TEMP switch 3 to set the desired temperature To...

Page 105: ...r conditioner The will come on to indicate it has been turned on Press the switch 8 again to turn off the air conditioner The will go out Note that the fan must be operating at the time the A C switch...

Page 106: ...n 18 0 and 25 0 C 64 and 77 F 5 Use the fan switch 2 to set the desired fan speed 6 Press the Ventilation switch 6 to select Ventilation Select Circulation if the outside air is dirty QUICK COOLING 1...

Page 107: ...MP switch 3 to set to 32 0 C 90 F for maximum defrosting efficiency 4 Use the fan switch 2 to set the fan speed to High 5 Press the Ventilation switch 6 to select Ventilation 6 Arrange the louvers of...

Page 108: ...e outlet sensor E43 Air outlet damper error E44 Air mix damper error E51 Coolant high low pressure error In case of multiple errors press either the or button of the TEMP switch 3 to view the codes in...

Page 109: ...the cup holder in counterclockwise Warm or cool wind blows from the bottom of the cup holder INTERIOR LIGHT IMPORTANT The battery capacity decreases if the interior light is left on for a long time wh...

Page 110: ...up the lighter and could be dangerous If the lighter knob does not pop out 30 seconds after it was pushed in it may be broken Pull it out by hand Do not use any other cigarette lighters than Takeuchi...

Page 111: ...Check the left side rear view 3 Check the rear view 4 Check the blind spot in the rear of the machine 24 V EXTERNAL POWER SOCKETS Use only those electric products which comply with the specifications...

Page 112: ...d the operation mode 3 Display button DISP Pressing this button while the frequency is displayed on the LCD changes the display to the clock Pressing the button again returns to the frequency If the b...

Page 113: ...Auxiliary input jack AUX IN Use this jack to connect an external audio source such as a portable music player Pull off the rubber cap and connect the output terminal headphone jack of the portable pl...

Page 114: ...ations stored will be cleared cancelled by the auto storing If the station stored in the preset button is not desirable try to preset the station manually ACCESSORIES Auxiliary input AUX Connect a por...

Page 115: ...turning off by itself SU mode The volume at power off is retained FI mode The volume at power off is reset ACCESSORIES SPECIFICATIONS Power source 12 24 VDC negative ground Maximum power consumption...

Page 116: ...several times to release the pressure from the auxiliary hydraulic circuit Press the air breather button to relieve the tank pressure When disconnecting hoses stand to the side and loosen them slowly...

Page 117: ...When connecting is complete purge air from the hydraulic lines a Start the engine and run it at a low idle speed with no load for 10 minutes b With the engine running in low idle operate the auxiliary...

Page 118: ...ary hydraulic circuits have been used pressure remains in the circuits This is called the residual pressure Release this residual pressure before disconnecting the lines Perform the residual pressure...

Page 119: ...the pressure in the e side to increase and to prevent the pin inserted on the bucket from coming out If the pressure in the e side drops the alert that the bucket may come out is indicated by the war...

Page 120: ...is button is used to switch the operation between the second auxiliary and the fourth auxiliary Pressing this button while the second auxiliary symbol is displayed on the LCD will switch to the fourth...

Page 121: ...ration Release the residual pressure as necessary by using the following steps Perform the residual pressure releasing within 10 minutes after the engine stopping 1 Return the throttle controller to i...

Page 122: ...not disassemble it and or replace or adjust its internal part Takeuchi shall not be held responsible for any injuries accidents or product malfunction caused by disassembly The emergency shut off valv...

Page 123: ...gency shut off valve may be activated If the horn starts sounding stop operating the machine and lighten the load If a weight greater than the lifting capacity is applied or lifted the overload warnin...

Page 124: ...Left outrigger operation R Right outrigger operation Operation The outrigger operation is done by the blade lever A Outriggers Raise B Outriggers Lower Stoppers When traveling on a public road retract...

Page 125: ...nly use the fuel supply pump for diesel fuel This device automatically supplies fuel to the fuel tank and stops automatically when the fuel tank is full 1 Open the right side cover 2 Insert the pump s...

Page 126: ...2 74...

Page 127: ...3 1 OPERATION...

Page 128: ...steps holding the handrail to support your weight in a three point secure stance hand and feet Never use the safety lock lever or control levers as hand holds WALK AROUND INSPECTION Perform the walk...

Page 129: ...pections All warning lamps flash and an alarm is sounded for two seconds The meters also start functioning After two seconds the deceleration lamp 3 stops flashing and remains lit while the battery ch...

Page 130: ...ated to set the engine revolutions to low idling whenever the engine is started Cancel the deceleration mode by pressing the deceleration button as necessary 4 Warm up the engine Refer to Warming up t...

Page 131: ...TOPPING THE ENGINE IMPORTANT Do not stop the engine suddenly when operating with heavy loads or at the maximum speed Doing so may cause the engine to overheat or seize Never stop running the engine su...

Page 132: ...g the ISO pattern in this manual OPERATING THE MACHINE Brake Forward Travel Reverse Travel Arm Out Boom Lower Arm In Boom Raise Upperstructure Slew Left Bucket Load Upperstructure Slew Right Bucket Du...

Page 133: ...ISO pattern in this manual Brake Forward Travel Reverse Travel Boom Lower Arm Out Boom Raise Arm In Upperstructure Slew Left Bucket Load Upperstructure Slew Right Bucket Dump Boom Swing Left Second Bo...

Page 134: ...he hydraulic oil temperature is below 20 C 68 F The proper hydraulic oil temperature during operation is 50 to 80 C 122 to 176 F If operations must be performed at lower temperatures heat up the hydra...

Page 135: ...e 6 Travel slowly forward and in reverse several times 2 Set the bucket cylinder at the stroke end and keep it there Do not keep this condition for more than 30 seconds 3 Repeat Step 2 until the bucke...

Page 136: ...heck that the operating and travel levers are locked TRAVELING THE MACHINE Before traveling set the machine to the travel posture Refer to Preparing for travel for further details When traveling on a...

Page 137: ...Do not raise the safety lock lever or turn the starter switch to the OFF position while traveling Doing so is dangerous because it activates the parking brake and causes the machine to stop suddenly...

Page 138: ...these switches turned on the engine speed may increase causing the machine to travel unexpectedly rapidly for machines with the deceleration and auto deceleration switches When traveling on a road kno...

Page 139: ...n to disengage the ram lock 4 Press the travel pedal button 1 while the brake pedal is depressed When entering the foot accelerator mode 5 Press the attachment lock button 2 to lock the working equipm...

Page 140: ...vel pedal Turning When the steering device is in front of the operator s seat To turn forward to the right Press the travel select button F and turn the steering wheel to the right To turn backward to...

Page 141: ...he brake pedal all the way down to lock it OPERATING THE WORKING EQUIPMENT Before starting operation carefully check which lever pattern you are going to use It is described using the ISO pattern in t...

Page 142: ...ower Tilt the right operating lever forward Boom raise Tilt the right operating lever backward Bucket load Tilt the right operating lever to the left Bucket dump Tilt the right operating lever to the...

Page 143: ...he pedal For machines with outriggers select the dozer blade operation with the outrigger switch Dozer blade lower Tilt the blade lever forward Dozer blade raise Tilt the blade lever backward Operatin...

Page 144: ...tion or leveling using slew force OPERATING PROCEDURES Do not demolish walls or level ground using slew force Also do not dig the bucket teeth into the ground during slewing Doing so will damage the h...

Page 145: ...d base rock break the rock up into small pieces with a breaker etc before digging This prevents damage to the machine and is thus more economical in the end Caution on exposing the dozer blade to shoc...

Page 146: ...dozer blade Operate with the dozer blade at the rear whenever possible Caution on folding the hoe attachment Be careful not to let the bucket hit the dozer blade when the hoe attachment is being fold...

Page 147: ...t load on the machine body and may cause damage to it Avoid crossing over obstacles whenever possible If you must do so keep the hoe attachment near the ground travel at a low speed and go over the ob...

Page 148: ...ding a slope slow down the engine speed Do not travel at speeds of over 20 km h 12 4 mph on long down slopes Release the travel pedal from time to time to protect the travel motor and ensure travel st...

Page 149: ...he engine stops If the engine stops when descending a slope depress the brake pedal to stop the machine use the bucket to anchor the machine to the ground and then start the engine Do not open close t...

Page 150: ...to an angle of 90 to 110 3 Press the bottom of the bucket not the teeth against the ground to raise the stuck tires 4 Place a plank or the like under the raised tires 5 Lift the bucket and slowly move...

Page 151: ...d set the tires parallel to the ditch to be dug for greater efficiency When digging wide ditches dig the sides first and then dig the center Loading When loading dirt onto a truck bed load from the ba...

Page 152: ...eplacing the attachment or performing the inspection and maintenance on it follow the procedure Releasing the residual pressure from the working equipment circuit described below as necessary 4 Raise...

Page 153: ...and undercarriage If any irregularities are found repair 2 Fill up the fuel tank Refer to Inspecting the fuel level on page 5 21 3 Remove any paper scraps or dirt from the engine room 4 Remove any mud...

Page 154: ...nd making it impossible for the machine to move Remove all mud and water from the machine body In particular wipe the hydraulic cylinder rod clean to prevent damage to the seal caused by mud or dirt o...

Page 155: ...3 29 MEMO...

Page 156: ...there are many boulders may cause the stones to get caught and damage the tires or make the tires come off Do not use the machine on the seashore The salt may corrode the metal wheels Do not let fuel...

Page 157: ...he tires to strong shocks Salt potassium chloride ammonium sulfate potassium sulfate and triple superphosphate can damage the tires If any of these substances gets on the tires wash if off thoroughly...

Page 158: ...3 32...

Page 159: ...4 1 TRANSPORT...

Page 160: ...is operated on such roads with these switches turned on the engine speed may increase causing the machine to travel unexpectedly rapidly for machines with the deceleration and auto deceleration switc...

Page 161: ...ve the machine straight toward the ramps and go up or down the ramps slowly in low gear by following the signal from the signal person 8 Load the machine at the specified position on the transporter R...

Page 162: ...f the persons IMPORTANT This hoisting method applies to machines with standard specifications The center of gravity differs according to the attachments and optional equipment installed Contact your T...

Page 163: ...4 5 TRANSPORT Hoisting posture HOISTING THE MACHINE...

Page 164: ...ne remove the starter key and lock all locks 5 Lock the slew and the boom swing with the slew swing lock pin 6 Place the stoppers chocks in front of and behind the tires 7 Install chains or wire rope...

Page 165: ...achine is to be transported complete by sea for example the special tie bar provided by the manufacturer is to be used For enquiries contact the manufacturer Precautions for transportation by low load...

Page 166: ...4 8...

Page 167: ...5 1 MAINTENANCE...

Page 168: ...maintenance works than those listed in this manual For works not listed in this manual ask your sales or a service dealer for help Keep the machine clean Clean the machine before performing inspectio...

Page 169: ...disposing of harmful objects such as oil fuel cooling water coolant filters and batteries Check after maintenance Gradually increase the engine speed from a low idle to maximum speed and check that t...

Page 170: ...o be changed replace the whole fuel oil Fuel Diesel fuel specifications Diesel fuel should comply with the following specifications The table lists several worldwide specifications for diesel fuels Di...

Page 171: ...specially in the U S A and Canada ultra low sulfur fuel should be used A higher sulfur content fuel may cause sulfuric acid corrosion in the cylinders of the engines Never mix kerosene used engine oil...

Page 172: ...NLGI No 2 Every 250 hrs Slew bearing Every 50 hrs Working equipment Daily or every 10 hrs Levers When required If the ratio of traveling time to total operating time is high replace the gear oil earli...

Page 173: ...oil tank Fuel tank Upper limit 15 L 15 8US qt Lower limit 11 L 11 6 US qt 12 L 12 7 US qt System 175 L 46 2 US gal Tank 82 L 21 7 US gal Level capacity 148 L 39 0 US gal Transmission Differential Hub...

Page 174: ...to the machine and the breaker hydraulic system To prolong the service life of the hydraulic devices properly replace the hydraulic oil and the return filter elements according to the table below Whe...

Page 175: ...0 02715 Every 1000 hrs Engine lubrication system Engine oil filter Cartridge I8 98018 8580 Every 250 hrs after the initial 50 hrs Fuel system Pre fuel filter Element kit 15520 02910 Every 500 hrs Main...

Page 176: ...1922 19 22 10 Spanner 16900 02427 24 27 11 Spanner 16900 02730 27 30 12 Spanner 16900 03236 32 36 13 Single ended wrench 16909 00019 19 14 Single ended wrench 16901 00041 41 15 Hex wrench 16906 00250...

Page 177: ...alternately top bottom left then right or in 2 or 3 times so that they are evenly tightened SERVICE DATA Classification Head width b Size a x pitch Tightening torque General connection points mm mm N...

Page 178: ...er hoses Heater Air conditioner systems Heater hoses Air conditioner hoses Hydraulic system Main body Hydraulic hoses pump delivery Hydraulic hoses pump suction Hydraulic hoses slew motor Hydraulic ho...

Page 179: ...ice dealer In addition to the safety critical parts inspect the hydraulic hoses and retighten or replace as necessary When replacing the hydraulic hoses replace the O rings and seals at the same time...

Page 180: ...and adjusting the compressor belt AC 5 29 Replacing the hydraulic oil return filter 5 30 Replacing the pilot line filter 5 31 Replacing the travel line filter 5 32 Every 50 hours Lubricating the slew...

Page 181: ...pression pressure 5 61 Inspecting and cleaning the engine starter and the alternator 5 61 Every 1500 hours Inspecting cleaning and checking operation of the engine fuel injectors 5 62 Inspecting and r...

Page 182: ...ne is parked on a slope Before starting the engine look around the machine and clean any combustibles from the surroundings of the engine Also inspect if oil or water is leaking and any nuts bolts or...

Page 183: ...ls axles and drive shaft for damage wear and loose bolts 10 Check for oil leakage from the travel motor transmission differential and hubs 11 Check the cab and guard for damage and loose nuts and bolt...

Page 184: ...hen walking Never jump down from the machine or the work bench When getting on or off the machine or work bench use the steps handrails or work bench to support your body Your weight should be evenly...

Page 185: ...rous because of the unsteady foothold Use the work bench Inspection 1 Open the engine hood 2 Take out the dipstick 1 and wipe the oil off with a rag The dipstick 1 is attached to the oil filler cap 3...

Page 186: ...stributed among the three contact points one hand and two feet or two hands and one foot Do not stand on the dozer blade and perform maintenance work Doing so is dangerous because of the unsteady foot...

Page 187: ...a well ventilated place Clean up spilled fuel immediately Do not fill the fuel tank to capacity Allow room for oil expansion Securely tighten the fuel filler cap Use the correct grade of fuel for the...

Page 188: ...rature Inspect the oil by maintaining the machine at posture shown in the figure at the next Machine posture for inspecting the hydraulic oil level DAILY INSPECTION EVERY 10 HOURS 1 Start the engine a...

Page 189: ...NT 1 Keep the machine configuration as shown in the diagram above lower the working equipment to the ground and then stop the engine 2 Use the grease gun to lubricate the grease fittings 3 Wipe off th...

Page 190: ...lcohol injector Never cut or weld on a wheel with an inflated tire mounted on it This could cause an explosive decompression Tires should be replaced only by an authorized person using the proper proc...

Page 191: ...pressure See below Use an air hose fitted with a self locking air chuck and remote shut off valve 3 Add the air Make sure that the air hose is correctly connected to the tire valve Clear other people...

Page 192: ...atch your step when walking Never jump down from the machine or the work bench When getting on or off the machine or work bench use the steps handrails or work bench to support your body Your weight s...

Page 193: ...and coat the new O rings with thin oil 12 Install the case 6 and secure it with the bolt 5 Tightening torque 44 1 N m 32 5 ft lb 13 Install the drain plug 4 Tightening torque 24 5 N m 18 1 ft lb 14 A...

Page 194: ...and on the dozer blade and perform maintenance work Doing so is dangerous because of the unsteady foothold Use the work bench IMPORTANT The loose belts could result in bad battery charge overheat of e...

Page 195: ...bench to support your body Your weight should be evenly distributed among the three contact points one hand and two feet or two hands and one foot Do not stand on the dozer blade and perform maintena...

Page 196: ...ng plugs or screws or when disconnecting hoses stand to the side and loosen them slowly to gradually release the internal pressure before removing Before performing maintenance on top of the work benc...

Page 197: ...ooting and observe the following precautions to prevent falling Do not spill oil or grease Do not leave tools scattered around Watch your step when walking Never jump down from the machine or the work...

Page 198: ...l pressure before removing Before performing maintenance on top of the work bench clean the footing and observe the following precautions to prevent falling Do not spill oil or grease Do not leave too...

Page 199: ...n a half more turn after the filter packing comes in contact with the surface of installation 10 Remove the plug 3 11 Add hydraulic oil up to the middle of the sight gauge 1 12 Tighten the plug 3 Refe...

Page 200: ...ne 1 Stop the engine with the machine in the posture shown on the figure above 2 Use the grease gun to grease the grease fitting 1 3 Start the engine lift the bucket and slew clockwise 90 4 Lower the...

Page 201: ...steps handrails or work bench to support your body Your weight should be evenly distributed among the three contact points one hand and two feet or two hands and one foot Do not stand on the dozer bl...

Page 202: ...skin if contacted If eye contact occurs flush immediately with clean water and get prompt medical attention If accidentally swallowed drink large quantities of water or milk and call a physician imme...

Page 203: ...is distorted Level too low B If fluid does not reach up to the bottom edge of the sleeve 3 the plate looks laminar not distorted 4 Check the battery terminal for looseness dirt and corrosion 5 Check t...

Page 204: ...ine 2 Place a pan under the plug 2 to catch the waste oil 3 Remove the plug 2 and drain the oil 4 Tighten the plug 2 Tightening torque 35 to 50 N m 25 8 to 36 9 ft lb 5 Add oil through the hole of the...

Page 205: ...m will cause burns The gear oil is also hot and under high pressure immediately after the engine is stopped Be careful not to touch the oil when loosening the plugs Working on the machine under these...

Page 206: ...Replacing the engine oil and the oil filter on page 5 26 EVERY 250 HOURS INSPECTING AND ADJUSTING THE V BELT Refer to Inspecting and adjusting the V belt on page 5 28 INSPECTING AND ADJUSTING THE COM...

Page 207: ...Keep the machine configuration as shown in the diagram above lower the working equipment to the ground and then stop the engine 2 Use the grease gun to lubricate the grease fittings Type of grease Mol...

Page 208: ...ing the plugs Working on the machine under these conditions could result in burns or injuries The pressure in the reduction gear case of transmission may cause oil or the plug to fly out Loosen the pl...

Page 209: ...ning the plugs Working on the machine under these conditions could result in burns or injuries The pressure in the gear case of differentials may cause oil or the plug to fly out Loosen the plug slowl...

Page 210: ...chine under these conditions could result in burns or injuries The pressure in the reduction gear case of hubs may cause oil or the plug to fly out Loosen the plug slowly to release the pressure 1 Par...

Page 211: ...stributed among the three contact points one hand and two feet or two hands and one foot Do not stand on the dozer blade and perform maintenance work Doing so is dangerous because of the unsteady foot...

Page 212: ...nd on the dozer blade and perform maintenance work Doing so is dangerous because of the unsteady foothold Use the work bench IMPORTANT Be careful not to damage the fins when cleaning When using compre...

Page 213: ...rd and remove the ventilation filter 2 from the filter case 1 Ventilation filter 2 parts No 19115 13680 3 Open the cover 3 4 Remove the circulation filter 4 5 Use compressed air or water to clean the...

Page 214: ...machine or the work bench When getting on or off the machine or work bench use the steps handrails or work bench to support your body Your weight should be evenly distributed among the three contact p...

Page 215: ...be evenly distributed among the three contact points one hand and two feet or two hands and one foot Do not stand on the dozer blade and perform maintenance work Doing so is dangerous because of the...

Page 216: ...y transparent when the engine speed is increased or decreased Flow of bubbles can be seen constantly Sometimes transparent or white with bubbles Mist like flow is faintly visible No bubbles is visible...

Page 217: ...5 51 MEMO...

Page 218: ...g Never jump down from the machine or the work bench When getting on or off the machine or work bench use the steps handrails or work bench to support your body Your weight should be evenly distribute...

Page 219: ...Tighten the case 7 with the filter wrench Tightening torque 30 N m 22 1 ft lb Main fuel filter 8 Place a pan under the main fuel filter 2 to catch fuel 9 Loosen the vent plug 5 and the drain plug 6 t...

Page 220: ...your body Your weight should be evenly distributed among the three contact points one hand and two feet or two hands and one foot Do not stand on the dozer blade and perform maintenance work Doing so...

Page 221: ...the dozer blade and perform maintenance work Doing so is dangerous because of the unsteady foothold Use the work bench 1 Open the engine hood 2 Place a pan under the joint bolt 1 to catch fuel 3 Loose...

Page 222: ...5 56 MAINTENANCE EVERY 800 HOURS EVERY 800 HOURS REPLACING THE DIFFERENTIAL GEAR OIL Refer to Replacing the differential gear oil on page 5 38...

Page 223: ...THE PILOT LINE FILTER Refer to Replacing the pilot line filter on page 5 31 REPLACING THE TRANSMISSION GEAR OIL Refer to Replacing the transmission gear oil on page 5 38 REPLACING THE HUB GEAR OIL Re...

Page 224: ...achine could move suddenly Never stand at the back of the machine while the engine is running Do not remove the radiator cap or the drain plug when the cooling water is hot Stop the engine and wait un...

Page 225: ...to rinse the cooling system 11 Tighten the drain plug 4 12 Take time and slowly add the new coolant mixture of antifreeze and tap water to the radiator through the fill port until it is full 13 Close...

Page 226: ...maged IMPORTANT Be sure to install the element and dust cap securely If not dust could be drain into the cylinder damaging the engine 1 Open the engine hood 2 Loosen the clamps 1 and remove the dust c...

Page 227: ...wo hands and one foot Do not stand on the dozer blade and perform maintenance work Doing so is dangerous because of the unsteady foothold Use the work bench Oil may spurt out if caps or filters are re...

Page 228: ...G OPERATION OF THE ENGINE FUEL INJECTORS This operation requires experience Ask your sales or service dealer for it EVERY 1500 HOURS INSPECTING AND REPLACING THE AIR FILTER CASE FOR CRACKING This oper...

Page 229: ...5 63 MEMO...

Page 230: ...o support your body Your weight should be evenly distributed among the three contact points one hand and two feet or two hands and one foot Do not stand on the dozer blade and perform maintenance work...

Page 231: ...he hydraulic oil circuit following Bleeding air below 19 Set the machine to the hydraulic oil level inspection posture and inspect the oil level after the oil cools Refer to Inspecting the hydraulic o...

Page 232: ...moving plugs or screws or when disconnecting hoses stand to the side and loosen them slowly to gradually release the internal pressure before removing 1 Place a pan under the hose A or B to catch the...

Page 233: ...EVERY 4000 HOURS Second boom 2 Piece boom Arm 4 Loosen the hose B slowly 5 Slowly move the arm in the Arm in direction a little until there are no more air bubbles coming from the hose B joint 6 Tigh...

Page 234: ...ECM This operation requires experience Ask your sales or service dealer for it INSPECTING AND CLEANING THE INJECTOR This operation requires experience Ask your sales or service dealer for it INSPECTI...

Page 235: ...5 69 MEMO...

Page 236: ...ear such as safety goggles and gloves When hitting pins or bucket teeth always check that there is no one in the surrounding area Do not allow unauthorized personnel in the work area while working Rem...

Page 237: ...hat the end surfaces of the locking pin just knocked out are aligned with the upper and lower surface of the point Do not use the worn locking pin The life of the teeth can be lengthened and the frequ...

Page 238: ...al parts such as pins bucket teeth side cutter or bearings are hit with a hammer wear protective gear such as safety goggles and gloves When hitting pins or bucket teeth always check that there is no...

Page 239: ...2 4 Align the turn prevention holes and then install the bolt 1 and the nut Be sure to leave a gap of about 0 5 to 1 mm 0 02 to 0 04 in between the nut and bucket bush or the nut will come loose 5 Adj...

Page 240: ...0 5 mm 0 02 in Swing the upperstructure slightly to the left and lightly press the arm point to the left side of the bucket the side without an adjuster 4 Remove the three bolts 2 the end plate 3 and...

Page 241: ...e steps handrails or work bench to support your body Your weight should be evenly distributed among the three contact points one hand and two feet or two hands and one foot Do not stand on the dozer b...

Page 242: ...n walking Never jump down from the machine or the work bench When getting on or off the machine or work bench use the steps handrails or work bench to support your body Your weight should be evenly di...

Page 243: ...sult in the machine moving abruptly leading to serious injury or death If the levers or pedals no longer move smoothly grease them Operating levers WHEN REQUIRED Boom swing Second boom pedal Dozer bla...

Page 244: ...5 78 MAINTENANCE EVERY 2 YEARS EVERY 2 YEARS REPLACING THE RECEIVER DRYER This operation requires experience Ask your sales or service dealer for it...

Page 245: ...rusting operate the machine once a month so that the oil can be circulated throughout the system 2 Inspect the battery and recharge it as necessary Ask your sales or service dealer for recharging Sta...

Page 246: ...5 80...

Page 247: ...6 1 TROUBLESHOOTING...

Page 248: ...d end of the slewing The travel motor produces noise when stopped suddenly from its high speed traveling The control valve produces noise if excessive force is applied to the working equipment or when...

Page 249: ...ot Do not stand on the dozer blade and perform maintenance work Doing so is dangerous because of the unsteady foothold Use the work bench The symptoms listed below indicate overheating IF THE ENGINE O...

Page 250: ...e protective goggle when jump starting the engine by using the jumper cables IMPORTANT Use the jumper cables and clips of a size suited to the capacity of battery Do not use damaged or corroded jumper...

Page 251: ...the engine block of the dead machine 2 Disconnect the other clip of jumper cable B from the negative battery terminal of the booster vehicle 3 Disconnect the clip of jumper cable R from the positive b...

Page 252: ...position to stop the engine IF A FUSE BLOWS 2 Open the fuse box cover 1 3 Check for any blown fuses 2 4 If a fuse is blown replace it with a spare fuse of the same capacity Fuse layout and circuits pr...

Page 253: ...used in high current applications Like a regular fuse they act as fuses by protecting the electric components and wirings from damage caused by excessive current draw Capacity Symbol Protected circuit...

Page 254: ...e there is enough fuel is going through can cause the starter to fail RESTARTING AFTER ADDING FUEL 1 Add fuel 3 Turn the starter key to the ON position and wait for the air to be bled from the vent pl...

Page 255: ...6 9 MEMO...

Page 256: ...e and ask for help Refer to Multi information display on pages 2 16 to 2 31 Refer to Engine error code list on pages 6 14 to 6 17 Battery charge warning lamp There is a problem with the fan belt or ch...

Page 257: ...perate the machine while the lamp is flashing could damage the line filter and hydraulic equipment Refer to Replacing the travel line filter on page 5 32 Cold climate operation Hydraulic oil is not wa...

Page 258: ...802 CAN communication error TMD1 1703 Main power supply voltage error too high 1704 Main power supply voltage error too low 1713 OX024 power supply voltage error too high 1714 OX024 power supply volta...

Page 259: ...gh 6504 AUX1 slide switch voltage value error too low 6509 AUX1 slide switch neutral error 6519 AUX1 L switch error 6529 AUX1 R switch error 6603 AUX2 slide switch voltage value error too high 6604 AU...

Page 260: ...rror high voltage error P2128 4 Accelerator sensor 2 error low voltage error P2127 100 3 Engine oil pressure sensor error high voltage error P0523 4 Engine oil pressure sensor error low voltage error...

Page 261: ...temp sensor 1 high temp error CSF inlet P0426 1 Exhaust temp sensor 1 low temp error CSF inlet P0426 3 Exhaust temp sensor 1 error CSF inlet high voltage error P0428 4 Exhaust temp sensor 1 error CSF...

Page 262: ...fuel temp P1093 1347 3 SCV high voltage error P0092 4 SCV low voltage error P0091 1381 3 Fuel filter clogging sensor error high voltage error P1294 4 Fuel filter clogging sensor error low voltage erro...

Page 263: ...inlet high voltage error P042D 4 Exhaust temp sensor 2 error DOC inlet low voltage error P042C 10025 5 DPD lamp error P1669 10026 0 DPD PM excessive trapping 2 P1455 15 DPD PM excessive trapping P242...

Page 264: ...raulic oil is not warm enough Perform the warm up Refer to pages 3 8 to 3 9 Air cleaner is clogged Clean the air cleaner Refer to page 5 45 Hydraulic oil is not of suitable type Replace the hydraulic...

Page 265: ...sales or service dealer Fuel line is faulty Adjust or repair ask your sales or service dealer Preheating device is faulty Adjust or repair ask your sales or service dealer Engine exhaust is white or b...

Page 266: ...st or repair ask your sales or service dealer Clogging in the exhaust line Adjust or repair ask your sales or service dealer DPD is faulty Adjust or repair ask your sales or service dealer Irregular n...

Page 267: ...s will cause burns The hydraulic oil is also hot and under high pressure immediately after the engine is stopped Be careful when loosening the caps or plugs Working on the machine under these conditio...

Page 268: ...owing truck with sufficient braking power IMPORTANT Do not tow a machine if its engine does not start or if the machine does not run Doing so could damage the hydraulic devices Release the parking bra...

Page 269: ...X Note The released parking brake is returned to the original position once the engine is restarted Towing the machine Permissible forces 158 8 kN 35700 lbf 1 Attach the wire rope to the shackle 1 2...

Page 270: ...ace the damaged cab Serious injury or death may occur if the machine is operated with damaged cab Do not operate the machine until the replacement is complete Do not try to repair the damaged cab by w...

Page 271: ...7 1 SPECIFICATIONS...

Page 272: ...speed travel 0 to 9 8 6 09 High speed travel 0 to 29 2 18 14 0 to 19 6 12 18 Gradeability degrees 30 Noise level dB A Sound power level LWA 99 Emission sound pressure level at the operator s position...

Page 273: ...0 to 9 8 6 09 High speed travel 0 to 29 2 18 14 0 to 19 6 12 18 Gradeability degrees 30 Noise level dB A Sound power level LWA 99 Emission sound pressure level at the operator s position ISO 6396 200...

Page 274: ...7 4 SPECIFICATIONS MACHINE DIMENSIONS EQUIPPED WITH A REAR BLADE MACHINE DIMENSIONS EQUIPPED WITH A REAR BLADE...

Page 275: ...tion 4620 182 0 4425 174 2 M Rear distance to axis of rotation 2010 79 1 N Dozer blade width 2300 90 6 P Dozer blade height 500 19 7 Q Swing angle of axles 7 5 R Minimum turning radius Tire 5490 216 2...

Page 276: ...7 6 SPECIFICATIONS MACHINE DIMENSIONS MACHINES WITH AN OUTRIGGER MACHINE DIMENSIONS MACHINES WITH AN OUTRIGGER...

Page 277: ...distance to axis of rotation 4835 190 4 4340 170 9 M Rear distance to axis of rotation 1980 77 9 N Dozer blade width 2300 90 6 P Dozer blade height 500 19 7 Q Swing angle of axles 7 5 R Minimum turni...

Page 278: ...7 8 SPECIFICATIONS OPERATING RANGES OPERATING RANGES...

Page 279: ...mum vertical digging depth 3625 142 7 3080 121 2 E Reach at maximum vertical digging depth 4385 172 7 4215 165 9 F Maximum height of cutting edge 8400 330 8 6630 260 9 G Maximum dumping height 6475 25...

Page 280: ...7 10 MEMO...

Page 281: ...ad falling from the hooking device For example equipped with a hook slippage prevention device 3 A system that poses no risk of the hooking system slipping from the hoe attachment LIFTING CAPACITIES D...

Page 282: ...7 12 SPECIFICATIONS 2 Piece boom LIFTING CAPACITIES...

Page 283: ...7 13 SPECIFICATIONS 2 Piece boom LIFTING CAPACITIES...

Page 284: ...7 14 SPECIFICATIONS Mono boom LIFTING CAPACITIES...

Page 285: ...7 15 SPECIFICATIONS Mono boom LIFTING CAPACITIES...

Page 286: ...7 16...

Page 287: ...8 1 OPTIONS...

Page 288: ...ry to temporally place a heavy object or an attachment on the ground during removal or installation be sure to place it in a stable position Keep everyone out of the area when hoisting There is a haza...

Page 289: ...nd the machine Keep a safe distance from surrounding obstacles When a heavy attachment is installed natural drop the gradual dropping of the attachment under its own weight when it is stopped in midai...

Page 290: ...y the use by a non approved attachment The swing stopper must be installed when a bucket wider than a 750W standard bucket is installed Failure to do so may result in the bucket hitting the machine bo...

Page 291: ...LEVER PATTERN SWITCHING THE LEVER PATTERN A ISO pattern G G pattern 1 Park the machine on a flat and rigid ground and stop the engine 2 Fully open the cab door and fix it in place 3 Remove the floor m...

Page 292: ...it at 75 of the maximum speed Pound with the chisel pressed perpendicular to the surface to be pounded When pounding press the chisel properly against the object to be broken so as to avoid pounding...

Page 293: ...quickly than that used for a usual operation Be sure to replace the hydraulic oil and the return filter elements Failure to replace these in time can lead to damage to the machine and the breaker hyd...

Page 294: ...21670 10120 22310 9475 20890 9765 21530 OPTION Air suspension seat 10 20 Bucketless 180 395 Second boom arm emergency shut off valve 10 20 Auxiliary hydraulic lines Auxiliary 3rd 15 35 Auxiliary 3rd A...

Page 295: ...ngerous and requires experience Have it performed by a Takeuchi sales or service outlet Flushing To be performed by a Takeuchi sales or service outlet 1 Drain the hydraulic oil mineral oil from the hy...

Page 296: ...8 10 OPTIONS CAB OPTIONS CAB OPTIONS 1 Rain guard 2 Front light 3 Roof guard Level II ISO 10262 4 Front guard Level II ISO 10262 5 Rear light...

Page 297: ...s button on the left operating lever to lower the engine speed to low idling Press the button again to return to the engine speed set with the throttle controller For safety reasons it is designed tha...

Page 298: ...oil in the first auxiliary hydraulic lines A Hydraulic oil flows to the left auxiliary line a B Hydraulic oil flows to the right auxiliary line b Refer to Auxiliary hydraulic lines on page 2 64 to 2...

Page 299: ...Pressing this button displays the second auxiliary on the Multi information display to indicate that the second auxiliary operation is enabled Pressing this button again displays the auxiliary 4th on...

Page 300: ...Releasing the residual pressure After the auxiliary hydraulic circuits have been used pressure remains in the circuits This is called the residual pressure Release this residual pressure before discon...

Page 301: ...again soon after replacement then the electric system is likely faulty It may pose a fire hazard if not properly repaired Contact your sales or service dealer for advice 1 Turn the starter key to the...

Page 302: ...mbol on the low high speed travel switch B High speed travel 1 0 to 15 2 km h 9 42 mph Depress 1 on the switch A and the Hare symbol on the low high speed travel switch B Low speed travel 2 0 to 9 8 k...

Page 303: ...8 17...

Page 304: ...8 18 First Published July 2013 Ninth Published January 2016 Printed in Japan by STATION M Co Ltd OPERATOR S MANUAL No 43757 Hydraulic excavator TB295W Edited and issued by TAKEUCHI MFG CO LTD...

Page 305: ...alteration of the machine not coordinated with us this certificate loses its validity Designation of the machine Hydraulic Excavator Manufacturer TAKEUCHI MFG CO LTD 205 Uwadaira Sakaki machi Hanishi...

Reviews: