


7
SECTION #5 OPERATION OF THE TOUCH PANEL CONTROLLER:
The Touch Panel Controller (B) for the Tach-It Mini-Con R allows for full control of all functions of the labeler.
Please note that if at any time the screen of the Touch Panel Controller turns Red, there has been an error with the
labeler and it must be resolved prior to resuming work. Easy to use, the Touch Screen Controller requires only a fin-
ger to work or change any settings. Simply touch the desired box to set up the machine and use the arrow located
next to the screen name to return to the previous screen. See Figure #7.
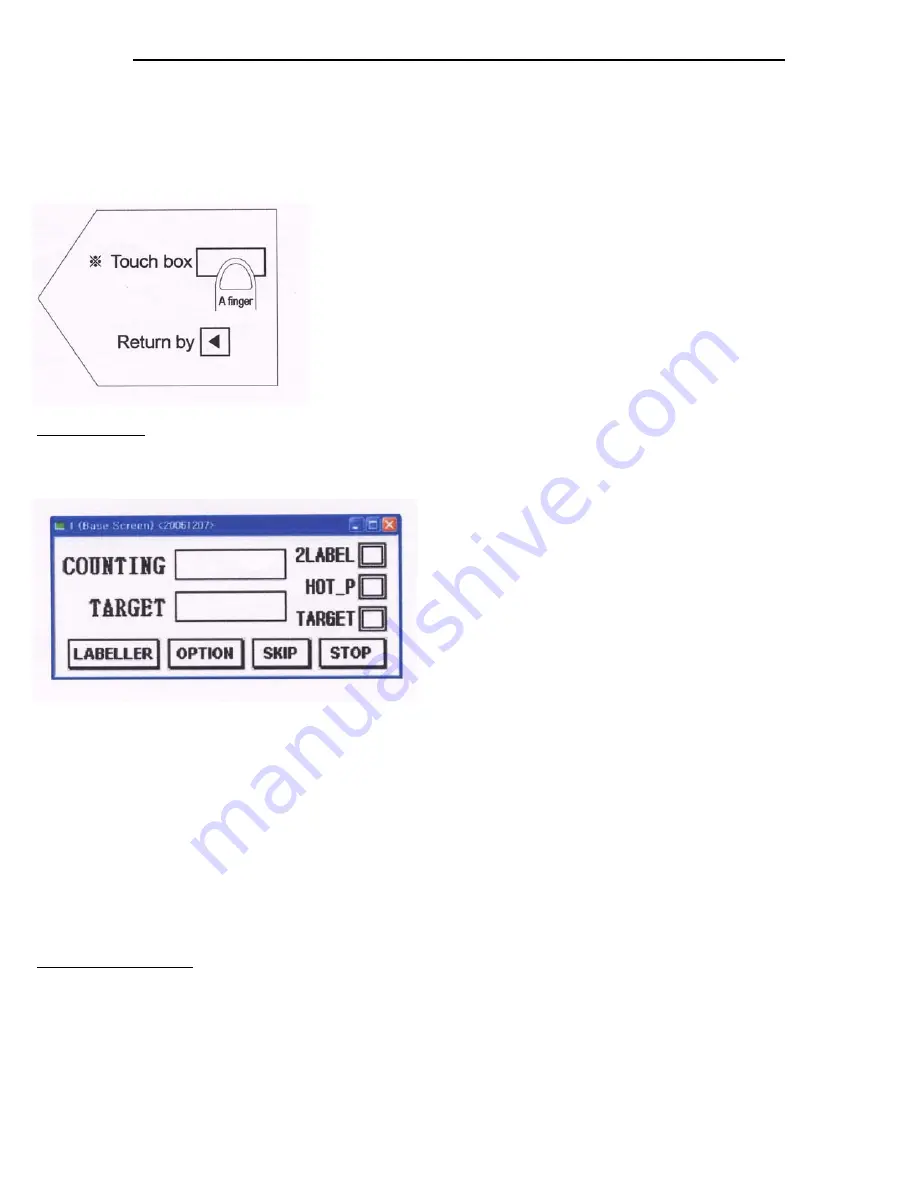
Figure #7
Home Screen:
The Home Screen is what is shown when the labeler is first turned on, or when operating the
machine. Through the Home Screen, you can make the necessary settings with the labeler for your specific applica-
tion. Figure #8 Shows the Home Screen and a description of each of the functions is as follows:
Figure #8
Counting—Shows the # of Units that have been Labeled
Target—If using the Target Counter Function, it shows the number of desired products to be labeled.
2 Label—If highlighted it shows that you are set up to put 2 labels to each product put through the machine.
Hot_P—If highlighted it shows that the machine has an optional Hot Stamp Printer installed and that the
Touch Panel Controller has been set to work with the Hot Stamp Printer.
Target—If highlighted this shows that the Target Counter Feature is enabled.
Labeller—This leads to a sub menu that allows for control of the Start Delay, 2 Label Delay and Motor Speed.
Option—This leads to s sub menu that allows for the enabling and disabling of the Hot Printer, Target Counter,
Conveyor Mode and 1 or 2 label mode.
Skip—This is a function not used in the Mini-Con labeller.
Stop—This switches between the Stop and Run mode of the labeller.
Labeller Sub-Menu:
The Labeller Sub Menu allows for control of the Start Delay, 2 Label Delay and the Motor
Speed. Please note that the Start Delay, the 2 Label Delay and the Motor Speed will affect the location of the label
onto the product. The Start Delay is the amount of time the labeller delays from then the product is sensed by the
Start Sensor (A-7) to when the label is applied. The 2 Label Delay is used if you have enabled the 2 Label func-
tion on the Option Screen (explained next page) and you have 2 labels on 1 web and this sets the delay between
the 1st label and the 2nd label. The Motor Speed is the speed of the conveyor. The Start Delay, 2 Label Delay (if
enabled) and the Motor Speed work in combination of ensure consistent and proper label placement. Please note
that some trial and error with these settings will be required during initial set up to get proper label placement.
Please see Figure #9 on the next page.
Summary of Contents for Mini-Con R
Page 11: ...11 SECTION 8 TROUBLE SHOOTING...
Page 12: ...12 SECTION 9 PARTS LIST...


