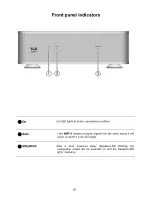
T+A Elektroakustik AMP 8 User Manual Download Page 26

26 

Connection 


The terminals (marked with the 

-symbol) can carry high voltages. 

Always  avoid  touching  terminals  and  sockets  and  the  conductors  of 
cables  connected  to  them.  Unless  ready-made  cables  are  used,  all 
cables  connected  to  these  terminals  and  sockets  must  always  be 
deployed by a trained person. 


Power supply 


The  device  is  intended  to  be  connected  to  mains  outlet  with  protective 
earth connector. Please connect it only with the mains cable supplied to 
a properly installed mains outlet with protective earth connector.  
The  power  supply  required  for  this  unit  is  printed  on  the  mains  supply 
socket. The unit must never be connected to a power supply which does 
not  meet  these  specifications.  If  the  unit  is  not  to  be  used  for  a  long 
period disconnect it from the mains supply at the wall socket. 


Mains leads / 
Mains plug 


Mains  leads must  be  deployed  in  such  a  way  that there  is  no  danger  of 
damage  to  them  (e. g.  through  persons  treading  on  them  or  from 
furniture).  Take  particular  care  with  plugs,  distribution  panels  and 
connections at the device. 
Unplugging the mains plug will disconnect the device from the mains for 
service  and  repair.  Please  make  sure  that  the  mains  plug  is  easily 
accessible. 


Enclosure 
openings 


Liquid  or  particles  must  never  be  allowed  to  get  inside  the  unit  through 
the  ventilation  slots.  Mains  voltage  is  present  inside  the  unit,  and  any 
electric  shock  could  cause  serious  injury  or  death.  Never  exert  undue 
force on mains connectors. 
Protect  the  unit  from  drips  and  splashes  of  water;  never  place  flower 
vases or fluid containers on the unit. 
Do not place naked flame sources, such as candle lights on the device. 


Supervision of 
device 
operation 


Like  any  other  electrical  appliance  this  device  should  never  be  used 
without proper supervision. Take care to keep the unit out of the reach of 
small children. 


Service, 
Damage 


The  case  should  only  be  opened  by  a  qualified  specialist  technician. 
Repairs  and  fuse  replacements  should  be  entrusted  to  an  authorised 

  specialist  workshop.  With  the  exception  of  the  connections  and 

measures  described  in  these  instructions,  no  work  of  any  kind  may  be 
carried out on the device by unqualified persons. 
If the unit is damaged, or if you suspect that it is not functioning correctly, 
immediately  disconnect  the  mains  plug  at  the  wall  socket,  and  ask  an 
authorised 

 specialist workshop to check it. 


Approved 
usage 


The  device  is  designed  to  operate  in a  temperate climate.  The  range  of 
permissible  operating  temperatures  is  +10  …  +35°C.  This  device  is 
designed  exclusively  for  reproducing  sound  and/or  pictures  in  the 
domestic environment. It is to be used in a dry indoor room which meets 
all the recommendations stated in these instructions.  
Where the equipment is to be used for other purposes, especially in the 
medical  field  or  any  field  in  which  safety  is  an  issue,  it  is  essential  to 
establish the unit’s suitability for this purpose with the manufacturer, and 
to obtain prior written approval for this usage. 


Over voltage 


The  unit  may  be  damaged  by  excess  voltage  in  the  power  supply,  the 
mains  circuit  or  in  aerial  systems,  as  may  occur  during  thunderstorms 
(lightning strikes) or due to static discharges. 
Special power supply units and excess voltage protectors such as the  

Summary of Contents for AMP 8

Page 1: ...Bestell Nr Order no 9103 0480 DE UK Betriebsanleitung User manual AMP 8...

Page 2: ...2...

Page 3: ...3 Seite Page Deutsch 4 English 17...

Page 4: ...Stattdessen wird auf Metalle oder andere unbedenkliche Materialien zur ckgegriffen die einerseits gut recycelbar sind und andererseits eine sehr gute elektrische Abschirmung ergeben Durch unsere massi...

Page 5: ...erden sind im ersten Teil dieser Bedienungsanleitung beschrieben Der zweite Teil Installation Inbetriebnahme Sicherheitshinweise beschreibt Anschlusselemente und Einstellungen die sehr selten von Inte...

Page 6: ...et die ON LED AUTO Sobald der AMP 8 ein Audiosignal ber seine Audioeing nge detektiert schaltet das Ger t ein und die AUTO LED leuchtet SPEAKER Nach einer kurzen Einschaltverz gerung LED blinkt werden...

Page 7: ...dem DAC 8 oder die Einspeisung einer externen Triggerspannung ist die sofortige Musikwiedergabe ohne Verz gerung m glich Au erdem wird ein ungewolltes automatisches Ausschalten in Musikpausen unterbun...

Page 8: ...eite 32 Der AMP 8 ist mit zwei Eingangsvarianten Cinch und XLR symmetrisch ausgestattet Beim Anschluss darf jeweils nur eine Anschlussvariante gew hlt werden Die jeweils nicht benutzten Eing nge m sse...

Page 9: ...werden Verbinden Sie diese Buchse mit der CTRL Buchse des DAC 8 Danach wird der AMP 8 zusammen mit dem DAC 8 ein und ausgeschaltet Des Weiteren kann an diese Buchse ein sogenanntes Triggersignal von...

Page 10: ...eeintr chtigt wird Die Aufstellung darf nur an einem gut bel fteten trockenen Ort erfolgen wobei direkte Sonneneinstrahlung und die N he von Heizk rpern zu vermeiden sind Das Ger t darf nicht in der N...

Page 11: ...sollten Sie bitte unbedingt diese Betriebsanleitung vollst ndig lesen und insbesondere die Aufstellungs Betriebs und Sicherheitshinweise genau befolgen Aufstellung Beachten Sie das Gewicht des Ger tes...

Page 12: ...Netzsteckers trennt das Ger t bei Wartung oder Servicearbeiten vom Netz Bitte achten Sie darauf dass der Stecker ohne Schwierigkeiten zug nglich und benutzbar ist Ger te ffnungen Durch die Ger te ffnu...

Page 13: ...orschriften Es ist zum bestimmungsgem en Gebrauch in der EG zugelassen Durch das am Ger t befindliche Zeichen erkl rt die Konformit t mit den EG Richtlinien siehe Seite 4 und den daraus abgeleiteten n...

Page 14: ...nger als 20 Minuten kein Musiksignal erkannt schaltet der AMP 8 automatisch in den Standbybetrieb Betriebsst rungen Viele Betriebsst rungen haben eine einfache Ursache die sich leicht beheben l sst Im...

Page 15: ...auschen Ger t schaltet bei h heren Lautst rken wiederholt ab Ursache 1 berhitzung durch W rmestau Abhilfe Das Ger t so aufstellen dass eine ungehinderte K hlluftzufuhr gew hrleistet ist Ursache 2 berh...

Page 16: ...16...

Page 17: ...17 English...

Page 18: ...on hazardous materials metal components are ideal for recycling and also provide effective electrical screening Our robust all metal cases exclude any possibility of external sources of interference a...

Page 19: ...described in the first section of these operating instructions The second part Basic funktions Installation Using the system for the first time covers connections and settings which are very seldom re...

Page 20: ...ional condition Auto If the AMP 8 detects an audio signal from the audio inputs it will power on and the Auto LED lights SPEAKER After a short power on delay Speaker LED blinking the loudspeaker outpu...

Page 21: ...FF by this device For details of connection please see page 34 Using the CTRL connection in conjunction with a DAC 8 or the trigger ON voltage avoids switch ON delays and the possibility of unintentio...

Page 22: ...please refer to page 32 The AMP 8 is equipped with two variants of input socket Cinch XLR symmetrical 3 pin When connecting equipment only one variant may be selected at any one time The input not us...

Page 23: ...e loudspeaker terminals The speakers can then be connected using banana plugs The stoppers are simply a push fit in the terminals and can be prised out from the rear using a suitable tool such as a kn...

Page 24: ...and store the original packing material carefully The carton and packing are specially designed for this unit and will be needed again if you wish to move the equipment at any time If you have to tra...

Page 25: ...sider it essential to read these operating instructions right through and observe in particular the notes regarding setting up operation and safety Installation Please consider the weight of the devic...

Page 26: ...r place flower vases or fluid containers on the unit Do not place naked flame sources such as candle lights on the device Supervision of device operation Like any other electrical appliance this devic...

Page 27: ...ons or repairs to the unit or any other intervention by a workshop or other third party not authorised by invalidates the approval and operational permit for the equipment Only genuine accessories may...

Page 28: ...itself on If no music signal is detected for a period longer than 20 minutes the AMP 8 automatically switches to stand by mode Trouble shooting Many problems have a simple cause and a correspondingly...

Page 29: ...volume levels Cause 1 Overheating due to heat build up Remedy Set up the unit in such a way that an unobstructed flow of cooling air is guaranteed Cause 2 Overheating through insufficient loudspeaker...

Page 30: ...an einen DAC 8 muss die im DAC 8 integrierte Lautst rkeregelung aktiviert werden Stellen Sie hierzu den Schiebe schalter in die Position VRBL In conjunction with an AMP 8 the volume control of the DAC...

Page 31: ...native is to use the asymmetrical RCA Cinch connection Der AMP 8 ist mit zwei Eingangsvarianten Cinch XLR symmetrisch ausgestattet Beim Anschluss darf jeweils nur eine Anschlussvariante gew hlt werden...

Page 32: ...ng diagram Anstelle der unsymmetrischen Cinch verbindung kann alternativ die symmetrische XLR Verbindung benutzt werden Instead of the asymmetrical RCA Cinch connection an alternative is to use the sy...

Page 33: ...rbesserung durch sogenanntes Bi Amping ist in Kombination mit einem zus tz lichem AMP 8 m glich s Abb oben A substantial improvement in sound quality is possible by using an additional AMP 8 so called...

Page 34: ...Buchse auf der R ckseite angelegt s Abb oben A third party preamp can conveniently switch ON OFF the AMP 8 through a control voltage Trigger Signal The control voltage 5 20V is applied to pins 1 and...

Page 35: ...D mpfungsfaktor Damping factor 170 Fremdspannungsabstand Signal noise ratio Ger uschspannungsabstand Signal noise ratio A weighted 103 dB 110 dB Klirrfaktor Distortion 0 009 Eingangsempfindlichkeit n...

Page 36: ...elektroakustik GmbH Co KG Herford Deutschland Germany Allemagne...

Reviews: