background image


  4 

Chapter 1: Before You Start 


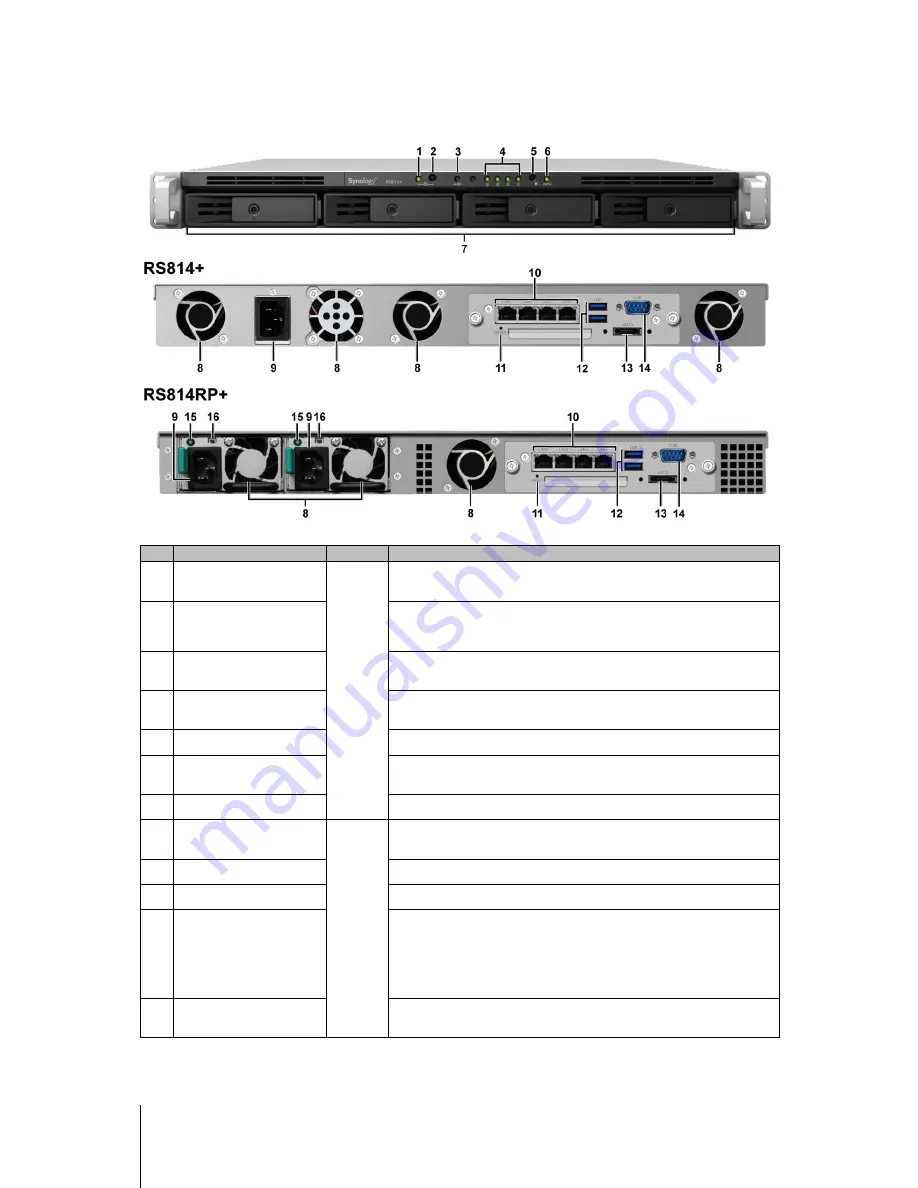
Synology RackStation at a Glance 


No. 

Article Name 

Location 

Description 

1) 

Power Indicator 

Front 

Panel 

Displays power status of the RackStation. For more information, see 

"Appendix B: LED Indicator Table". 

2) 

Power Button 

1. Press to power on the RackStation. 

2. To power off the RackStation, press and hold until you hear a beep 

sound and the power indicator starts blinking. 

3) 

Alert Indicator 

Displays warnings regarding fan or temperature. For more information, 

see "Appendix B: LED Indicator Table".  

4) 

Disk Indicator 

Displays the status of internal drives. For more information, see "Appendix 

B: LED Indicator Table". 

5) 

Beep off Button 

Press to deactivate beep sound when malfunctions occur. 

6) 

Status Indicator 

Displays the status of the system. For more information, see "Appendix B: 

LED Indicator Table". 

7) 

Drive Tray 

Install drives here. 

8) 

Fan 

Back 

Panel 

Disposes of excessive heat and cools the system. If a fan malfunctions, 

the RackStation will emit a beeping sound. 

9) 

Power Port 

Connect power cord here to supply power to your RackStation. 

10) 

LAN Port 

Connect network cables here. 

11) 

RESET Button 

1. Press and hold until you hear a beep sound to restore the default IP 

address, DNS server, and passwords for users belonging to the 

administrators

 group. 

2. Press and hold until you hear a beep sound, then press and hold again 

until you hear three beep sounds to return the RackStation to “Not 

Installed” status so that DiskStation Manager can be reinstalled. 

12) 

USB 3.0 Port 

Connect external hard drives, USB printers, or other USB devices to the 

Synology RackStation here. 

Summary of Contents for RackStation RS814+

Page 1: ...Synology_QIG_RS814 RS814RP _20131025 Synology RackStation RS814 RS814RP Quick Installation Guide...

Page 2: ...ty Instructions 6 Chapter 2 Hardware Setup Tools and Parts for Drive Installation 7 Install Drives 7 Add a RAM Module on RackStation 9 Start up the RackStation 11 Chapter 3 Install DSM on RackStation...

Page 3: ...that you have received the items below Also make sure to read the safety instructions carefully to avoid harming yourself or damaging your RackStation Package Contents Main unit x 1 AC power cord x 1...

Page 4: ...functions occur 6 Status Indicator Displays the status of the system For more information see Appendix B LED Indicator Table 7 Drive Tray Install drives here 8 Fan Back Panel Disposes of excessive hea...

Page 5: ...ation Console Port For manufacturing use only 15 Redundant Power LED Displays the status of redundant powers supplies alerting the user of power supply or fan failure 16 Beep off Button Press to deact...

Page 6: ...ord Wipe with damp paper towels Do not use chemical or aerosol cleaners To prevent the unit from falling over do not place on carts or any unstable surfaces The power cord must plug in to the correct...

Page 7: ...he data in the future please back it up before installation Install Drives 1 Pull the drive tray handle in the direction as indicated below to remove the drive tray 2 Load drives in the drive trays Fo...

Page 8: ...tray 5 Insert the drive tray key into the drive tray lock turn the key clockwise to lock the handle of the drive tray and then remove the key 6 Repeat the steps above to install all prepared drives 7...

Page 9: ...board Important When you pull out the panel you expose sensitive internal components Avoid touching anything other than the memory assembly when you remove or add memory 3 To insert the new memory mo...

Page 10: ...ther or not the system recognizes the new memory To check the memory of the RackStation 1 Start up your RackStation See Start up the RackStation for more information 2 Install DiskStation Manager DSM...

Page 11: ...the edges and remove it from the slot 3 Follow step 4 of Install a RAM Module to replace the circuit board Start up the RackStation 1 Connect one end of each power cord to the power ports located on t...

Page 12: ...nstall DSM To use Web Assistant please follow the steps below 1 Power on the RackStation 2 Open a web browser on a computer in the same network as the RackStation 3 Enter either of the following into...

Page 13: ...Learn More Congratulations Your RackStation is set up now Refer to the User s Guide in the installation disc for advanced settings and management For more information or online resources about your Ra...

Page 14: ...EXT3 FAT NTFS HFS Supported RAID Types Basic JBOD RAID 0 RAID 1 RAID 5 RAID 6 RAID 10 Synology Hybrid RAID Up to 2 Disk Fault Tolerance Agency Certifications FCC Class A CE Class A BSMI Class A HDD H...

Page 15: ...10 100 Mb connection Off No network Rear LAN on left side of jack Green Static Network connected Blinking Network active Off No network Disk 1 4 Green Static Drive ready and idle Blinking Drive is bei...

Page 16: ...o control access to the components features or functions of the Product or Software Section 6 Open Source The Software may contain components licensed to Synology under the GNU General Public License...

Page 17: ...the United States except as otherwise provided below In such cases the arbitration will be conducted before a single arbitrator and will be limited solely to the dispute between you and Synology The a...

Page 18: ...h Synology and may obtain the manufacturing date for Category I Products Category II Products and Category III Products at the Web Site The failure to register a Product at the Web Site will not dimin...

Page 19: ...WHATSOEVER INCLUDING BUT NOT LIMITED TO LOSS OF DATA INFORMATION REVENUE PROFIT OR BUSINESS ARISING OUT OF OR RELATING TO THE USE OR INABILITY TO USE THE PRODUCT ANY ACCOMPANYING DOCUMENTATION OR SOFT...

Page 20: ...inally resolved by arbitration conducted by three neutral arbitrators in accordance with the procedures of the R O C Arbitration Law and related enforcement rules The arbitration shall take place in T...

Reviews: