background image

- 8 -

2.

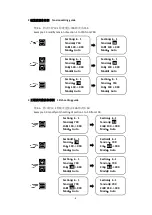
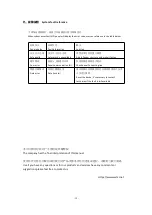
松紧度操作示例

Tension setting guide

2.1

:修改工程段

1

松紧度由

700

修改为

750

Example 2.1:modify tension of section 1 to 750 from 700

3.

工程段针数操作示例

Stitch setting guide

3.1

:将工程段

1

针数设定值由

100

修改为

50

Example 3.1: modify stitch setting of section 1 to 50 from 100

Section

6 - 1

Tension

750

Cnt

100 -> 000

Mode

Auto

Section

6 - 1

Tension

700

Cnt

100

-> 000

Mode

Auto

Section

6 - 1

Tension

750

Cnt

100 -> 000

Mode

Auto

Section

6 - 1

Tension

700

Cnt

100 -> 000

Mode

Auto

Section

6 - 1

Tension

700

Cnt

100 -> 000

Mode

Auto

Section

6 - 1

Tension

700

Cnt

100 -> 000

Mode

Auto

Section

6 - 1

Tension

700

Cnt

050 -> 000

Mode

Auto

Section

6 - 1

Tension

700

Cnt

050

-> 000

Mode

Auto

Section

6 - 1

Tension

700

Cnt

050

-> 000

Mode

Auto

Section

6 - 1

Tension

700

Cnt

100 -> 000

Mode

Auto

Section

6 - 1

Tension

700

Cnt

100

-> 000

Mode

Auto

Section

6 - 1

Tension

700

Cnt

100 -> 000

Mode

Auto

Section

6 - 1

Tension

700

Cnt

100 -> 000

Mode

Auto

Section

6 - 1

Tension

750

Cnt

100 -> 000

Mode

Auto

Summary of Contents for MC-20K

Page 1: ...SXSTAR MC 20K AUTO CUTTING AND COMPUTERIZED METERING DEVICE USER MANUAL...

Page 2: ...LCD display reference 5 Language setting 6 Function operation guide 7 Parameter reference 11 System fault reference 12 Two Row One Row Two Row One Row Correct Wrong ONE NEEDLE OVERLOCK TWO NEEDLE OVER...

Page 3: ...FTING MAIN MECHANIS M CONTROL BOX PEDAL SWITCH 5mm The distance between magnet and SY needle counter must not exceed 5 mm Magnet should keep center align with SY needle counter ATTENTION SY needle cou...

Page 4: ...gram description Safety lock switch Power line Pedal switch Step motor driver supply power Gas valve driver line Step motor driver control line Knee switch Control Panel SY needle counter Step motor w...

Page 5: ...diagram 4kgf cm2 Note The pressure air must not be less than 4kgf cm2 Vaccum device Pay attention to the inlet and outlet direction of the filter valve when installing Original chain cutter of sewing...

Page 6: ...ption can be selected by this button Long press to enter system setting page Section switch button used for modify the section number Long press for modify total section number and short press for mod...

Page 7: ...current section number tension of current section stitch setting and section switch mode Section setting Display The black background indicate which program option is selected Program number setting...

Page 8: ...guage by course shown below 6 1 700 100 000 MENU 01 Parameter 02 Test 03 Language MENU 01 Parameter 02 Test 03 Language Language Set ENGLISH Language Set ENGLISH MENU 01 Parameter 02 Test 03 Language...

Page 9: ...n stitch counting is reach to the setting Manual cutting system switch to next section after user press manual cut button Auto cutting system auto cut and switch to next section when stitch is reach t...

Page 10: ...000 Mode Auto Section 6 1 Tension 700 Cnt 100 000 Mode Auto Section 6 1 Tension 700 Cnt 100 000 Mode Auto Section 6 1 Tension 700 Cnt 100 000 Mode Auto Section 6 1 Tension 700 Cnt 050 000 Mode Auto Se...

Page 11: ...1 Tension 700 Cnt 100 000 Mode Auto 710 710 710 710 710 710 Program B Section 6 1 Tension 700 Cnt 100 000 Mode Auto Section 6 1 Tension 700 Cnt 100 000 Mode Auto Section 6 1 Tension 700 Cnt 100 000 Mo...

Page 12: ...1 Modify inserting length to 30mm from 20mm Section 6 1 Tension 700 Cnt 100 000 Mode Auto Insert lenth Value 030 mm Insert lenth Value 030 mm Insert lenth Value 020 mm PARAMETER 01 Ins lenth 02 Ins s...

Page 13: ...Cutter Time 00 0 01s 99 1 00s 1 0 01s 05 Slack set TR Stitch after cut to active TR and vacuum device 00 99 99 99 99 stitch 1 1 1 1 stitch 06 Foot mode Pressure foot lifted up and insert the tape afte...

Page 14: ...for our products and services have any comments or suggestions please feel free to contact us Https www sxstar net Panel display Fault information Solution Safe invalid Safe switch is unavailable Adj...

Reviews: