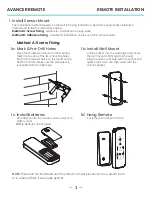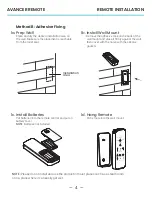
— 4 —
SMART TOILET
INSTALLATION INSTRUCTIONS
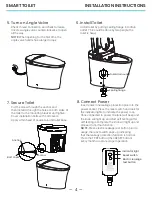
8. Connect Power
· Insert power line leakage protection plus into the
power socket. Press the reset switch and look for
the indicator lights to indicate the power is on.
Once connected to power, the toilet will beep and
the knob will light up and start self testing. After
self testing is complete, the knob will light up and
proceed to normal function.
NOTE:
Press electric leakage test button prior to
usage, the reset switch pops up indicating
that the leakage protection function is normal.
Press the TEST button (then RESET button)
every month to assure proper operation.
6. Install Toilet
· Install toilet by putting sealing flange into drain
outlet. This sould be done by two people, the
toilet is heavy.
5. Turn on Angle Valve
· Check thread connection and check for leaks.
Unscrew angle valve counterclockwise to open
all the way.
NOTE:
When opening for the first time, the
angle valve handle has a larger torque.
7. Secure Toilet
· Put the screw through the anchor and
then install it through the holes on both sides of
the toilet to the mounting bracket and tighten.
· Cover installation bolts with bolt covers.
· Apply a thin bead of sealant around toilet base.
Anchor
Screw
Bolt cover
Toilet drain outlet
Sealing flange
Electric leakage
test button
Reset switch
Indicator light


