background image

2.   The rack is designed to carry up to two 60 lbs. bikes. 

You cannot combine weight to carry one bike over 
60 lbs. If installing an ebike you may have to remove 
the battery so the bike does not exceed 60 lbs.

Bike Installation

:

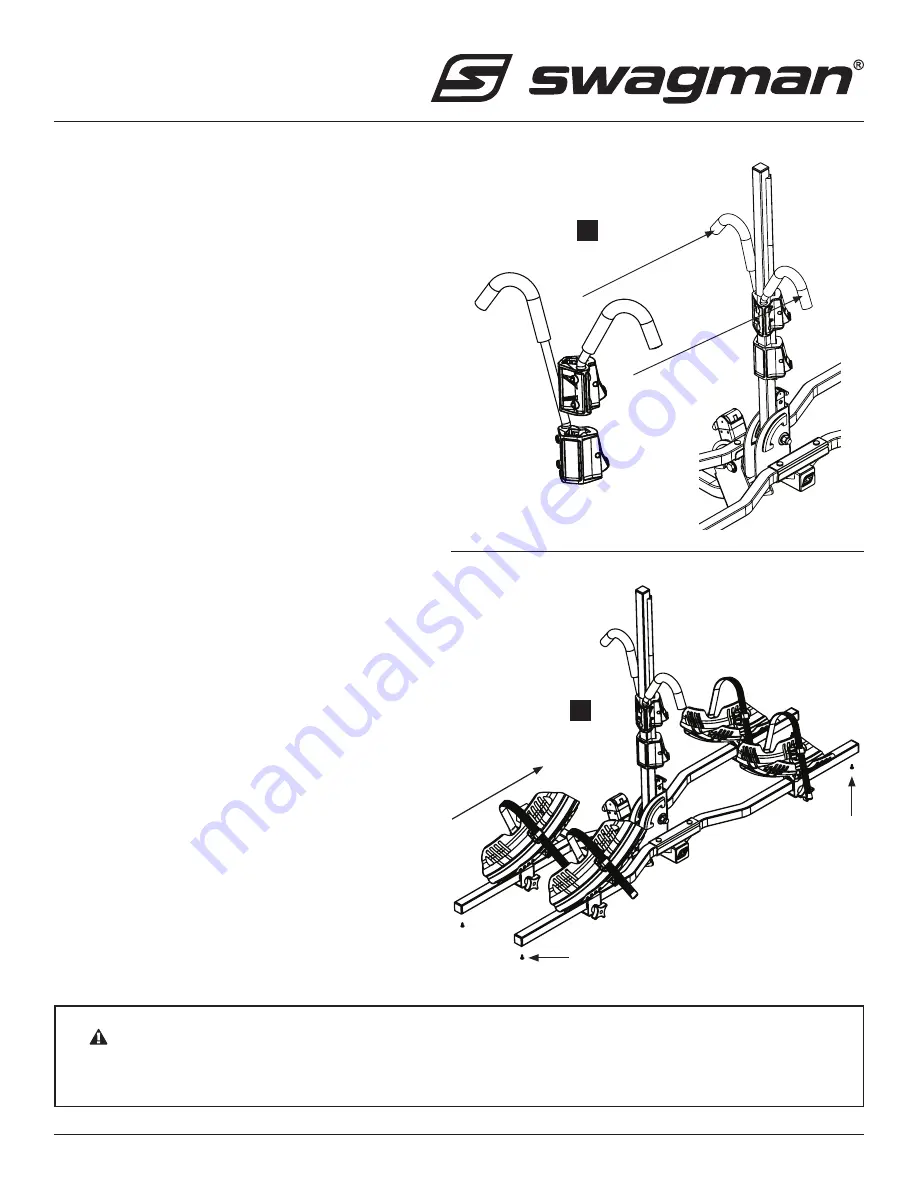
1.   Pull the lever on the bottom of the upright ratchet 

arm and fold down. This allows you to easily put the 
inside bike onto the rack. The taller bike should go on 
the inside location.  

2.   Adjust the trays to the wheels of the bike so that 

they are all the way in the tray. Trays press on the 
insides of the tires. Once these are adjusted tighten 
the knobs on the tray so that they are secure and 
cannot slide. Attach the strap to secure the wheel 
into the wheel tray.

3.   Fold the upright bar back into the upright position. 

You should hear a click to indicate the cam is engaged. 

4.   Push the longer hook down onto the bike. Press the 

release button on the hook to slide it more easily 
into place. Release the button when the hook is 
securely holding the bike. Releasing the button locks 
the hook in place and prevents it from any upward 
movement while in transit.  Ensure the hook arm is 
fully locked into the notches on the upright ratchet 
arm. IMPORTANT: You should always ensure that the 
hook is located in the lowest position on the top tube.  
It is usually at the connection point of the top tube 
and the seat tube (diagram 7). 

5.   Install the outside bike in the same manner using the 

short hook. 

6.   After complete installation check all pins and tighten 

knobs to ensure they are all tight and that the bikes 
are motionless in the rack. 

IMPORTANT:

 You have 

to ensure that all of the wheel straps are attached 
and secure.

7.   To lock your bikes rotate the key in the ratchet hook 

so the button cannot be depressed (diagram 8). 
NOTE: Never leave your bikes unattended for any 
length of time. Locks are meant as a deterrent and 
won’t prevent bike theft.

 WARNING

Due to the increase in thinner/lighter “carbon frame bikes” this rack may be inappropriate because the hook clamps the frame.  
Please check with your bike manufacturer for specific details. 

INSTRUCTION SHEET

PRODUCT: 64678 Current • Page 2 of 3

300 - 1880 Government St. • Penticton, B.C. Canada V2A 7J1 • Phone (250) 490-8883 • Fax (250) 490-8885 • www.swagman.net

REV 14/11/19

(G)

(F)

(G)

5

4

(E)

(D)

Summary of Contents for 64678

Page 1: ...e long hook goes on first NOTE depending on the bikes you may have to install the short hook first and then the long hook 7 Slide the wheel trays F onto the cross bars Diagram 5 The wheel trays should be orientated so that the high side of the tray is closest to the centre post of the rack and the buckles and knobs are facing the back of the rack Your bike size will determine the best position for...

Page 2: ...lace and prevents it from any upward movement while in transit Ensure the hook arm is fully locked into the notches on the upright ratchet arm IMPORTANT You should always ensure that the hook is located in the lowest position on the top tube It is usually at the connection point of the top tube and the seat tube diagram 7 5 Install the outside bike in the same manner using the short hook 6 After c...

Page 3: ...sh will lose its luster It is recommended that when not in use it is stored indoors Take care to add padding on any area of the bikes that touches another bike or any part of the vehicle Damage can and will happen to your bikes and or to the vehicle if care is not taken during the loading and transporting of your bikes and padding used where necessary Bicycle tires should be kept at least 6 away f...

Page 4: ...ible que vous ayez à installer le bras court avant le long selon la dimension des vélos 7 Glissez les plateaux de roue F sur les barres transversales diagramme 5 Les plateaux doivent être installés de sorte que la partie surélevée est plus près du support central et que la molette et la boucle d attache sont orientées vers la partie arrière du porte vélos L emplacement des plateaux est déterminé e...

Page 5: ...ralement au point de raccordement du tube de selle diagramme 7 5 Installez l autre vélo de la même façon en utilisant le bras à cliquet court 6 Après l installation des vélos vérifiez les vis et boulons serrez les molettes et assurez vous que les vélos ne bougent pas sur le porte vélos IMPORTANT Assurez vous que les courroies de roue sont solidement attachées 7 Pour verrouiller les vélos tournez l...

Page 6: ... le porte vélos les vélos ou le véhicule afin d éviter les dommages ou les bris Faites attention en chargeant et en déchargeant les vélos Vérifiez régulièrement le porte vélos et les vélos au cours du transport Veillez à ce que les pneus des vélos soient à au moins 6 po du tuyau d échappement du véhicule car la température à la sortie est suffisamment chaude pour faire fondre ou endommager les pne...

Reviews: