background image


3.5.4 Privilege 

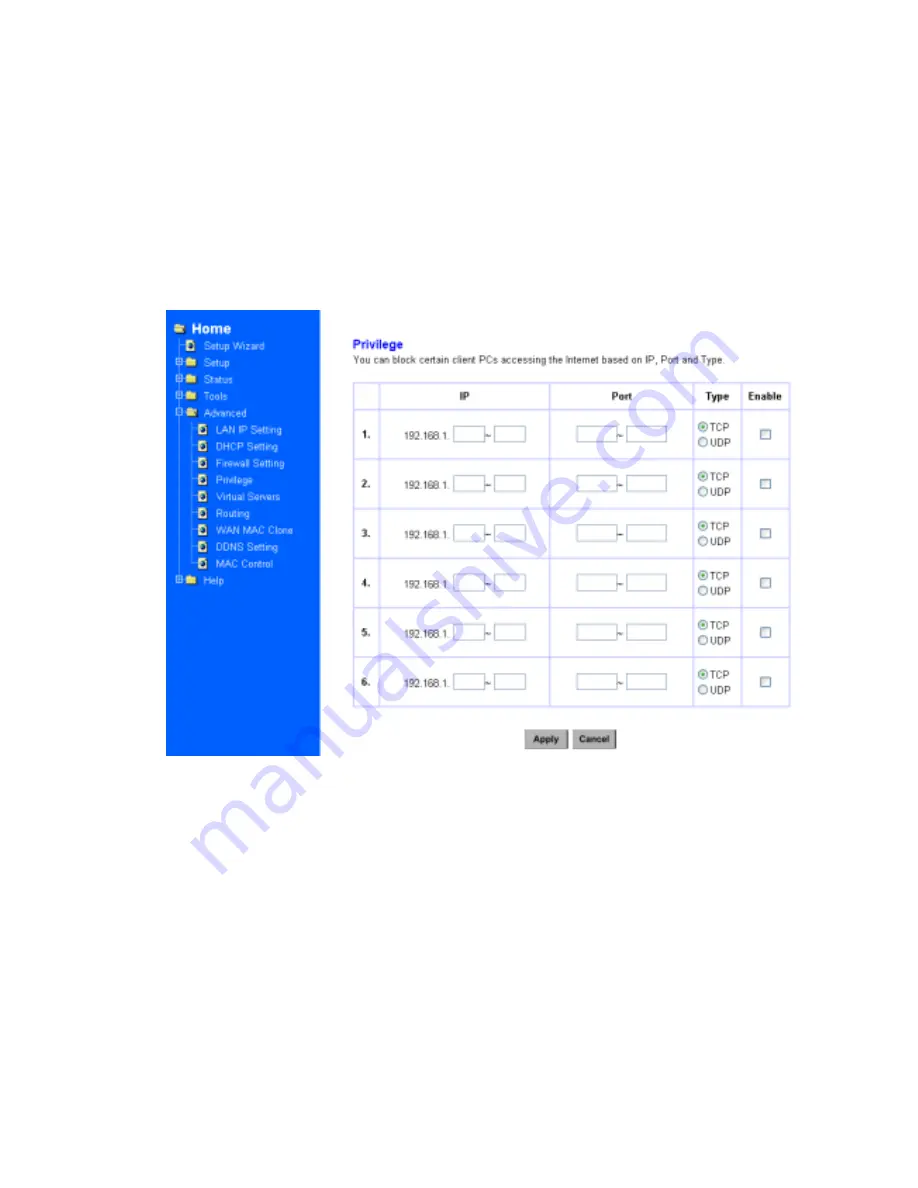
Privilege setting allows you to keep certain PCs on your network from accessing to the 

Internet. You can set up a filter through an IP address or network port number. Users 

who have their IP address or Port number listed on the “Blocked Private Address” field 

or “Block Private Ports” field will no longer be able to access the Internet. Figure 3-27 

shows the screen of Privilege setting. 


Figure 3-27

 Privilege Menu Screen 


33 

Summary of Contents for 4504AX

Page 1: ...Cable DSL Gateway Router plus 4 port Switch User Guide Version 1 0 1...

Page 2: ...ly with the limits for a Class B digital device pursuant to Part 15 of the FCC Rules These limits are designed to provide reasonable protection against harmful interference in a residential installati...

Page 3: ...aring for the installation 2 2 2 Getting Started 3 Configuration 3 1 Configuring the Cable DSL Gateway Router 3 2 The Setup Wizard 3 2 1 PPPoE Connection for WAN 3 2 2 Fixed IP for WAN 3 2 3 PPTP for...

Page 4: ...5 5 Virtual Servers 3 5 6 Routing 3 5 7 WAN MAC Address 3 5 8 DDNS Setting 3 5 9 MAC Control 3 6 Configuring your PCs to Connect to the Router 4 Specifications 4 1 Technical Specifications 4 2 Environ...

Page 5: ...ility to assign IP address to the devices on your LAN as well Throughout this guide the Cable DSL Gateway Router may be referred to as the Router 1 1 Before You Start Check the package of the router b...

Page 6: ...the configuration of the router with its Web based utility In addition the configuration of the PCs that you want to connect to the Router can be found within this chapter Chapter 4 Specifications con...

Page 7: ...ned with the management utility the router can block specific interior users Internet access and offer the network administrator the remotely accessing facility Also the Cable DSL Gateway Router serve...

Page 8: ...ront panel of the Cable DSL Gateway Router Module Status LED 10 100 Port Status LEDs LAN Ports WAN Port Uplink Port 2 1 4 LEDs and Reset Button The LEDs are explained in the following tables Table 2 1...

Page 9: ...is actively sending or receiving data over that port FDX Col Green 1 Lights to indicate that the connection made through the corresponding port is running in Full Duplex mode 2 Blinks periodically to...

Page 10: ...r more than 3 seconds The router will restore to factory default setting DC Input Port To connect the adapter to receive power Caution Reset Button Pressing the Reset button for more than 3 seconds Th...

Page 11: ...values from your ISP You will need those values to setup the Router and configure you networked PCs to accept the IP address the Router chooses to assign them PPPoE User Name and Password or Fixed In...

Page 12: ...uter to your Cable or DSL modem A Connect one end of a standard network cable to the RJ 45 WAN port on the front of the Router B Connect the other end of the cable to either a Cable or DSL modem Step...

Page 13: ...ping http 192 168 1 1 into the PC s browser address windows See Figure 3 1 Then you will receive a pop up password request page See Figure 3 2 Type admin into the Password field and leave the User Nam...

Page 14: ...Utility The Setup Wizard of the Router will lead you step by step to configure your Router Please follow the instructions as the Wizard page request and change the settings in accordance to the infor...

Page 15: ...gure 3 6 PPPoE Menu Screen User Name and Password Fill in the entries with the information you get from your ISP Service Name If your ISP provides this info please type it into the field Connect on De...

Page 16: ...Figure 3 5 Cable DSL Setup Menu with No Option Screen Figure 3 6 PPPoE Menu Screen 16...

Page 17: ...do the following steps as an example Step 1 Choose YES when you see the question See Figure 3 5 Cable DSL Setup Menu Has your Internet Service Provider given you static IP address Then select Fixed I...

Page 18: ...Step 3 Enter the DNS Address See Figure 3 8 DNS Menu Screen Your ISP should provide you with at least one DNS IP Address If not contact your ISP Figure 3 8 DNS Menu Screen 18...

Page 19: ...3 2 3 PPTP For WAN Step 1 Choose YES when you see the question See Figure 3 5 Cable DSL Setup Menu Has your Internet Service Provider given you static IP address Then select PPTP Figure 3 9 19...

Page 20: ...ce Provider should be filled in Figure 3 10 PPTP Settings Screen 3 2 4 Dynamic IP for WAN If you did not receive any values such as fixed IP address Subnet Mask Default Gateway and Primary DNS IP addr...

Page 21: ...ote that this function is effective only when your ISP supports it If you want to delete the entered IP address pull down the IP address and highlight the IP address you want to delete Click Delete th...

Page 22: ...creen will appear You can enter the DNS Address Your ISP should provide you with at least one DNS IP Address If not contact your ISP Figure 3 12 DNS 3 2 7 Time You can get the data of log files by set...

Page 23: ...on your network to use one IP address Hacker Attack Protect keeps you from hackers attack DHCP server shows the status of the router s DHCP server function Block Hacker Scan makes your Router invisibl...

Page 24: ...n 3 3 2 DHCP Table This table shows the number of clients who exist on your DHCP pool and their information such as MAC Address Computer name and IP Address Figure 3 15 shows the DHCP Table Screen Fig...

Page 25: ...Menu Screen Figure 3 16 Routing Table Menu Screen 3 3 4 DDNS Status Screen This router supports the DDNS service allowing you to use one specific DNS name while the actual IP address changes You can...

Page 26: ...3 4 Viewing the Tools 3 4 1 System Log You can acquire the information of the system in this screen including the time the type and the message Figure 3 18 System Log 26...

Page 27: ...3 4 3 Reset You have two options to reset your Router If you choose Restart the router will reboot yet retain all the previous configuration settings On the other hand if you choose Restore Factory Se...

Page 28: ...pgrade Menu Screen and find the firmware upgrade file that you download from the our website Then double click the Start button See Figure 3 21 Upgrade Menu Screen Figure 3 21 Upgrade Menu Screen 3 4...

Page 29: ...e Virtual Servers and the Routing You may set up the Advanced Features by clicking the Advanced Features button on the left column of the page 3 5 1 LAN IP Setting The LAN IP and Subnet Mask of the ro...

Page 30: ...g Do you want to enable DHCP Server on this router Click the Enable option to enable the DHCP server Note that you can t have two DHCP servers on the network at the same time Set the router s DHCP opt...

Page 31: ...ide the router so that the hackers won t find it on the network Remote Management makes you able to manage the router from Internet DMZ Host IP Addresses can allow one local user to be exposed to the...

Page 32: ...bled the following screen will appear Figure 3 26 DMZ Host IP Address enabled Your can choose the WAN IP set up previously in 3 2 4 Alias IP Setup as your IP address You can enter the desired IP addre...

Page 33: ...an set up a filter through an IP address or network port number Users who have their IP address or Port number listed on the Blocked Private Address field or Block Private Ports field will no longer b...

Page 34: ...ly used to set up a web server ftp server or e mail server on your network Figure 3 28 shows the screen of Virtual Servers Menu If you had set Alias IP for WAN Figure 3 29 shows the screen of Virtual...

Page 35: ...abled to ignore IP Address Set IP addresses to be detected by users WAN Address If more than one Alias Address is set in section 3 2 5 the Alias IP Setup you can get multiple WAN IP addresses to choos...

Page 36: ...Figure 3 29 Virtual Server Setting Menu Screen With WAN Address 36...

Page 37: ...and which portion is the host portion Gateway IP This is the address of the gateway device that allows for a contact between the Router and the remote network or host Dynamic Routing Dynamic Routing...

Page 38: ...Figure 3 30 Static Routing and Dynamic Routing Menu Screen 38...

Page 39: ...r the MAC Address if your ISP allows access of one specific PC s Ethernet MAC address See Figure 3 31 WAN MAC Address Setting Click Restore MAC Address to return to the default setting Figure 3 31 WAN...

Page 40: ...ws the router to make the connection again in the period you set DDNS Server Choose the desired server from the drop down list Click the Website to make the link to the server Host name It is the DNS...

Page 41: ...3 5 9 MAC Control This feature allows you to block certain specific PCs accessing your ISP Figure 3 33 MAC Control Screen 41...

Page 42: ...o connect to the Router Complete the following steps to configure your PC Step 1 Click the Start button select Setting then Control Panel Step 2 Double Click the Network and Dial up icon Step 3 Highli...

Page 43: ...IP Address tab Select Obtain an IP address automatically Press OK You have completed the client settings See Figure 3 35 Note Windows may ask you for original Windows installation files supply them a...

Page 44: ...10 100 Mbps Half Duplex 20 200 Mbps Full Duplex LAN Switch 10 100 Mbps Half Duplex 20 200 Mbps Full Duplex Cabling Type 10BaseT UTP STP Category 3 or 5 100BaseTX UTP STP Category 5 Topology Star LED...

Page 45: ...3 or better UTP or STP 328 ft 100M 100BASE TX Category 5 or better UTP or STP 328 ft 100M 1000BASE T Category 5e or better UTP or STP 328 ft 100M Caution Please do not use telephone cables Telephone c...

Page 46: ...Blue 4 Blue 5 White Blue 5 White Blue 6 Green 6 Green 7 White Brown 7 White Brown 8 Brown 8 Brown Figure4 2 Diagram of Crossover Cables Diagram 1 White Orange 1 White Orange 2 Orange 2 Orange 3 White...

Page 47: ...terial under normal use from the date of original retail purchase of the Hardware If the product proves defective during this warranty period call our Customer Service in order to obtain a Return Auth...

Reviews: