background image

Chapter 2: Installation

2-29

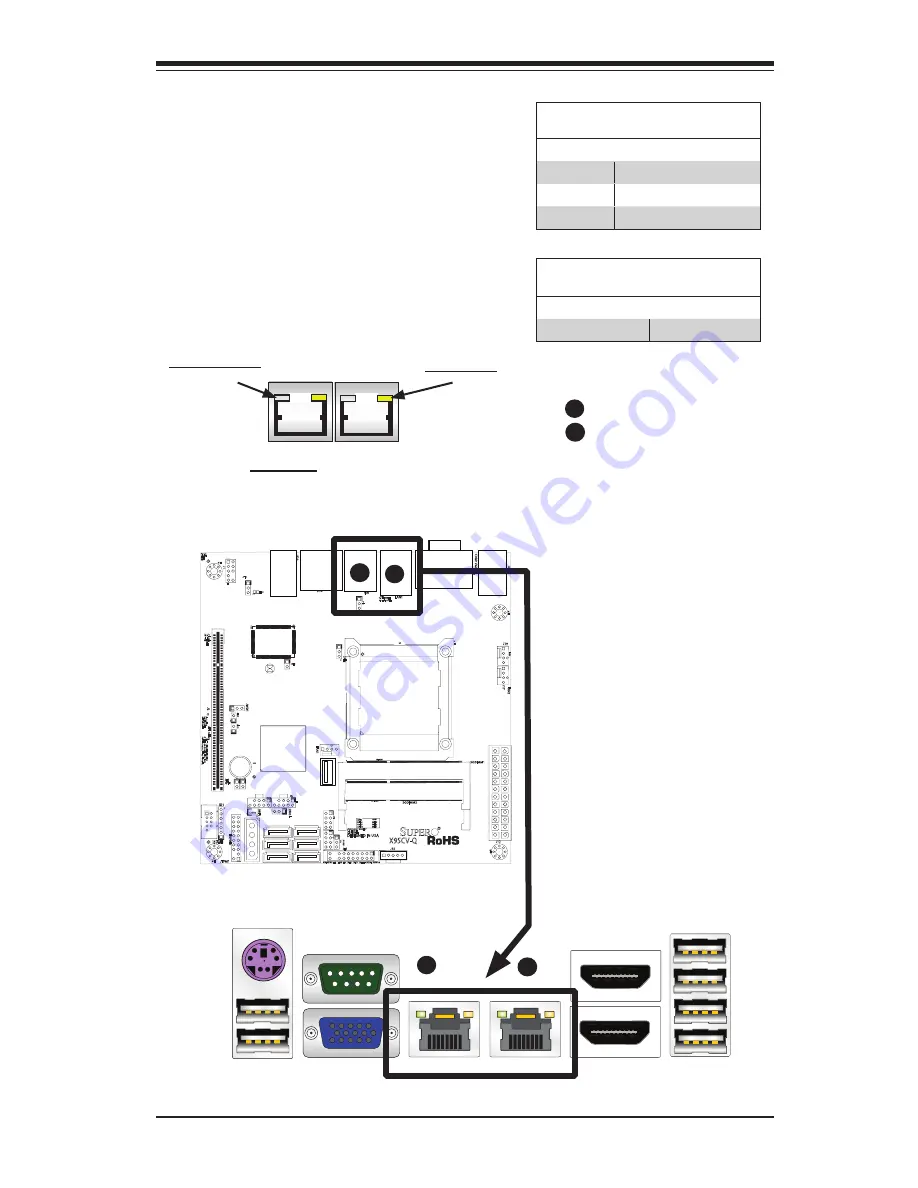
LAN Port LEDs

Two  LAN  ports  are  located  on  the  I/O 
Backplane.  Each  Ethernet  LAN  port  has 

two LEDs. The yellow Activity LED (right, 

see below) indicates activity, while the Link/

Speed LED (left) may be green, amber or off 
to indicate the speed of the connection. See 
the tables at right for more information. 

2-7  Onboard Indicators

LAN Port 1
LAN Port 2 (

Rear View

 (when facing the 

rear side of the chassis)

Activity LED

Link/Speed LED

Back Panel Connectors

A
B

GLAN Activity LED Indicator

Color                            Definition     

Yellow (Flashing)

ConnectionActive

GLAN  Link/Speed LED Indicator

LED Color        Definition     

Off

No Connection or 10 Mbps

Green (On)

100 Mbps

Amber (On)

1 Gbps

A

B

A

B

Summary of Contents for X9SCV-Q

Page 1: ...X9SCV Q X9SCV QV4 USER S MANUAL Revision 1 0b...

Page 2: ...TALLING OR RECOVERING SUCH HARDWARE SOFTWARE OR DATA Any disputes arising between manufacturer and customer shall be governed by the laws of Santa Clara County in the State of California USA The State...

Page 3: ...rts and an LVDS header on the X9SCV QV4 This enables the X9SCV Q motherboard series to deliver cost effective performance in a small form factor package Manual Organization Chapter 1 describes the fea...

Page 4: ...elf Danger Caution Instructions to be strictly followed to prevent catastrophic system failure or to avoid bodily injury Warning Critical information to prevent damage to the components or data loss I...

Page 5: ...s Super Micro Computer B V Het Sterrenbeeld 28 5215 ML s Hertogenbosch The Netherlands Tel 31 0 73 6400390 Fax 31 0 73 6416525 Email sales supermicro nl General Information support supermicro nl Techn...

Page 6: ...ence 1 6 Ports and Connectors 1 7 Jumper Descriptions 1 7 Motherboard Features 1 8 X9SCV Q Motherboard Series Block Diagram 1 10 1 2 Chipset Overview 1 11 1 3 PC Health Monitoring 1 12 Recovery from A...

Page 7: ...10 LAN Ports 2 11 HDMI Port 2 11 Front Control Panel 2 12 JF1 Header Pins 2 12 Front Control Panel Pin Definitions 2 13 Power LED 2 13 HDD LED 2 13 NIC1 NIC2 LED Indicators 2 13 Overheat OH Fan Fail...

Page 8: ...ors 2 29 LAN Port LEDs 2 29 Onboard Power LED 2 30 2 8 Serial ATA and HDD Connections 2 31 SATA Connections SATA1 SATA6 2 31 Chapter 3 Troubleshooting 3 1 Troubleshooting Procedures 3 1 Before Power O...

Page 9: ...ad Spectrum 4 5 Hardware Prefetcher 4 5 Adjacent Cache Line Prefetch 4 6 Intel Virtualization Technology 4 6 Execute Disable Bit Capability Available when supported by the OS and the CPU 4 6 Intel AES...

Page 10: ...t 4 10 Load Onboard LAN1 LAN2 Option ROM 4 10 Super IO Device Configuration 4 10 Serial Port 1 Serial Port 2 4 10 Serial Port 1 2 Settings 4 10 Remote Access Configuration 4 11 Bits per Second BPS 4 1...

Page 11: ...up Prompt Timeout 4 18 Boot Option 1 Boot option 2 Boot Option 3 etc 4 18 Hard Disk Drives 4 18 4 7 Exit Options 4 19 Save Changes and Exit 4 19 Discard Changes and Exit 4 19 Discard Changes 4 19 Rest...

Page 12: ...xii X9SCV Q Motherboard Series User s Manual Notes...

Page 13: ...detail and to provide you with the highest standards in quality and performance Please check that the following items have all been included with your motherboard If anything listed here is damaged o...

Page 14: ...Q Image Note All graphics and images shown in this manual were based upon the latest PCB Revision available at the time of publishing of the manual The motherboard you ve received may or may not look...

Page 15: ...tion 1 3 X9SCV Q Layout Important Notes to the User Jumpers not indicated are for testing only See Chapter 2 for detailed information on jumpers I O ports and JF1 front panel connections indicates the...

Page 16: ...V4 Image Note All graphics and images shown in this manual were based upon the latest PCB Revision available at the time of publishing of the manual The motherboard you ve received may or may not look...

Page 17: ...5 X9SCV QV4 Motherboard Layout Important Notes to the User Jumpers not indicated are for testing only See Chapter 2 for detailed information on jumpers I O ports and JF1 front panel connections indica...

Page 18: ...A5 I SATA2 I SATA4 I SATA1 J5 J7 JP2 JP3 JPUSB1 JF1 JPI2C J16 J12 FAN2 FAN3 PS 2 TOP J8 COM1 TOP VGA LAN1 LAN2 U14 U20 JPL2 JPL1 FAN1 CPU SODIMM1 SODIMM2 JWOL X9SCV QV4 motherboard ONLY LVDS JLCDVCC J...

Page 19: ...rce for internal Hard Drive DVD Drive JWF1 DOM Power Connector I SATA1 I SATA6 SATA Connectors White connectors SATA 3 Black SATA 2 JF1 Front Panel Control Header J16 4 Pin ATX Power Connector X9SCV Q...

Page 20: ...IO Panel Connectors with Link and Activity LEDs I O Devices SATA Connections SATA 3 0 Ports Two 2 SATA 1 2 RAID 0 1 Support SATA 2 0 Ports Four 4 SATA 3 6 RAID 0 1 5 10 USB Devices Six 6 USB ports on...

Page 21: ...chometer Monitoring CPU chassis environment Monitoring CPU Thermal Trip support Thermal Monitor 2 TM2 support Fan Control Fan status monitoring with firmware 4 pin Pulse Width Modulation fan speed con...

Page 22: ...s User s Manual X9SCV Q Motherboard Series Block Diagram Note This is a general block diagram Please see the Motherboard Features pages for details on the features of the motherboard X9SCV Q Motherboa...

Page 23: ...platforms in a compact package The Intel QM67 Express chipset is part of the mobile Intel 6 series Chipset family with a single chip architecture Among its features are 3 9W Power Consumption Intel v...

Page 24: ...power switch to turn it back on or for it to automatically return to a power on state See the Power Lost Control setting in the BIOS chapter of this manual to change this setting The default set ting...

Page 25: ...button the system will enter a Soft Off state The monitor will be suspended and the hard drive will spin down Pressing the power button again will cause the whole system to wake up During the SoftOff...

Page 26: ...and a processor interrupt system Both UARTs provide legacy speed with baud rate of up to 115 2 Kbps as well as an advanced speed with baud rates of 250 K 500 K or 1 Mb s which sup port higher speed mo...

Page 27: ...its edges only do not touch its components peripheral chips memory modules or gold contacts When handling chips or modules avoid touching their pins Put the motherboard and peripherals back into their...

Page 28: ...to the chassis Make sure that the metal standoffs click in or are screwed in tightly Then use a screwdriver to secure the motherboard onto the motherboard tray Caution Some components are very close...

Page 29: ...Locate the matching mounting holes on the chassis Install standoffs in the chassis as needed Align the mounting holes on the motherboard against the mounting holes on the chassis Install the motherbo...

Page 30: ...attention to the notch along the bottom of the mod ule to prevent incorrect DIMM module installation 2 Insert each DIMM module at an angle vertically and snap it into place Repeat step 1 to install DI...

Page 31: ...ease it from the slot Pull the SO DIMM module upwards The SO DIMM Socket Position the SO DIMM module s bottom key so it aligns with the receptive point on the slot Press down until the module locks in...

Page 32: ...rts are color coded in conformance with the PC 99 specification See the figure below for the colors and locations of the various I O ports Back Panel Connectors and I O Ports 2 4 7 1 3 5 6 8 1 USB 4 5...

Page 33: ...able Back Panel USB 2 0 9 For a Y cable that connects to a KB cable and a Mouse Cable Note This motherboard offers three Keyboard Mouse connection options as shown in the graphic below 1 Connect a key...

Page 34: ...7 10 11 on 2 headers are also lo cated on the motherboard to provide front chassis access Cables are not included See the tables on the right for pin definitions Back Panel USB 1 2 3 4 Type A USB 10 P...

Page 35: ...A COM2 header is located near the PCI E slot to provide an additional onboard serial port See the table on the right for pin definitions Serial Ports COM1 COM2 COM3 COM4 Pin Definitions Pin Definitio...

Page 36: ...o pro vide video display Refer to the board layout below for the location 1 Back Panel Connectors 15 pin VGA Connector VGA Port Connector Pin Definitions Pin Definition Pin Definition 1 Red Video 9 5V...

Page 37: ...Pin Definitions Pin Definition Pin Definition 1 TX_D1 5 BI_D3 2 TX_D1 6 RX_D2 3 RX_D2 7 BI_D4 4 BI_D3 8 BI_D4 1 2 HDMI Port Two HDMI High Definition Multimedia Interface Ports are located next to the...

Page 38: ...ally for use with Supermicro server chassis See the figure below for the descriptions of the various control panel buttons and LED indicators Refer to the following section for descriptions and pin de...

Page 39: ...d on pins 13 and 14 of JF1 Attach a hard drive LED cable here to display disk activity for any hard drive activities on the system including Serial ATA and IDE See the table on the right for pin defin...

Page 40: ...eat or fan failure Refer to the table on the right for pin definitions OH Fan Fail Indicator Status State Definition Off Normal On Overheat Flash ing Fan Fail A B JF1 Header Pins A B C C NMI Button Th...

Page 41: ...tton Pin Definitions JF1 Pin Definition 1 Signal 2 Ground Reset Button The Reset Button connection is located on pins 3 and 4 of JF1 Attach it to a hardware reset switch on the computer case Refer to...

Page 42: ...X9SCV Q 4 pin PWR X9SCV QV4 4 pin 12V Power Source ATX Power 24 pin Connector Pin Definitions JPW1 Pin Definition Pin Definition 13 3 3V 1 3 3V 14 12V 2 3 3V 15 COM 3 COM 16 PS_ON 4 5V 17 COM 5 COM 1...

Page 43: ...f the fan headers are back ward compatible with the traditional 3 pin fans Note Please use all 3 pin fans or all 4 pin fans on a motherboard Please do not use 3 pin fans and 4 pin fans on the same boa...

Page 44: ...n Definitions JL1 Pin Definition 1 Intrusion Input 2 Ground Front Panel Audio Chassis Intrusion A B A B High Definition Front Panel Audio Pin Signal 1 MC_L 2 AUD_GND 3 MC_R 4 FP_Audio Detect 5 Line_2_...

Page 45: ...ate storage devices B Power SMB I2 C Connector Power System Management Bus I2 C Connector on J15 monitors the status of the power supply fan and system temperature See the table on the right for pin d...

Page 46: ...ith the enclosure management chip in the system See the table on the right for pin definitions Refer to the board layout below for the locations of the headers Overheat Fan Fail LED JOH1 The JOH1 head...

Page 47: ...ons Speaker Connector Pin Definitions Pin Setting Definition Pins 6 7 Internal Speaker Pins 4 7 External Speaker Internal Speaker Buzzer The Internal Speaker on SP1 can be used to provide audible indi...

Page 48: ...tion of hard drives It enables the motherboard to deny access if the TPM associated with the hard drive is not installed in the system See the table on the right for pin definitions TPM Header A Trust...

Page 49: ...play This motherboard s LVDS connector is located where JP2 and JP3 used to be on the X9SCV Q A LVDS Header A LVDS Header Pin Definitions Pin Definition Pin Definition 1 12V 2 12V 3 12V 4 12V 5 12V 6...

Page 50: ...e motherboard jumpers can be used to choose between optional settings Jumpers create shorts between two pins to change the function of the connector Pin 1 is identified with a square solder pad on the...

Page 51: ...u to con nect the System Management Bus SMB to PCI E and PCI slots The default setting is set to Disabled See the table on the right for jumper settings I2 C to PCI Slots Jumper Settings Jumper Defini...

Page 52: ...portant For an ATX power supply you must completely shut down the system remove the AC power cord and then short JBT1 to clear CMOS A A CMOS Clear Wake On LAN Enable Metal contact pads Motherboard B L...

Page 53: ...ether with the USB Wake Up function in the BIOS Enable both the jumper and the BIOS set ting to activate this function See the table on the right for jumper settings and jumper connections Note The de...

Page 54: ...Close pins 1 2 to reset the system if an application hangs Close pins 2 3 to generate a non maskable interrupt signal for the application that hangs See the table on the right for jumper settings Watc...

Page 55: ...ff to indicate the speed of the connection See the tables at right for more information 2 7 Onboard Indicators LAN Port 1 LAN Port 2 Rear View when facing the rear side of the chassis Activity LED Lin...

Page 56: ...ard Power LED An Onboard Power LED is located at LED1 on the motherboard When LED1 is on the AC power cable is connected and the system is running Onboard PWR LED LED1 LED Status Status Definition Off...

Page 57: ...TA 3 0 connectors I SATA 1 2 are located on the motherboard In addition four SATA 2 0 I SATA 3 6 connectors are also located on the board The SATA 3 0 ports support RAID 0 1 while the SATA 2 0 ports s...

Page 58: ...2 32 X9SCV Q Motherboard Series User s Manual Notes...

Page 59: ...and chas sis 3 Disconnect all ribbon wire cables from the motherboard including those for the keyboard and mouse Also be sure to remove all add on cards 4 Connect the chassis speaker and the power LE...

Page 60: ...may cause the system to lose the CMOS setup information Refer to Section 1 5 for details on recommended power supplies 2 The battery on your motherboard may be old Check to verify that it still suppl...

Page 61: ...com by phone at 408 503 8000 option 2 or by fax at 408 503 8019 3 3 Frequently Asked Questions Question What type of memory does my motherboard support Answer The X9SCV Q Motherboard Series supports...

Page 62: ...to flash the BIOS Then boot the system to the floppy disk The BIOS utility will automatically flash the BIOS without any prompts Please note that this process may take a few minutes to complete Do not...

Page 63: ...the manufacturer the RMA number should be prominently displayed on the outside of the shipping carton and mailed prepaid or hand carried Ship ping and handling charges will be applied for all orders t...

Page 64: ...3 6 X9SCV Q Motherboard Series User s Manual Notes...

Page 65: ...lays all the options that can be configured Grayed out options cannot be configured Options in blue can be configured by the user The right frame displays the key legend Above the key legend is an are...

Page 66: ...tup screen You can always return to the Main setup screen by selecting the Main tab on the top of the screen The Main BIOS Setup screen is shown below Aptio Setup Utility Copyright C XXXX American Meg...

Page 67: ...or the arrow keys to move between fields The date must be entered in Day MM DD YY format The time is entered in HH MM SS format Note The time is in the 24 hour format For example 5 30 P M appears as 1...

Page 68: ...The options are Force BIOS and Keep Current Bootup Num Lock This feature selects the Power on state for Numlock key The options are Off and On Aptio Setup Utility Copyright C XXXX American Megatrends...

Page 69: ...e if the power button will turn off the system in stantly or wait for 4 seconds when it is pressed The options are Instant Off and 4 Seconds Override Restore on AC Power Loss Use this feature to set t...

Page 70: ...in the system memory where an application code can execute and where it cannot thus preventing a worm or a virus from flooding illegal codes to overwhelm the processor or damage the system during an a...

Page 71: ...performance for a short duration Chipset Configuration Warning Take Caution when changing the Advanced settings An incorrect value a very high DRAM frequency or incorrect DRAM timing may cause system...

Page 72: ...the system through the Ethernet controller The settings are Enabled and Disabled USB Functions This feature allows the user enable or disable the onboard USB ports The Op tions are Disabled and Enabl...

Page 73: ...bles PCH to aggressively enter link power state The options are Enabled and Disabled Serial ATA Port 0 5 This feature displays the model and capacity of the detected device attached to the port This i...

Page 74: ...M Select This feature selects whether to load the iSCSI or PXE onboard LAN option ROM The options are iSCSI and PXE Load Onboard LAN1 LAN2 Option ROM This feature enables or disables the onboard ROM o...

Page 75: ...order Mode Disabled or Enabled Resolution 100x31 Disabled or Enabled Legacy OS Redirection Resolution 80x24 or 80x25 Serial Port for Out of Band Management Windows Emergency Services EMS Console Redir...

Page 76: ...power saving then automatically adjust speed as needed by the system This setting is recommended for regular systems with normal hardware configurations The options are Full Speed and Standard CPU Te...

Page 77: ...han a Real time Clock RTC does in synchronizing multimedia streams providing smooth playback and reducing the de pendency on other timestamp calculation devices such as an x86 RDTSC Instruc tion embed...

Page 78: ...TPM operation Displays any TPM related operation by the system The following are informational status messages that indicate the current TPM State TPM Enabled Status TPM Active Status TPM Owner Statu...

Page 79: ...chDog Timer Allows AMT to reset or power down the system if the operating system or BIOS hangs or crashes The options are Disabled and Enabled OS WatchDog Timer BIOS WatchDog Timer These options appea...

Page 80: ...ECI counter counts the number of oc curences a duplicate event must happen before the MECI counter is incremented This is a numeric value METW The Multiple Event Time Window METW defines number of min...

Page 81: ...n any program or virus issues a Disk Format command or attempts to write to the boot sector of the hard disk drive The options are Enabled and Disabled Aptio Setup Utility Copyright C XXXX American Me...

Page 82: ...ves Boot Option 1 Boot option 2 Boot Option 3 etc Delete Boot Option This feature allows the removal of a boot device and the order of priority from which the systems boots from during startup 3rd Boo...

Page 83: ...is option and press Enter to discard all the changes and return to the AMI BIOS Utility Program Restore Defaults To set this feature select Restore Defaults from the Exit menu and press Enter These ar...

Page 84: ...is feature to retrieve user defined settings that were saved previously Boot Override Set this feature to override a previously defined boot device The available devices will be listed below Launch EF...

Page 85: ...Beep Codes for recoverable POST errors Recoverable POST Error Beep Codes When a recoverable type of error occurs during POST BIOS will display a POST code that describes the problem BIOS may also issu...

Page 86: ...A 2 X9SCV Q Motherboard Series User s Manual Notes...

Page 87: ...hese software programs and drivers click the icons to the right of these items Driver Tool Installation Display Screen Note Click the icons showing a hand writing on the paper to view the readme files...

Page 88: ...r III displays crucial system information such as CPU temperature system voltages and fan status See the Figure below for a display of the Supero Doctor III interface Note 1 Both default user name and...

Page 89: ...Control Note SD III Software Revision 1 0 can be downloaded from our Web site at ftp ftp supermicro com utility Supero_Doctor_III You can also download SDIII User s Guide at http www supermicro com PR...

Page 90: ...B 4 X9SCV Q Motherboard Series User s Manual Notes...

Page 91: ...ted to result in significant injury or loss of life or catastrophic property damage Accordingly Supermicro disclaims any and all liability and should buyer use or sell such products for use in such ul...

Reviews: