Superior FVDA18M Installation And Operation Instructions Manual Download Page 7

Superiorfireplaces.US.com

126900-01_B

7

CHECKING GAS CONNECTIONS

 WARNING: Test all gas piping and connections, 

internal and external to unit, for leaks after installing 

or servicing. Correct all leaks at once.

 WARNING: Never use an open flame to check for a 

leak. Apply a noncorrosive leak detection fluid to all joints. 

Bubbles forming show a leak. Correct all leaks at once.

PRESSURE TESTING GAS SUPPLY PIPING SYSTEM 

Test Pressures In Excess Of 1/2 PSIG (3.5 kPa)

1.  Disconnect log set and its individual equipment shutoff valve 

from gas supply piping system.

2.  Cap off open end of gas pipe where equipment shutoff valve was 

connected.

3.  Pressurize supply piping system by either using compressed air 

or opening main gas valve located on or near gas meter.

4.  Check all joints of gas supply piping system. Apply a noncorrosive 

leak detection fluid to all joints. Bubbles forming show a leak.

5.  Correct all leaks at once.
6.  Reconnect log set and equipment shutoff valve to gas supply. 

Check reconnected fittings for leaks.

Test Pressures Equal To or Less Than 1/2 PSIG (3.5 kPa)

1.  Close equipment shutoff valve (see Figure 5).
2.  Pressurize supply piping system by either using compressed air 

or opening main gas valve located on or near gas meter.

3.  Check all joints from gas meter to equipment shutoff valve (see 

Figure 5). Apply a noncorrosive leak detection fluid to all joints. 

Bubbles forming show a leak.

4.  Correct all leaks at once.

Figure 5 - Checking Gas Joints

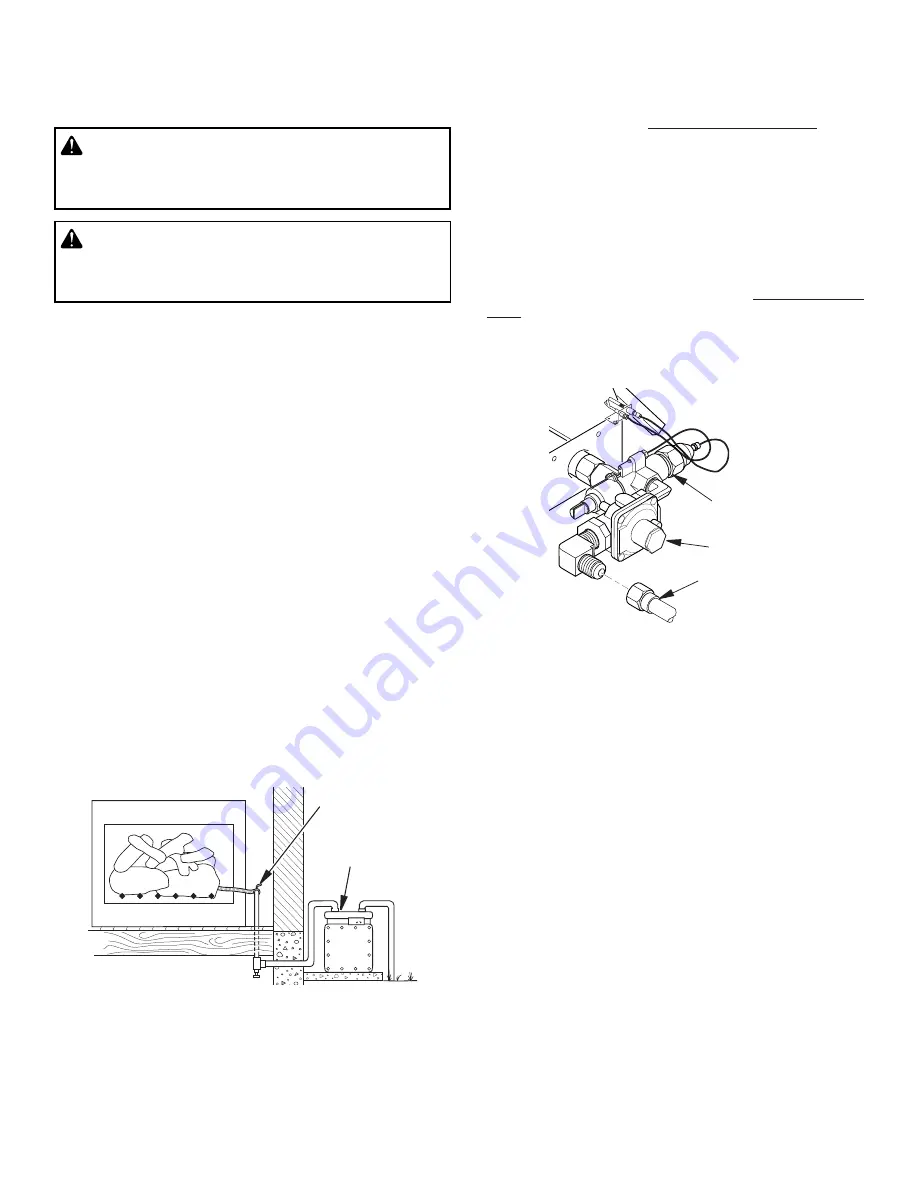
Figure 6 - Installing Inlet Fitting and Gas Connector Tube (Valve 

Cover Removed for Clarity)

Gas Connector 

Tube

Gas Control 

Valve

Regulator

INSTALLATION  

Continued

HEARTH PAN INSTALLATION

If using propane/LP gas, see 

Propane/LP Gas Conversion

, before 

installing hearth pan.
1.  Place burner pan assembly in center of fireplace floor. Make sure 

front of pan faces forward.

2.  Thread gas supply fitting to fireplace gas supply pipe. Adjust to 

most convenient position.

3.  Install gas connector tube to gas supply adapter. Carefully shape 

tube and attach to gas inlet fitting (see Figure 6). Be careful not 

to cause kinks in tube.

4.  Test for leaks following instructions under 

Testing Burner for 

Leaks

, page 9.

5.  Retighten and adjust location of gas control as necessary. Gas 

control should be level, with control rod to the front.

Gas Meter

Equipment 

Shutoff Valve

Propane/LP Gas Conversion

To convert to propane/LP gas, burner inlet fitting and pilot orifice 

must be replaced and regulator pressure must be reset. Propane/LP 

burner inlet fitting is supplied with orifice installed. Propane/LP pilot 

orifice for converting pilot is supplied and is marked with a red stripe.
1.  Remove control rod extension and piezo ignitor by pulling gently.
2.  Remove screws that attach pilot assembly to valve cover and 

valve cover to burner pan (see Figure 7, page 8).

3.  Remove valve cover.
4.  Using a wrench, remove gas control valve and burner inlet fitting 

by turning counterclockwise (see Figure 8, page 8).

5.  Remove burner inlet fitting from gas control assembly (see Figure 

8, page 8). DO NOT remove orifice from this fitting. Propane/LP 

burner inlet fitting is included in hardware kit (see Figure 9, page 

8).

6.  Be sure to use correct orifice for your appliance. Orifice kit in-

cluded with this appliance contains an orifice installed in an air 

mixer fitting.

7.  Using thread sealant (resistant to the action of propane/LP gas) 

on smaller end of fitting, screw burner inlet fitting into outlet side 

of gas control (see Figure 8, page 8). Tighten using a wrench.

Summary of Contents for FVDA18M

Page 1: ...erial and connected to a working flue See page 5 for minimum flue opening IMPORTANT Read this owner s manual carefully and completely before trying to assemble operate or service this log set Improper...

Page 2: ...ng agent is added to the gas The odor helps you detect a gas leak However the odor added to the gas can fade Gas may be present even though no odor exists Make certain you read and understand all warn...

Page 3: ...AFETY Continued in high traffic areas in windy or drafty areas 5 Before installing in a solid fuel burning fireplace the chimney flue and firebox must be cleaned of soot creosote ashes and loose paint...

Page 4: ...NPACKING CAUTION Do not remove the metal data plates fromtheburnerpan Thedataplatescontainimportant warranty and safety information 1 Remove logs hearth kit pan materials and hardware from carton 2 Re...

Page 5: ...tructions and all codes and requirements of the authority hav ing jurisdiction Any modifications to this kit or use of unauthorized components or accessory items will void the manufacturer s warranty...

Page 6: ...and for propane LP gas only a plugged 1 8 NPT tap Locate NPT tap within reach for test gauge hook up NPT tap must be upstream from log set see Figure 4 IMPORTANT Install equipment shutoff valve in an...

Page 7: ...N If using propane LP gas see Propane LP Gas Conversion before installing hearth pan 1 Place burner pan assembly in center of fireplace floor Make sure front of pan faces forward 2 Thread gas supply f...

Page 8: ...eplace injector with propane LP injector with red stripe 16 Replace and tighten pilot line to bracket 17 Using screws removed in step 2 page 7 reattach pilot bracket to valve cover 18 Continue with st...

Page 9: ...modified paper clip or other suitable tool 5 When finished testing turn gas shutoff valve OFF to extinguish all flames ADDING PAN MATERIAL 1 Open bag of ash bed material vermiculite and spread it eve...

Page 10: ...t for the first time after hooking up to gas supply If so the control knob may need to be pressed in for 30 seconds or more This will allow air to bleed from the gas system If control knob does not po...

Page 11: ...tions may have occurred during shipping and handling The pilot is located on the back right hand side of the burner The thermocouple should be fully enveloped in flame The flame should not be lifting...

Page 12: ...lieve any tight bends or kinks in gas supply line 2 Check reset gas regulator pressure see Figure 10 page 8 1 Check for proper gas supply pressure 2 Free burner orifice and manifold ports of any burrs...

Page 13: ...Wrong pilot orifice REMEDY 1 Turn on gas supply or open equipment shutoff valve 2 Turn control knob to PILOT position 3 Press in control knob while in PILOT position 4 Continue holding down control kn...

Page 14: ...ol valve 1 Locate and correct all leaks see Checking Gas Connections page 7 OBSERVED PROBLEM Log set produces a clicking ticking noise just after burner is lit or shut off Log set produces unwanted od...

Page 15: ...he installation date of the appliance If you encounter any problems or have any questions concerning the installation or application of this fireplace please contact your dealer IHP 1508 Elm Hill Pike...

Page 16: ...00 01_B 16 PARTS MODELS FVSA18M FVSA24M FVDA18M FVDA24M AND FVDA30M 3 2 14 8 26 25 15 16 13 20 21 18 24 19 6 4 17 22 23 10 7 5 5 9 9 11 12 1 27 MODEL CATALOG NO FVSA18M F0221 FVSA24M F0223 FVDA18M F02...

Page 17: ...Std Assembly 1 8 901232 01 Gas Line 12 Aluminum 1 9 901430 01 Grate Steps 2 901431 01 Grate Steps 2 10 901243 01 Log Grate 1 901243 02 Log Grate 1 901246 01 Log Grate 1 901246 02 Log Grate 1 901246 0...

Page 18: ...1 901565 03 Bottom Rear Log 1 901566 03 Bottom Rear Log 1 901567 03 Bottom Rear Log 1 2 901656 01 Bottom Front Log Rt 1 901657 01 Bottom Front Log Rt 1 901658 01 Bottom Front Log Rt 1 3 901666 01 Bott...

Page 19: ...o the Product will produce excessive temperatures and could result in a fire hazard c damages caused by failing to provide proper maintenance and service in accordance with the instructions provided w...

Page 20: ...ealer name P126900 01 Innovative Hearth Products reserves the right to make changes at any time without notice in design materials specifications prices and also to discontinue colors styles and produ...

Reviews: