16
17
1
+
direct to function
selection wheel:
water care -
maintenance -
date & time -
keypad -
electrical config -
wifi -
about -
spa mode
spa mode
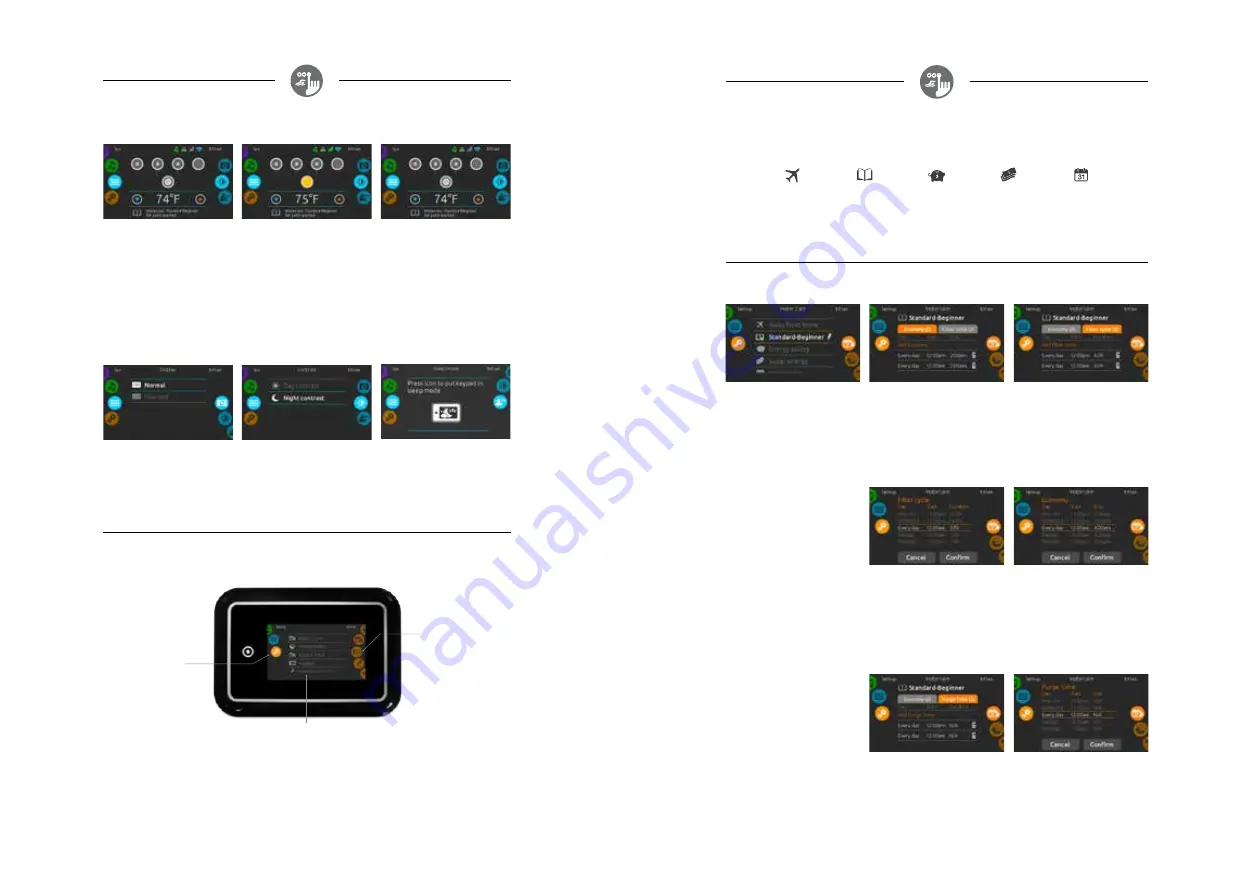
To select the spa mode, slide the left wheel up
or down until the spa icon is highlighted in the
middle.
The home page will display its equipment
start or stop keys, up and down buttons, water
temperature, messages and quick access to
display options:
• display orientation
• display contrast
To select an option, slide the right wheel up or
down until the desire icon menu is highlighted in
the middle.
display orientation
To modify the display orientation settings, slide
the right wheel until the display orientation icon is
highlighted in the middle.
Simply touch the line of the orientation you want
to select.
start or stop accessories
To start or stop an accessory (pump, blower,
light), touch the associated icon. Icons will
become animated when their accessory is turn
on, and animation will stop when turn off.
Icons on the screen will reflect the speed or state
of the devices running on your spa. When an
accessory has more than one speeds press the
button until it reaches the desired speed.
display contrast
To modify the display contrast settings, slide
the right wheel until the display contrast icon is
highlighted in the middle.
Simply touch the line of the contrast you want
to select.
water temperature
The temperature at the bottom of the screen
shows the current water temperature. Use the Up
and Down icon to set the desired temperature.
The set point will appear in blue. After 3 seconds
without any changes to the set temperature value,
the current water temperature will reappear.
When the set value is lower than the current
temperature Cooling to xx.x will appear below.
When the set value is higher than the current
temperature, Heating to xx.x will be indicated
under the value. Normally there is a short delay
before the heating starts, during which Heating
Suspended is indicated under the value.
list of featured items
mode selection
wheel:
settings icon
settings
You can use the Settings mode to manage settings of your spa system.
To select the settings mode, slide the left wheel up or down until the settings icon menu is highlighted in
the middle.
In the Settings page you can access the following:
• water care • electrical configuration
• maintenance
• wifi
• date & time • miscellaneous
• keypad
• about
To select an item, slide the right wheel until the desired icon is highlighted in the middle or press on the
menu name.
sleep
Press key to go directly into the sleep mode.
In sleep mode, water splashing on the keypad
can't inadvertently start/stop a pump.
1
+
water care
The Water care page will help you set up your ideal filtration and heating settings.
Choose, set or modify one of the 5 suggested modes depending on your needs at any given time.
Away from home
In this mode the
spa will always be in
economy; the set point
will be reduced
by 20° F.
Beginner
The spa will never be
in economy mode
and will be filtering
according to the pack's
low level configuration.
Energy Savings
The spa will be in
economy mode during
the peak hours of
the day and resume
normal mode on
the weekend.
Super Energy
The spa will always
be in economy mode
during peak hours,
every day of the week.
Weekender
The spa will be in
economy mode from
Monday to Friday, and
will run normally on
the weekend.
modifying water care schedules
water care
To modify a Water care category, touch the pencil
icon at the right end of the desired water care to
open the selected Water Care menu.
In Economy mode, the set point will be reduced
by 20°F, which means that the heating system
will not be engaged unless the temperature falls to
20°F below the spa's set temperature.
The filtration schedule show on the screen will be
applied to the main filtration pump, most likely
pump 1. If your spa uses a circulation pump
configured to run 24 hours, the screen will show
you the purge setting instead of filtration.
The purges are pre-programmed for a fix number
of minutes, therefore the duration will be set to
N/A on the screen, and only the start time can
be modified.
economy
Touch the Economy tab to change the economy
schedule. You can add economy schedules by
touching the orange line labelled "Add Economy" .
To delete a schedule, touch the garbage can icon
at the right end of the desired line.
You can modify the programmed schedules by
selecting one and adjusting the schedule.
You have several possibilities for the schedule
(Mon-Fri, weekend, every day, or single days).
The schedules will be repeated every week.
The time and duration are set in 30 minute
increments.
purges
Touch the Purge tab to change the purge
settings. You can add purges by touching the
orange line labelled "Add purge time".
To delete a schedule, touch the garbage can icon
at the right end of the desired line.
filter cycles
Touch the Filter cycle tab to change the filter
cycle schedules. You can add filtration schedules
by touching the orange line labelled "Add filter
cycle".
To delete a schedule, touch the garbage can icon
at the right end of the desired line.
Once you have set the schedule, press "Confirm".
If you don't want to keep any changes, press
"Cancel" or use the calendar icon to go back.
You can modify the programmed purges by
selecting one and adjusting the schedule.
You have several possibilities for the schedule
(Mon-Fri, weekend, every day, or single days).
The schedules will be repeated every week.
The time and duration are set in 30 minute
increments. Once you have set the purge,
press "Confirm". If you don't want to keep
changes, press "Cancel" or the calendar icon.


