background image

If you have any questions during the setup process, please call a SuperCloset representative at 1.877.476.9787

1.

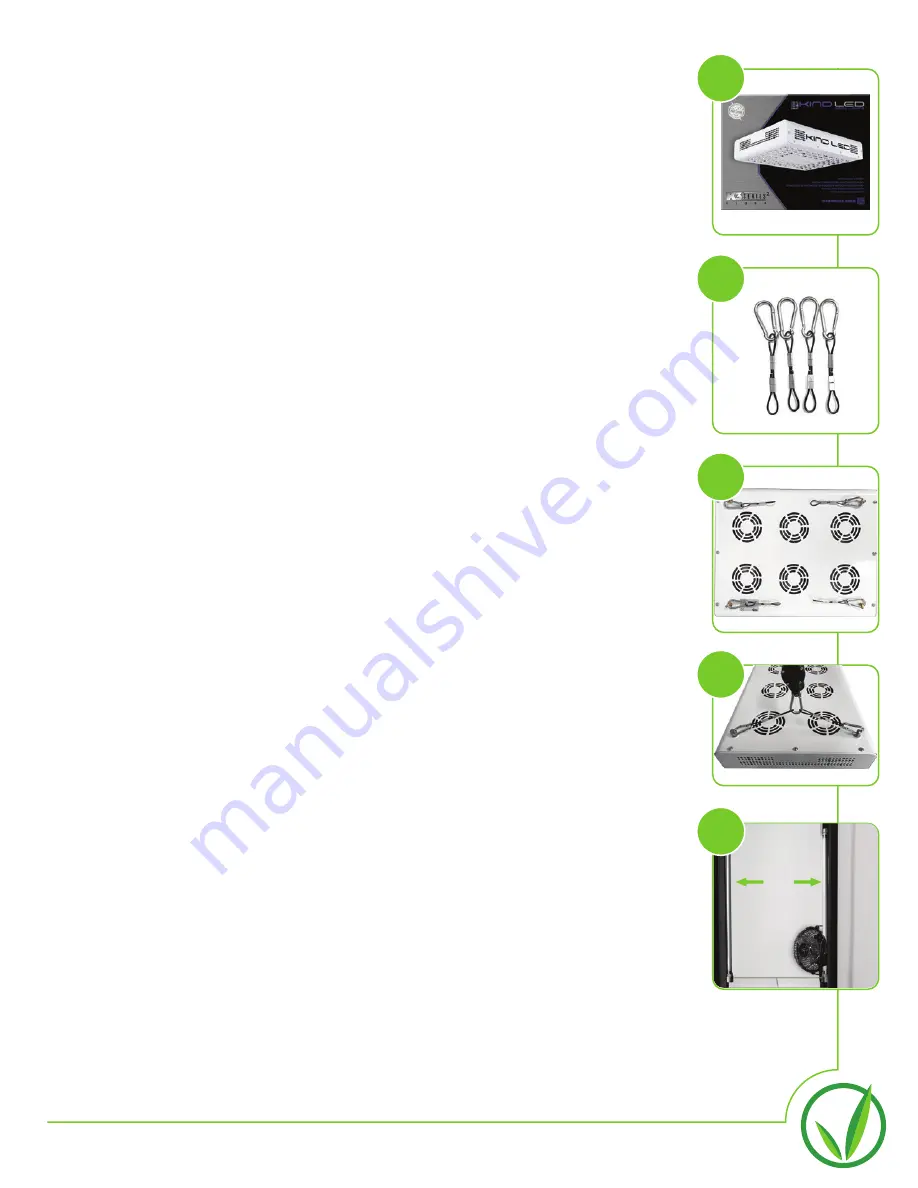
 Unpack KIND LED Grow Light (image a).


2.

 Locate your Hanging Hardware Kit. Using the four (4) shorter lengths of 

cable and the (4) small carabiners, (image b) connect one cable assembly 

to each of the brass hangers on the light (image c).

We have set the light on a convenient Yo-Yo system so the height can be 

adjusted as your plants grow. To lower the light, simply press the button 

located on the side of the Yo-Yo and adjust to the desired height. To raise 

the light pull upward on the end of the Yo-Yo cord.

4.

 Place the Kind LED Light in the bottom of the cabinet. Lower the Yo-Yo 

system until you can connect the other ends of the cable assemblies to the 

Yo-Yo carabiners (image d). Raise the light to the desired height.

5.

 Run the power cord from the LED light through the nearest Elbow opening 

to the back of the cabinet.

Hanging your LED Light

1.

 Locate and unpack the remaining T5 Light Strips in your package. Attach 

the power cord and affix one T5 to each side of your cabinet, via the 

magnetic backing, in the main growing chamber (image e). Run cords 

through the nearest Elbow opening.

Installing your T5 Side Lights

a

b

c

d

e

Summary of Contents for SUPERLOCKER

Page 1: ...INSTRUCTION MANUAL SUPERLOCKER SMART GROW CABINET LED ...

Page 2: ...hank you for choosing SuperCloset You now have the world s best grow cabinet These instructions will guide you through the process of setting up your SuperLocker Please read through the entire instruction manual before you begin including any and all instructions that come with the individual components Lets take a look at the layout and components of your SuperCloset ...

Page 3: ... SOIL POT TRAY 1 4 AIR PUMP TUBING AIR STONES 3 2 NET CUPS LOTUS NUTRIENTS STARTER KIT Ph TESTING KIT SHOT MEASURING GLASS GFCI THERMOMETER HYDROMETER TDS METER NET TRELLIS HOOKS TIES 3 1 ADAPTER T5 LIGHT 2 ELBOW W EXTENSION 1 ELBOW W EXTENSION 1 ELBOW CLAY ROCKS 1 GROW PLUGS SUPERCLONER 14 SMART PLUG OR X2 X2 X2 X2 X3 X3 X2 ...

Page 4: ...ide the cabinet reservoir Reference your Quality Assurance Checklist and verify that you have all of the needed components for your system Let s start with unpacking the SuperCloset Prior to setup make sure you have all of the necessary components by cross referencing with the QAC Quality Assurance Checklist Take this time to familiarize yourself with each of the components ...

Page 5: ...ng and is mounted to the underside ceiling of the cloning chamber upper chamber in this manner image e Once attached run the T5 power cord through the nearest elbow of the back of the cabinet The exterior Elbows will allow you to run your cords out of your cabinet with minimal light leaks and allow for fresh air flow into your cabinet The interior Elbow will facilitate airflow between the Cloning ...

Page 6: ...nd on the lower interior of the cabinet same as the Light power cord 7 Locate the Thermometer Hydrometer image c You will need to remove the battery cover and remove the plastic safety blocker from the battery terminal 8 Use the included Velcro Strips to affix your Thermometer Hydrometer to the inside of your cabinet The best placement for this is towards the top of the cabinet either on the side ...

Page 7: ... Yo and adjust to the desired height To raise the light pull upward on the end of the Yo Yo cord 4 Place the Kind LED Light in the bottom of the cabinet Lower the Yo Yo system until you can connect the other ends of the cable assemblies to the Yo Yo carabiners image d Raise the light to the desired height 5 Run the power cord from the LED light through the nearest Elbow opening to the back of the ...

Page 8: ...tal nodes on the front of the Air Pump Run the other end of the black tubing through the channels located on the rim of the reservoir image e 5 Connect the other end of the black tubing to the Air Stones Once these two pieces are connected ensure the Air Stones remain flat on the floor of the reservoir 6 Turn the black dial on top of your Air Pump clockwise until it stops Replace the lid of the Su...

Page 9: ...ervoir Note the airstones have a male end that will fit in the black Air Pump tubing 3 Locate the black Air Pump Tubing and connect to the end of the Air Stones Arrange the tubing into the channels located on rim of the Reservoir image c 4 Locate the Air Pump included in your shipment image d Connect the open end of the black tubing from the Air Stones to the metallic outputs located on the Air Pu...

Page 10: ... image d 11 Now we can place our Net Cups into the openings of the top of the reservoir Once in place arrange the top feed hoses to the center of the net cups 12 Notice the length of tubing located on the top side of the reservoir lid image e This is your Reservoir Drainage Tube By opening the valve turning parallel to the tube and turning the pump on you can easily drain your reservoir See image ...

Page 11: ... c and the 3 IN 1 adapter image d DO NOT PLUG IN THE POWER STRIP YET 2 Plug in the following from left to right Properly configured Power Strip Should look like this 1 Smart Plug 1 Once the Smart Plug is plugged in plug in the 3 in 1 Adapter with the following T5 Side Light 1 T5 Side Light 2 Kind LED Grow Light 2 Air Pump 1 3 Air Pump 2 4 Internal Circulation Fan 5 Carbon Filter Fan 6 T5 Clone Cha...

Page 12: ...and the system should spring to life before your very eyes 1 LED Light is properly hung 2 Watering System tube is securely fastened to the top of the Water Pump 3 Both Reservoirs are filled with water and Water Pump is fully submerged 4 Air Pump is next to NOT IN the reservoir 5 Light Power Cord and T5 Power Cords are plugged into Smart Plug 1 6 Water Pump Power Cord is plugged into Smart Plug 2 7...

Reviews: