background image

Preparing for Installation

1-7

1

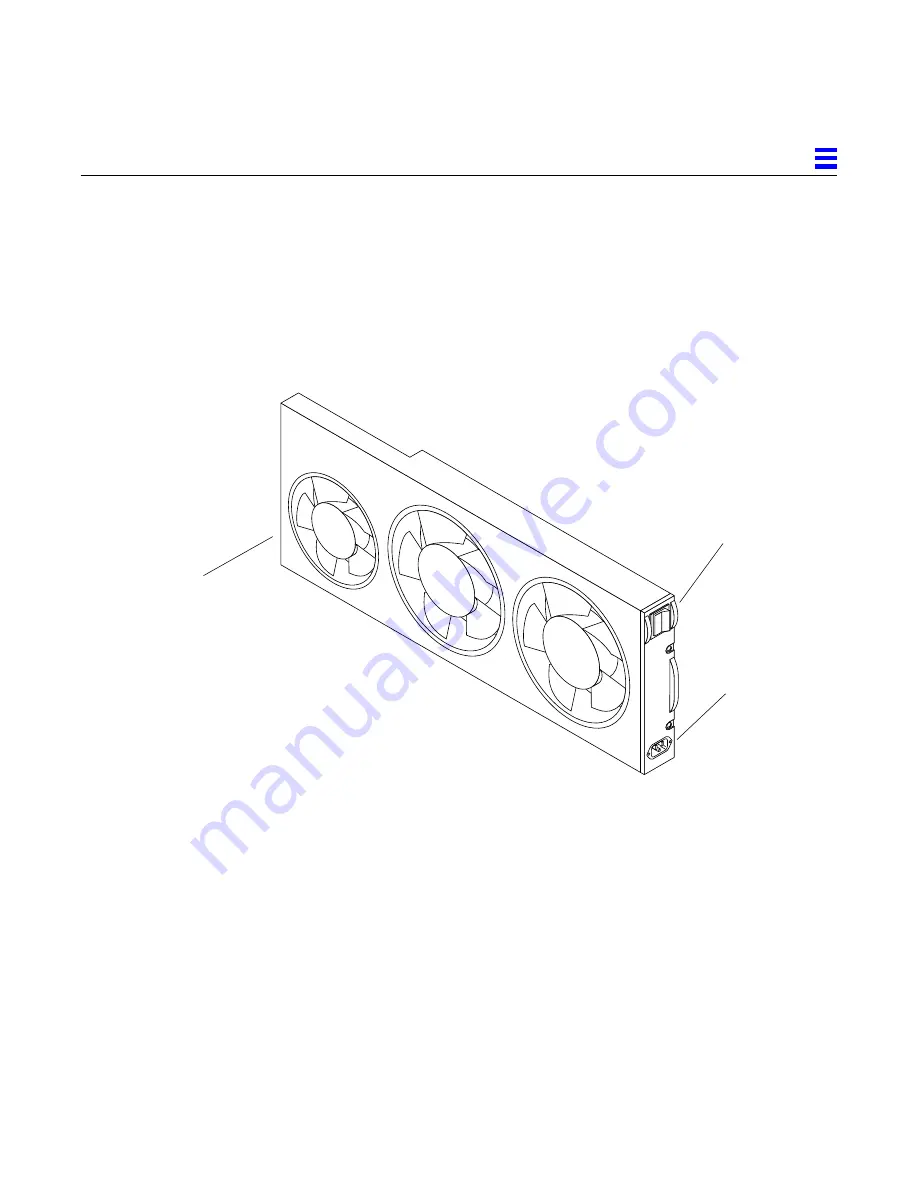
1.3.2 Fan Tray

The SPARCserver 1000 fan tray, shown in Figure 1-5, provides cooling for the
power supply, system boards, and the SCSI tray assemblies. In addition, this
module routes AC power from the rear of the chassis to the power supply.
Each fan has a fail sensor to enable orderly system shutdown if a fan fails. (DC
power for the fans is obtained from the power supply via a connector in the
rear of the fan tray.) The AC power switch is on the fan tray.

Figure 1-5

Fan Tray

AC plug

Power supply
connector (hidden)

Power switch

Summary of Contents for SunSwift SPARCserver 1000

Page 1: ...SPARCserver1000SystemInstallation Manual Part No 801 2893 13 Revision A June 1996 Sun Microsystems Computer Corporation 2550 Garcia Avenue Mountain View CA 94043 U S A ...

Page 2: ...TABILITY FITNESS FOR A PARTICULAR PURPOSE OR NON INFRINGEMENT Copyright 1996 Sun Microsystems Inc 2550 Garcia Avenue Mountain View Californie 94043 1100 U S A Tous droits réservés Ce produit ou document est protégé par un copyright et distribué avec des licences qui en restreignent l utilisation la copie et la décompilation Aucune partie de ce produit ou de sa documentation associée ne peut être r...

Page 3: ...atures 1 2 Chassis Assembly 1 5 Power Supply 1 6 Fan Tray 1 7 SCSI Tray Assembly 1 8 System Board 1 9 Options 1 10 External Options 1 11 Internal Options 1 11 Specifications 1 12 Physical Specifications 1 12 Electrical Specifications 1 12 Environmental Requirements 1 13 ...

Page 4: ...nnecting the Power Cord 2 2 Connecting the Network Cable to the Server 2 3 Connecting the Network Cable to the Transceiver 2 4 Connecting an ASCII Terminal 2 6 Connecting External SCSI 2 Devices 2 7 Precautions for JumpStart Automatic Installation 2 8 3 Powering the System On and Off 3 1 Powering On the System 3 1 Boot Messages 3 5 Powering Off the System 3 6 A General Rules for System Configurati...

Page 5: ...Contents v SIMMs A 4 NVSIMM A 6 Selecting Drive ID Numbers in the SCSI Tray A 7 Connecting Cables A 9 SCSI Cables A 9 Ethernet Cables A 9 Video Cables A 9 Glossary Glossary 1 ...

Page 6: ...vi SPARCserver 1000 System Installation Manual June 1996 ...

Page 7: ... 1 8 Example of 10Base T Twisted Pair Ethernet 1 14 Figure 2 1 Key Switch Positions 2 2 Figure 2 2 AC Power Switch and Power Receptacle 2 3 Figure 2 3 Transceiver Cable 2 3 Figure 2 4 10Base T Ethernet Connection 2 4 Figure 2 5 Connecting Twisted Pair Ethernet to N type Coaxial Cable 2 5 Figure 2 6 Ethernet Cabling Length Example Using N type Cable 2 6 Figure 2 7 Serial Port Connection for an ASCI...

Page 8: ...Front Panel 3 4 Figure 3 4 Reset Switch Behind the Front Panel and System Status LEDs 3 4 Figure A 1 Locations of SuperSPARC modules A 2 Figure A 2 SBus Card Locations A 3 Figure A 3 SIMMs and NVSIMM A 5 Figure A 4 SIMM Locations on the System Board A 6 Figure A 5 NVSIMM Jumper Locations A 7 Figure A 6 SCSI Tray Assembly A 8 ...

Page 9: ...earance and Service Access 1 12 Table 1 5 Power Supply Characteristics 1 12 Table 2 1 Ethernet Cabling Limitations for N type Coaxial Cable 2 5 Table 3 1 Front Panel LED System Status 3 5 Table A 1 Example of Connector and Slot Priorities A 3 Table A 2 Example of SBus Card Distribution A 4 Table A 3 ID Numbering in a SCSI Tray A 8 ...

Page 10: ...x SPARCserver 1000 System Installation Manual June 1996 ...

Page 11: ...re task is named Refer to the operating system documentation that was shipped with your system when you need help with commands or procedures such as Shutting down the system Booting the system Configuring devices Other software procedures Depending on the operating system you are using complete descriptions of commands and procedures can be found in On line AnswerBook documentation that comes wit...

Page 12: ...ystem su password AaBbCc123 Command line placeholder replace with a real name or value To delete a file type rm filename AaBbCc123 Book titles new words or terms or words to be emphasized Read Chapter 6 in User s Guide These are called class options You must be root to do this Table P 2 Related Documents Application Name Part Number Installation SBus Installation Guide for Deskside and Data Center...

Page 13: ...stallation Manual 801 2888 xx disk card Installation Manual 801 7671 xx Safety Other SPARCserver 1000 Cabinet Regulatory Compliance Manual 801 2892 xx Sun Site Preparation Guide Manual Set 825 1392 xx Country Telephone Fax United States 1 800 873 7869 1 800 944 0661 United Kingdom 0 800 89 88 88 0 800 89 88 87 France 05 90 61 57 05 90 61 58 Belgium 02 720 09 09 02 725 88 50 Luxembourg 32 2 720 09 ...

Page 14: ...l contact can result in serious injury or death Caution Improper handling by unqualified personnel can cause serious damage to this equipment Unqualified personnel who tamper with this equipment may be held liable for any resultant damage to the equipment Individuals who remove any outer panels to access this equipment must observe all safety precautions and ensure compliance with skill level requ...

Page 15: ...e 1 1 lists in order the tasks that are required to install a SPARCserver 1000 system Table 1 1 Task Map Task Reference Setting up the system Chapter 2 Powering up Chapter 3 SBus card installation SPARCserver 1000 System Service Manual Installing other options Installation manual for each peripheral or option Verification and diagnostics SPARCserver 1000 System Service Manual and POST Diagnostic M...

Page 16: ...ht SuperSPARC modules Up to 2 Gbytes of memory with 16 Mbit DRAM SIMMs Up to 12 SBus slots three per system board On board 10Base T Ethernet Up to four on board SCSI 2 ports Up to four half height 3 5 inch disk drives Up to three disk cards featuring four half height 3 5 inch disk drives per card CD ROM drive Half high 5 1 4 inch tape drive The SPARCserver 1000 system features an architecture allo...

Page 17: ...tion 1 3 1 Figure 1 1 SPARCserver 1000 System The internal components of the SPARCserver 1000 system are shown in Figure 1 1 and include the following Power supply Fan tray SCSI tray assembly with control board System board ...

Page 18: ...1 4 SPARCserver 1000 System Installation Manual June 1996 1 Figure 1 2 Internal Components Power supply SCSI tray assembly Fan tray System board Control board ...

Page 19: ... system components from both the front and rear of the system Another advantage of this design is that component connections are made with a small physical backplane Figure 1 3 System Chassis Assembly The SPARCserver 1000 backplane contains 1 XDBus System monitoring bus System scan bus The 72 bit wide XDBus 64 bit data and 8 bit parity provides 230 Mbytes of usable data bandwidth Backplane Card gu...

Page 20: ...s LEDs The power supply plugs directly into the backplane through two 240 pin connectors Connection to the fan tray is provided through a single connector located on the right rear side of the power supply The connector routes AC power to the power supply and provides DC power for the fans and the fan fail signals Figure 1 4 Power Supply Backplane connectors hidden Fan tray connector Key switch LE...

Page 21: ...es In addition this module routes AC power from the rear of the chassis to the power supply Each fan has a fail sensor to enable orderly system shutdown if a fan fails DC power for the fans is obtained from the power supply via a connector in the rear of the fan tray The AC power switch is on the fan tray Figure 1 5 Fan Tray AC plug Power supply connector hidden Power switch ...

Page 22: ... the SCSI disk drive tray The SCSI tray assembly mounts above the power supply in the chassis front The backup device tray on the left contains a SunCD Plus drive and may optionally contain a SCSI 2 tape device The SCSI disk drive tray on the right contains two or four half height disk drives The control board mounts on top of the SCSI disk drive tray on the right and includes Central arbiter CARB...

Page 23: ... 3 4 System Board The SPARCserver 1000 system must have at least one system board installed in card cage slot 0 The system board Figure 1 6 features One single ended narrow SCSI 2 port 10Base T Ethernet port Two serial ports One or two SuperSPARC modules Backup device tray Reset switch Control board Service port SCSI disk drive tray ...

Page 24: ...city to a basic system System options include NVSIMMs ECC memory DRAM SIMM expansion SBus cards Disk drives Tape drive Disk card SuperSPARC modules System board with 0 CPU and 0 Mbyte memory System board with 2 CPU and 64 Mbyte memory System board with 2 CPUs and 128 Mbyte memory SuperSPARC modules SBus connectors SIMMs Serial connectors SCSI connector LEDs 10BaseT Ethernet connector Keyboard conn...

Page 25: ...pe boards Table 1 2 summarizes the internal options for the SPARCserver 1000 system Table 1 2 Internal Options Option Location Quantity Comments System board Chassis 1 4 per system SuperSPARC module System board 1 8 per system 0 2 modules on each system board1 1 A system board with zero SuperSPARC modules can be used for memory expansion and for additional SBus slots SIMMs System board 0 16 per sy...

Page 26: ...n 54 cm Weight 70 lb approx 32 kg Actual weight depends on the installed options Power cord 6 ft 1 8 m Table 1 4 Server Clearance and Service Access US Metric Comments Front 12 in 31 cm Access to storage media key switch and reset switch Rear 16 in 41 cm Access to system board fan tray and cables Left 6 in 16 cm To maintain airflow Right 6 in 16 cm To maintain airflow Table 1 5 Power Supply Charac...

Page 27: ...Circuits Your SPARCserver 1000 system uses nominal input voltages of 115 VAC or 230 VAC Sun products are designed to work with single phase power systems having a grounded neutral conductor To reduce the risk of electrical shock do not plug Sun products into another type of power source Contact your facilities manager or a qualified electrician if you are unsure what type of power is supplied to y...

Page 28: ...rosystems products have RJ 45 connectors which resemble the smaller RJ 11 connectors used for modular telephone cables A computer using twisted pair cable does not connect directly to the network The twisted pair cable connects the computer to a hardware interface called a hub also known as a repeater concentrator gateway or bridge The hub connects by a second cable a coaxial or other cable to the...

Page 29: ...the host and the hub If you have problems verifying connection between Sun equipment and your hub verify that your hub also has the link test function enabled Refer to the Troubleshooting chapter in the SPARCserver 1000 System Service Manual and the manual provided with your hub for more information about the 10BaseT Link Integrity Test function 1 6 3 Preparing the Tabletop Area The SPARCserver 10...

Page 30: ...1 16 SPARCserver 1000 System Installation Manual June 1996 1 ...

Page 31: ...rd from their packing box and set them aside These items are needed to power on the system Follow graphic instructions on the shipping container to remove the server from the container Warning Two people are required to lift the server because it weighs more than 70 lbs 32 kg and personal injury could result 2 1 1 Repacking for Shipment Use the original shipping containers and packing materials to...

Page 32: ...rt the key provided with your system into the front panel key switch Turn it to the Standby position fully counterclockwise See Figure 2 1 Figure 2 1 Key Switch Positions 2 Turn the AC power switch to Off This switch is in the upper left corner of the system rear See Figure 2 2 3 Plug the female end of the power cord into the AC connector This connector is in the lower left corner of the system re...

Page 33: ...corporated directly on the system board installed in slot 0 top slot To connect the server side of the network cable 1 Locate a transceiver cable with two RJ 45 connectors Figure 2 3 shows one style of Ethernet cable Figure 2 3 Transceiver Cable 2 Plug one end of the transceiver cable into the Ethernet port The Ethernet port is located on the lower right side of the system board in card cage slot ...

Page 34: ...e cable to the transceiver See Figure 2 5 To connect the cable to the transceiver use instructions provided with the vampire tap If the Ethernet cable has N type connectors connect the Ethernet cable to the transceiver a Screw the Ethernet coaxial cable into one of the round screw on type connectors on the transceiver Use either one of the transceiver connectors b Screw the other Ethernet coaxial ...

Page 35: ...4M maximum 500M If cable falls shorter than one of these values add cable to achieve next highest value Distance between transceivers multiples of 2 52 2 Transceivers are placed at intervals of 2 5 meters or multiples of 2 5 meters along the Ethernet cable Example transceivers are connected 2 5 meters apart not 2 0 meters Example transceivers are connected 15 meters apart 6 multiples of 2 5 meters...

Page 36: ...I Terminal An ASCII terminal or workstation must be connected to the server to display diagnostic messages produced by the power on self test POST program A terminal is not required for normal server operation If necessary find a terminal and connect it to the server To connect an ASCII terminal 1 Plug the terminal cable into serial port A on the system board in slot 0 See Figure 2 7 Note Connect ...

Page 37: ...ote For information about connecting SCSI peripherals refer to the Solaris Handbook for SMCC Peripherals External SCSI 2 devices connect to your system via the built in single ended SCSI 2 port on system boards 1 through 3 or via FSBE S SWIS or DWIS S SBus cards installed in system boards 0 3 Note The on board SCSI 2 bus on the system board in slot 0 controls internal SCSI tray devices Therefore t...

Page 38: ...are The software that enables this feature is present on a hard disk in your system JumpStart will run only when the system is powered on for the first time Caution JumpStart may incorrectly install the system as a standalone workstation You must prevent JumpStart automatic installation from proceeding if the appropriate server specific configuration information is not in place Information about t...

Page 39: ...ction of the system a Ensure the key switch on the front panel is in the Standby position completely counterclockwise see Figure 3 1 b Ensure the AC power switch on the system rear is off and the server power cord is plugged into the server and wall socket Caution Do not disconnect the power cord from the wall socket when working on the server This connection provides a ground path that prevents d...

Page 40: ...stem is running If this LED fails to turn on and the middle LED is on a severe hardware fault exists Warning Never move the system when the power is on Failure to heed this warning may result in catastrophic disk drive failure Always power the system off before moving it 5 Watch the terminal screen for possible error messages from the POST diagnostic program POST tests subassemblies and some inter...

Page 41: ...move the key from the key switch 2 Remove the plastic front panel Push up on the latch at the bottom of the panel and gently pull the bottom of the panel towards you The top of the front panel rests in a grooved channel on the system top front edge Once the bottom latch is released the front panel lifts off Figure 3 3 3 Insert the back of a pencil or other narrow object into the small opening in t...

Page 42: ...System Installation Manual June 1996 3 Figure 3 3 Removing the Front Panel Figure 3 4 Reset Switch Behind the Front Panel and System Status LEDs 5 Return the key to the key switch B A Reset switch accessed through hole LEDs ...

Page 43: ...s LEDs on the front panel See Table 3 1 and Figure 3 4 Ideally when self test completes both left and right LEDs are on Less ideal is if all LEDs are on system needs service but is able to run The worst condition is if the left and middle LEDs are on system cannot boot or if no LED is on SPARCserver 1000XX POST V4 1 various test messages SPARCserver 1000 Series No Keyboard ROM Rev MB Memory instal...

Page 44: ...onnect or plug in any cable while power is applied to the system To shut down the system and give users a shutdown warning 1 Back up the system files and data to tape if necessary 2 Notify users that the system is going down 3 Halt the system using the appropriate commands 4 Wait for the system halted message and the boot monitor prompt 5 Turn the key switch on the front panel of the server to the...

Page 45: ...g Installation Locations Each component described in this appendix has a specific recommended location The following sections describe the locations for each component A 1 1 System Board Slots System boards are installed at the factory from the lowest card cage slot number 0 at the card cage top to the highest slot number 3 at the bottom Air restrictor boards must be installed in all empty slots S...

Page 46: ... removing or installing SuperSPARC modules and avoid contact with the heatsinks Hold SuperSPARC modules only by the edges Each system board has two SuperSPARC module connectors designated A and B location A is closest to the backplane connector See Figure A 1 The modules mount above the system board on standoffs Modules should first be installed in the A connectors on consecutive system boards sta...

Page 47: ...A 2 Figure A 2 SBus Card Locations The system board in slot 0 must have the minimum required configuration The on board SCSI port on the system master board must be terminated All SBus slots are available Each type of SBus card should be distributed evenly among available system boards Table A 1 Example of Connector and Slot Priorities System Board Slot 0 System Board Slot 1 System Board Slot 2 Co...

Page 48: ...e low density SIMM uses 1 Mbit by 4 bit DRAMs Two vendors are used so a slight variation exists in physical appearance between the two products See Figure A 3 The 32 Mbyte high density SIMM uses 4 Mbit by 4 bit DRAMs Each vendor uses the same printed circuit card for both the 8 and 32 Mbyte SIMMs so no major difference in appearance exist between a given vendor s high and low density SIMMs Only on...

Page 49: ... 8 SIMMs 12 SIMMs or 16 SIMMs When installing memory first install all group 0 SIMMs on all system boards from the lowest board slot number to the highest Then install group 1 SIMMs in the same order followed by groups 2 and 3 if there for all remaining SIMMs 1 34 35 68 1 2 12 18 3 9 5 10 11 CBS2 CBS4 SIMM Vendor 1 Capacity Type P N 8 Mbyte DRAM 501 1817 32 Mbyte DRAM 501 2196 SIMM Vendor 2 Capaci...

Page 50: ...tionally 8 and 32 Mbyte SIMMs can be used on the same board provided they do not reside within the same group Figure A 4 SIMM Locations on the System Board A 1 4 1 NVSIMM Before installing NVSIMMs you must first activate the battery to insure data retention To activate the battery 1 Locate the jumper on the right side of the NVSIMM See Figure A 5 J2800 J3200 J3600 J4000 J2900 J3300 J3700 J4100 J30...

Page 51: ...vice controller The controller connects to the system board via the backplane The SunCD Plus device mounted in the lower left location in the SCSI tray has a device ID of 6 The tape drive if installed mounts just above the SunCD Plus and has device ID 5 Your system can have from two to four disk drives mounted on the SCSI tray right side behind a metal faceplate The device IDs for these devices ar...

Page 52: ...6 A Figure A 6 SCSI Tray Assembly Table A 3 lists the correct ID numbers for the six drives in the SCSI tray Table A 3 ID Numbering in a SCSI Tray Device ID SunCD 6 Tape drive 5 Disk drive 3 Disk drive 2 Disk drive 1 Disk drive 0 Tape Drive SunCD Disk drives ...

Page 53: ...oard 0 Refer to Chapter 2 of this manual and to the instructions that come with your Ethernet transceivers for additional information The SPARCserver 1000 system supports twisted pair Ethernet installations A 3 3 Video Cables Only one CGSIX interface is allowed per system It must be installed in SBus slot 1 of system board 0 The keyboard must be plugged into the keyboard connector of system board ...

Page 54: ...A 10 SPARCserver 1000 System Installation Manual June 1996 A ...

Page 55: ... The SPARCserver 1000 arbitration system consists of one Central Arbiter CARB on the control board and one Board Arbiter BARB on every system board ASIC Applications Specific Integrated Circuit Many circuits that formerly were composed of many ICs and other components are now implemented by single ASICs Among these are BARB CARB BBC BIC BW MQH IOC and SBI See individual ASIC names for details Back...

Page 56: ...erface Chip Four BICs on each system board connect the board to the backplane XDBus Board The term board refers to printed circuit boards larger than a certain size for example larger than 3x5 inch SBus cards and SPARC modules There are two types of boards in the SPARCserver 1000 system system boards maximum of four and control board one only See also Card and Module Relative sizes of the system b...

Page 57: ...PARC module BootBus this system board bus connects the OpenBoot EPROM to the SuperSPARC module JTAG for factory use only BW Bus Watcher The system board has two BWs one for each processor BWs convert XDBus signals to XBus signals and pass them to the cache controller MXCC on the processor module Together the BWs and MXCC control the flow of information between the XDBus and the processors and thei...

Page 58: ...ation with board arbiter ASICS BARBs on system boards to determine which processor controls the bus structure at any instant The control board mounts on top of the SCSI tray Disk card An optional SCSI 2 disk expansion board featuring four 3 1 2 inch disk drives The card cage can accommodate up to three residing in slots 1 3 Filler panel See Air Restrictor Board ID Identity code number or address I...

Page 59: ...anel LED System Status System Board The system board has ten LEDs on the board rear panel Two green LEDs left positions denote the presence of zero one or two SuperSPARC modules The remaining eight yellow LEDs right positions display board activity and status Module See SuperSPARC Module MQH Memory Queue Handler The MQH on the system board provides the interface between the system board SIMMs and ...

Page 60: ...p of NVSIMMs This feature prevents memory failure should one battery fail Power on Reset Reset signals produced by reset circuitry on the control board At power on reset is asserted for 200msec and is distributed to each system board to initialize all ASICs The reset PAL maintains system reset until Vtt is ready Processor Bus Found only on the SuperSPARC module To compare bus types see Bus Process...

Page 61: ...ck An oscillator driven timing means governing the speed at which SBus based devices operate SCSI Tray This tray can hold up to six SCSI 2 devices and the control card The chassis accommodates one SCSI device tray SIMM Single In line Memory Module Sixteen SIMM sockets reside on the system board A SIMM consists of control circuitry and numerous DRAMs SIMMs are 8 or 32 Mbyte See also NVSIMM SuperSPA...

Page 62: ...y Clock TODC contains the system date and time year month day hour minutes Every system board has a TODC so at boot time the control board selects the TODC on one system board to be the master datekeeper for the entire system U number See J number XBus The XBus is a high speed bus located on the SuperSPARC module It connects the Bus Watchers BWs MXCC IOC and SBΙ See also Bus XDBus This is the main...

Page 63: ...rol Glossary 4 boot bootbus Glossary 3 bus Glossary 3 C cabling ethernet 2 3 2 4 length 2 6 preparation for 2 2 card cage Glossary 4 chassis 1 5 clearance requirements 1 12 configuring ASCII terminal 2 7 connecting ASCII terminal 2 6 ethernet cables A 9 network cable to server 2 3 to transceiver 2 4 power cord 2 2 SCSI cables A 9 video cables A 9 control board Glossary 4 features 1 8 mounting 1 8 ...

Page 64: ...tem 1 2 filler panel Glossary 4 G groups SIMM A 5 H halting the system 3 6 I installation preparation for 1 1 SBus card 1 1 SIMM A 5 J jumpers Glossary 4 K key switch Glossary 5 location 3 1 positions 2 2 keys location 2 1 L LEDs Glossary 5 status 1 6 system status 3 5 lifting the server 2 1 limitations cable ethernet 2 5 link test function 1 15 2 6 M messages bootup 3 5 module See SuperSPARC moni...

Page 65: ...Glossary 7 card location A 3 slots 1 11 SCSI cables connecting A 9 device address A 7 external 2 7 ID numbers A 7 tray contents 1 8 selecting SBus card location A 3 SCSI ID numbers A 7 SIMM locations A 4 SuperSPARC module location A 2 serial port A connection to 2 6 shipping container opening 2 1 SIMM groups A 5 installation A 5 locations A 4 options A 4 site preparation 1 13 specifications enviro...

Page 66: ... 1 weight 1 12 system board description Glossary 8 ethernet port location 2 3 features 1 9 slot positions A 1 T task map 1 1 transceiver cable example of 2 3 network 1 15 tty terminal removal 3 6 twisted pair cables 1 14 U unpacking the system 2 1 V video cables connecting A 9 X XBus Glossary 8 XDBus 1 5 Glossary 8 ...

Page 67: ...RevisionHistory Revision Dash Date Comments 801 2893 13 A June 1996 2nd Revision to FCS 801 2893 11 A August 1993 1st Revision to FCS 801 2893 10 A May 1993 First Customer Ship FCS ...

Page 68: ...SPARCserver 1000 System Installation Manual June 1996 ...

Page 69: ...gree Applicable Comments The information provided in SPARCserver 1000 System Installation Manual was complete Strongly Strongly Not Agree Agree Disagree Disagree Applicable Comments The information I needed was easy to find Strongly Strongly Not Agree Agree Disagree Disagree Applicable Comments The manual was useful to me Strongly Strongly Not Agree Agree Disagree Disagree Applicable Comments Do y...

Page 70: ...LED IN THE UNITED STATES SUN MICROSYSTEMS INC Attn Manager Hardware Publications MS MTV15 42 2550 Garcia Avenue Mt View CA 94043 BUSINESS REPLY MAIL FIRST CLASS MAIL PERMIT NO 1 MOUNTAIN VIEW CA POSTAGE WILL BE PAID BY ADDRESSEE ...

Reviews: