


2. Front Seat
S908343
A: REMOVAL
S908343A18
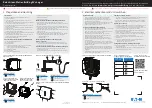
1) While operating button (located on top of
backrest), lift headrest out with hand placed
between backrest and headrest.
S5M0303
2) Pull reclining lever back to fold backrest all the
way forward. While pulling slide adjuster lever,
move seat all the way forward.
3) Remove bolt cover at rear end of slide rail.
4) Remove bolts securing seat rear.
S5M0366
5) While pulling slide adjuster lever, slide seat all
the way back.
6) Remove bolts securing front of seat.
G5M0344
7) While disconnecting side airbag connector,
detach front seat. (Side airbag equipped vehicle)
and inner belt connector.
CAUTION:
쐌
When removing seat from vehicle, take care
not to damage body, seat, or trim.
쐌
After the front seat has been removed from
side airbag equipped vehicle, store it as
instructed in AIRBAG REPAIR SECTION. <Ref.
to AB-15, CAUTION, Side Airbag Module.>
B: INSTALLATION
S908343A11
1) While operating button (located on top of
backrest), lift headrest out by placing your hand
between backrest and headrest.
S5M0303
2) Pull reclining lever back to fold backrest all the
way forward. Pull slide adjuster lever and move
lower slide rail all the way backward.
3) Position seat in compartment and align the
holes on the seat with the holes on the vehicle
body side.
4) Secure the front of seat using inward and out-
ward bolts (A) and (B) in that order.
5) While pulling slide adjuster lever, move seat all
the way forward.
6) Secure the rear of seat using inward and out-
ward bolts (C) and (D).
S5M0227A
7) Connect inner belt connector.
8) Connect side airbag connector. (Side airbag
equipped model)
9) Install bolt cover on rear end of slide rail.
10) Install headrest on backrest.
CAUTION:
Confirm that seat can move smoothly and be
locked securely at any position.
SE-5
FRONT SEAT
Seats