24
M2-H
Description, Care and Maintenance
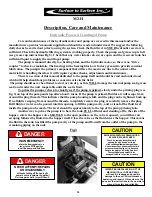
Filter / Shear System
The filter / shear (Fig.6a) system on the M2 is an integral part of the mixing system and to operate efficiently
requires daily cleaning of the stainless steel internal filter /shear. The filter / shear system is a two-piece unit
(Fig.6b) consisting of an outside housing and an internal filter / shear. The filter / shear will trap any debris,
such as parts of bags, stones, leaves grass etc. The proper procedure for cleaning the filter / shear is to close
the suction valve from the reservoir tank to the pump, rotate the two “Outlet” valves to the closed position,
remove the 3 inch Snap Loc coupler at the right end of the filter housing, remove the 2 inch Snap Loc
coupler on the discharge pipe of the centrifugal pump. You will now be able to remove the internal filter /
shear from the housing. After the internal filter / shear has been removed, you will see on the end of the filter
/ shear a pipe plug (Fig.6b). Remove the pipe plug and wash out the filter / shear with clear water. Reinstall
the pipe plug into the filter / shear, reinstall the filter / shear in the housing. Do-not clamp the 3 inch coupler
until the 2 inch coupler and gasket are properly lined up. After all pieces are correctly lined up, clamp the 3
inch coupler 1
st
and 2 inch coupler 2
nd
and reinstall the safety pins. Open all of the valves that were closed
prior to removing the filter / shear.
WARNING
while the unit is in operation.
Serious personal injury will result.
NEVER ATTEMPT TO REMOVE
OR CLEAN THE FILTER SHEAR
CAUTION
CARE MUST BE TAKEN WHEN
INSTALLING THE COUPLER GASKETS.
If the gaskets are not properly lubricated
and installed, a leak may develop.
Fig.6a
Fig.6b
DANGER
NEVER ATTEMPT REPAIRS
OR DISASSEMBLY
without shutting off the hydraulic
power source (customer supplied)
Serious personal inj ury will result.
Summary of Contents for M2-H
Page 2: ...2 This page left blank intentionally ...
Page 13: ...13 ...
Page 18: ...18 M2 H Identifying Your Machine Components Location of Tags and PIN Plates ...
Page 19: ...19 SECTION II Description Care and Maintenance ...
Page 31: ...31 SECTION III Set up and Installation of Unit in Detail ...
Page 33: ...33 SECTION IV Operating the M2 Unit ...
Page 41: ...41 SECTION V Troubleshooting the M2 Unit ...
Page 44: ...44 SECTION VI Periodic Maintenance Repair Information ...
Page 49: ...49 SECTION VII OEM Repair Information ...
Page 62: ...62 ...
Page 63: ...63 ...
Page 64: ...64 ...
Page 68: ...68 SECTION VIII Parts Manual ...


