Stryker SDC3 Manual Download Page 41

35

Selecting the Save Location

The Save screen is divided into three columns for saving images and video to external media:

•  Save to Disc
•  Save to USB/iPad
•  Send via Network

Images and video can be saved to different media simultaneously�

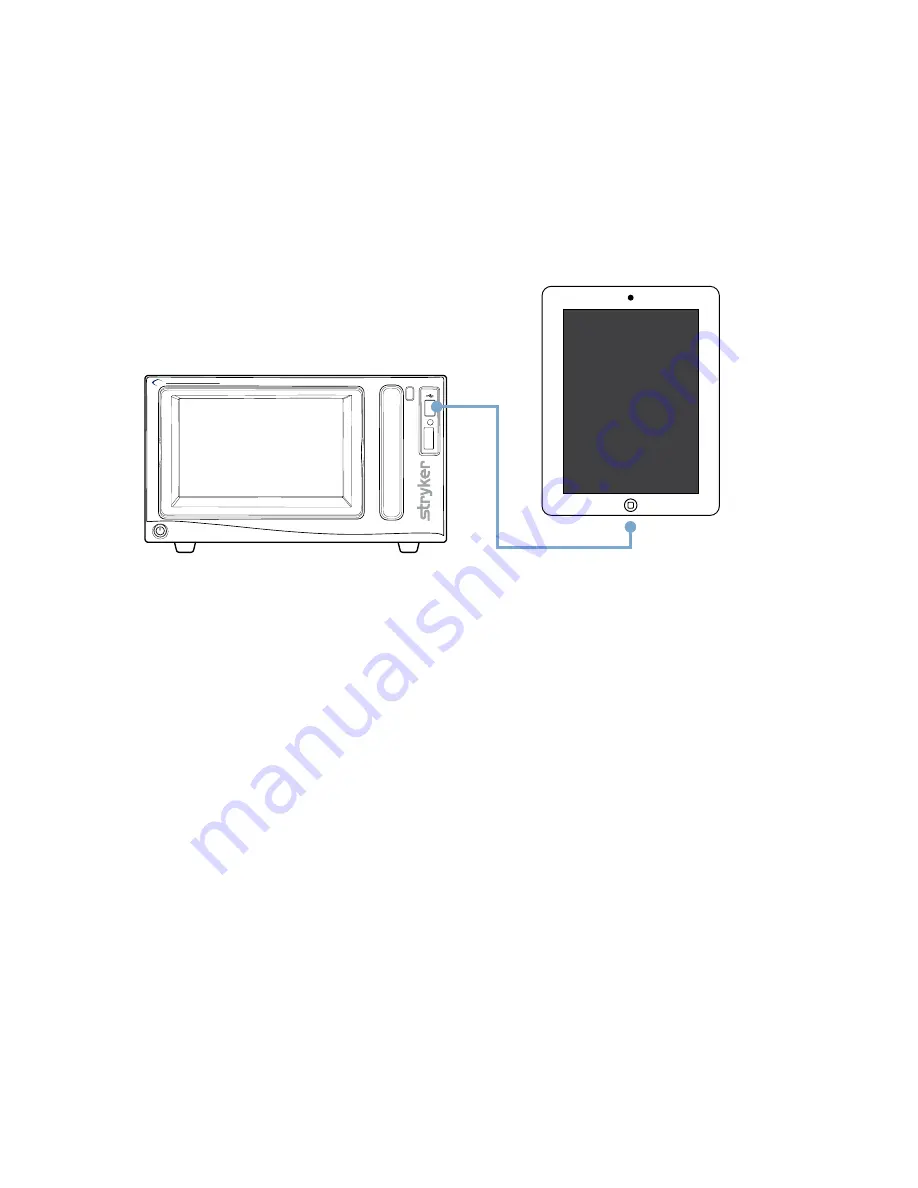
Connecting the iPad® to the SDC3

 HD INFORMA

TION MANAGEMENT SYSTEM

SDC 3

To connect an iPad to the SDC3, proceed as follows:

Notes: 

• 

iPad is a trademark of Apple Inc�, registered in the U�S� and other countries�

• 

iPad devices with iOS versions 7�0 - 8�2 are compatible with the SDC3�

1�  Set the SDC3 power to on�
2�  Make sure that the iPad power is on and the iPad is unlocked, and that the My SDC3 or 

app is installed�

3�  Connect the iPad to the USB port on the front of the SDC3 with a standard Apple Dock to 

USB cable� 

Note: If the SDC3 does not recognize the iPad, unplug the USB adapter from the SDC3 
and plug it back in.

4�  Refer to the “Saving Images and Videos” section of this manual for instructions on 

transferring images and videos to the iPad�

Summary of Contents for SDC3

Page 1: ...SDC3 HD Information Management System PowerShare Package HD INFORMA TION MANAGEMENT SYSTEM SDC 3...

Page 2: ......

Page 3: ...Getting Started 11 Starting the SDC3 System 11 Logging in as an Operator or Administrator 11 The Home Screen 11 Selecting a Surgeon Profile 12 Creating Patient Cases 13 Creating a New Patient Case 13...

Page 4: ...lay 31 Printer Settings 32 Printer Settings Page Layout 32 Printer Settings Advanced 33 Saving Images and Videos 34 Selecting the Save Location 35 Connecting the iPad to the SDC3 35 To save to disc CD...

Page 5: ...etwork Connection 59 Authentication 60 Wireless IP Settings 61 Manage Networks 61 Network Streaming Settings 62 Network Share Settings 63 Profiles Settings 64 Creating a New Surgeon Account 65 Modifyi...

Page 6: ...Symbols 88 Technical Specifications 89...

Page 7: ...in the environment and setup configuration in which it will be used 6 To avoid risk of electric shock use only a hospital grade power cord furnished with the unit Disconnect the unit from the power s...

Page 8: ...s and videos on a built in hard drive where they can be easily accessed after the surgical procedure The media stored on the hard drive can be tagged with patient specific information and burned to di...

Page 9: ...al surgeons gynecologists cardiac surgeons thoracic surgeons plastic surgeons orthopedic surgeons ENT surgeons and urologists SDC3 Contraindications There are no known contraindications PowerShare Int...

Page 10: ...AES PEAP MSCHAP v2 authentication using AES encryption Note this section is also repeated under Technical Specification External storage devices Limit transfer of data from the device as well as the u...

Page 11: ...d PHI anonymize the data before transit Go to Settings System Data Protection see the System Data Protection Settings Saving files to the Network Always select secure transmission of data to the netwo...

Page 12: ...DC 3 1 CD DVD Drive 2 Eject button for CD DVD Drive 3 USB Port 4 Token LED for use with WiSe Receiver 5 Token Slot for use with WiSe Receiver 6 Power Button 7 LCD Touchscreen Note SDC3 files are not r...

Page 13: ...0 S Video Out S Video Output 11 Secondary R1 Remote connection for capture control for secondary channel 12 Secondary R2 Remote connection for recording control for secondary channel 13 DVI 2 Out Seco...

Page 14: ...is manual 2 Connect peripheral devices according to the interconnection diagram on the following pages Warnings Connect only devices that have been specified as part of or compatible with the SDC3 sys...

Page 15: ...WiSe Receiver Insert the LED token provided with the WiSe receiver into the token slot on the front of the SDC3 console according to the sequence of steps described in the WiSe receiver user guide Wh...

Page 16: ...SDC3 to the surgical display will be lost Analog signals RGBHV S Video Composite will not be affected by power loss and can therefore be used as backup video signals if they have been connected prior...

Page 17: ...he Home Screen you can Start a new patient case Access current patient cases Access archived patient information Load patient information into the system Adjust system settings Change surgeon profiles...

Page 18: ...ows the available profiles Selecting a Surgeon Profile From the Profiles screen you can change the current surgeon profile and search profiles 1 To select a surgeon profile touch the corresponding ico...

Page 19: ...case The Surgeon Profile screen shows Note If a patient case has already been started and you have not saved any information to the case the SDC3 asks if you want to discard that case the current cas...

Page 20: ...mum the Patient ID field should be filled in All other fields are optional 3 To view patients currently loaded into the system press the VIEW PATIENT LIST button 4 To load patient data from an EMR sys...

Page 21: ...n 3 Press the IMPORT button The updated codes load Loading Patient Data with a Barcode Reader You can use any USB Barcode Scanner to load patient data onto the SDC3 From the Load Patient Info screen 1...

Page 22: ...system 1 2 3 4 5 1 To select a case for editing or deletion touch the corresponding row 2 To view or edit the selected case press the OK button 3 To delete the selected case press DELETE button 4 To...

Page 23: ...eout Checklist Start Screen Note Before the Surgical Timeout Checklist launches you are asked to confirm the current date and time 1 2 3 1 The Surgical Timeout Launch Screen is activated through the E...

Page 24: ...ion Screen shows the patient name the patient ID the facility name and the station name on the screen 2 Press the START OVER button to restart the verification process at any time during the process 3...

Page 25: ...procedure To open the Capture screen for a patient case select a NEW CASE or CURRENT CASE from the Home screen Capturing Images and Video from a Single Channel The Capture screen shows the live image...

Page 26: ...next to the review screen and again at the base of the Capture screen To Print Captured Images 7 Press the PRINT button 8 The PAGE LAYOUT indicator shows how many images will print on each page and th...

Page 27: ...SDC3 records images and videos from both sources as one file Note Choose Dual Channel mode in the General Application settings to enable this function 1 3 2 4 To record PIP video or capture PIP image...

Page 28: ...able this function 2 5 4 3 1 To record synchronized video from dual channels 1 Select the SYNCHRONIZED CAPTURE tab 2 Press the CAPTURE RECORD and STOP buttons under the preview pane to perform the cor...

Page 29: ...selected in the General Application settings to enable this function To record video or capture images from dual channels 1 Select the DUAL CAPTURE tab to show images from both channels with independe...

Page 30: ...econds before the SDC3 flips back to the capture screen Note To change flip screen settings go to Settings General Editing Patient Information To edit patient information for the current case go to th...

Page 31: ...apture screen 1 1 Press the green APPLY DEVICE PRESETS button to apply the presets 2 3 2 The DEVICE PRESETS button is greyed out while the SDC3 applies the presets 3 The SDC3 shows a status message Ap...

Page 32: ...error messages Status Solution Device Not Connected Make sure the device is connected to the SDC3 and that the device is turned on Press the RETRY button Preset Not Reached The value for the preset s...

Page 33: ...DEVICE PRESETS button to go to the Device Presets Settings screen 2 From the Specialty menu choose the correct Specialty 3 From the Procedure menu choose the correct Procedure 4 The saved presets are...

Page 34: ...NNEL 1 tab to show the Video Settings Channel 1 screen 2 The drop down menus show selections for Recording Format Record Resolution and Record Bitrate 3 Press the EXIT button closes the settings scree...

Page 35: ...efault Channel 2 recording mode is ATE and disc format is the same as selected for Channel 1 2 The drop down menus show selections for Recording Format Record Resolution and Record Bitrate 3 Press the...

Page 36: ...Picture PBP checkbox to view video inputs adjacent to each other in the main preview screen The PIP Size and Select PIP Location options are disabled if PBP is selected 3 Press the EXIT button to clo...

Page 37: ...deo Settings Screen to show the Video Settings On Screen Display screen 2 The Device drop down menus show which devices status appears on the surgical display 3 Press the EXIT button to close the sett...

Page 38: ...Prints Pending window shows the number of images ready to be printed Press the CANCEL button to cancel a pending print job 5 Press the COLLATE COPIES button to toggle between On and Off 6 Press the CH...

Page 39: ...2 Use the buttons or the sliders to adjust the following settings for Channel 1 and Channel 2 Brightness Contrast Phase Chroma Sharpness 3 The dropdown menu lists specialty selections which calibrate...

Page 40: ...e cloud server with the optional PowerShare package Network locations EMR server with the optional EMR Integration Package 1 To go to the Save screen press the SAVE button at the top of the SDC3 displ...

Page 41: ...pple Inc registered in the U S and other countries iPad devices with iOS versions 7 0 8 2 are compatible with the SDC3 1 Set the SDC3 power to on 2 Make sure that the iPad power is on and the iPad is...

Page 42: ...hecked on the Save Settings screen See the Save Settings section of this manual for details To save video to the iPad you must record videos in the MPEG4 format To save PDFs of surgical images and sur...

Page 43: ...save to the selected network Cases can be saved to another network after the previous save action is completed 12 The progress bar shows the status of the write process Other functions 13 Select the...

Page 44: ...t your Stryker Representative for more information Saving Case Information to PowerShare Note Make sure that you enter the first name and last name of the patient and the Patient ID before you save th...

Page 45: ...ges whenever you press Save Images print to PDF according to settings selected in Printer Settings Choose between ON and OFF 5 Press the AUTO CREATE PDF button to automatically create a PDF document o...

Page 46: ...t the ADVANCED SETTINGS tab to go to the Save Advanced Setting screen 2 Use the buttons or the sliders to adjust brightness contrast phase chroma and sharpness for images captured on Channel 1 and Cha...

Page 47: ...Playback screens 1 4 3 2 1 To go to the Playback screens press the PLAYBACK tab at the top of the SDC3 display 2 View image playback from the IMAGES tab 3 View video playback from the VIDEOS tab 4 Vi...

Page 48: ...f images 2 times to see it on the center preview screen Primary channel images are identified with a P and Secondary channel images are identified with an S To see images on the surgical display there...

Page 49: ...nnotation screen Adding Image Annotations Add or delete annotations for images selected in the Playback screen 1 4 3 2 1 The Edit Annotations screen shows when the EDIT button is selected in the Image...

Page 50: ...which it was captured Primary channel videos are identified with a P and Secondary channel videos are identified with an S 3 Press the arrows on either side of the bottom panel of videos to scroll th...

Page 51: ...accessible through the ARCHIVE button on the Home screen 2 Within the Archive screen cases can be accessed from or moved to external media such as USB Discs Network locations and the PowerShare cloud...

Page 52: ...case 5 Press the OK button to see patient cases in read only mode 6 When a case is selected press the PLAYBACK button to see images and videos within that case 7 Press the PATIENT INFO button to go to...

Page 53: ...ient case to select it Press the OK button to see selected archived information in un editable mode Viewing Information Archived on a Disc 1 Press the ARCHIVE DISC tab to see patient cases stored on a...

Page 54: ...ELETE button to delete a selected case A confirmation window shows to confirm the deletion Viewing Information Archived on the PowerShare Cloud Server 1 Press the POWERSHARE tab to see patient cases s...

Page 55: ...4 15 8 9 2 3 4 5 6 7 12 10 1 The General Application Settings screen opens automatically when the SETTINGS button is selected from the Home screen or when the GENERAL tab is selected from the right of...

Page 56: ...then available during patient cases See the Editing Global Annotations section immediately following this section 13 The LIVE VIDEO TIMEOUT button sets the time that an image selected on the Playback...

Page 57: ...Settings screen General Miscellaneous Settings 1 Press the MISC tab to show general miscellaneous settings 2 The buttons adjust the position of images projected onto the surgical display Use the appro...

Page 58: ...he active directory 2 Press AUTHENTICATE to make sure that the server connection is successful and the credentials are valid Operator Password Setup 3 Enter an Administrator password in the Admin Oper...

Page 59: ...IMPORT and EXPORT buttons to import a checklist from a USB storage device or export a checklist to a USB storage device 3 Press anywhere on a question or line to select it 4 Press the ADD EDIT or DELE...

Page 60: ...E buttons mute the Headset Speaker or Microphone 4 Press the OSD AUDIO METER button to show the strength of the audio input on the surgical display 5 Press the OSD DEVICE CONTROL button to show or hid...

Page 61: ...ed in the cloud the logo stored in the cloud dowloads to the SDC3 4 Press the RESET button to restore the default settings 5 The logo preview field shows the logo that will appear on the printed page...

Page 62: ...e FTP Address and Password if password protected in the text boxes The drop down menus list saved options for username and FTP address 3 Press the ANONYMOUS SECURE or PASSWORD button to select the cor...

Page 63: ...e directory corresponding to the current Username JOHND in current example It does not create a new directory based on the Username This avoids creation of multiple directories if someone accidentally...

Page 64: ...options IPV4 or IPV6 Toggle this button to set the correct network type 6 5 4 3 1 2 3 Select the Network Adapter from the dropdown menu 4 Check DHCP Dynamic or Static to choose the type of IP address...

Page 65: ...etwork Connection screen 2 Press the OTHER button to enter a WiFi network that is not listed 3 Press the REFRESH button to refresh the list of available WiFi connections 4 Press the WIFI ON OFF button...

Page 66: ...s the JOIN button to allow users to join the network 3 Press the EXIT button to return to the WiFi Network Connection screen WiFi Password 3 1 2 1 Enter the WiFi password The WiFi Setting Authenticati...

Page 67: ...of the connected WiFi network 2 Press the EXIT button to return to the WiFi Network Connection screen 1 Manage Networks From the Manage Networks screen you can view the security type and profile name...

Page 68: ...details cannot be modified while streaming is in progress 2 Press the STREAM MODE button to enable or disable streaming 3 Press the STREAM BITRATE button to choose between Low Medium and High 4 The P...

Page 69: ...etwork resources or to save data from the SDC3 1 Enter a display name for the network connection 2 Enter the network path username and password for the network 3 Press the SAVE button to save the shar...

Page 70: ...ile to open the Account Modification screen 3 Press the CREATE NEW ACCOUNT button to open the Surgeon Account screen 4 Press the IMPORT USER button to import a single surgeon profile from a USB drive...

Page 71: ...reated by an Administrator only 3 2 1 1 Enter the new surgeon name 2 Press the CREATE ACCOUNT button to save the new account The status bar confirms that a new account has been entered successfully 3...

Page 72: ...re to do those tasks for the selected surgeon account 2 Press EXPORT USER to save the surgeon profile to a USB drive 3 DISABLE OPNOTE and PROMOTE TO CLOUD are for Stryker Representatives only 4 Press...

Page 73: ...the Available Annotations window to see pre defined procedure names and annotations Press the applicable checkbox to select the correct procedure and annotation 3 Press the RIGHT or LEFT arrow button...

Page 74: ...sets to multiple specialties and procedures 2 The Connected Devices list shows the devices connected to the SDC3 3 To select all devices and their settings press SELECT ALL To deselect all devices and...

Page 75: ...lties Procedures list select the procedure and the device you want to edit 2 Press REMOVE PRESET to delete the saved settings 3 Change the Specialty Procedure Device Setting and Value from the drop do...

Page 76: ...the Custom Compliment Setup screen 2 Press anywhere on a compliment line to select it 3 Press the PLAY button to play a selected compliment 4 Press ADD to add a new compliment Press EDIT or DELETE to...

Page 77: ...system language and set data protection Date and Time Settings 2 1 3 4 1 Select the DATE TIME tab from the System screen to go to the Set Date Time Screen 2 Use the buttons to change the date and tim...

Page 78: ...g screen 2 The Log screen lists each SDC3 component along with its version active status and type 3 The scroll bar moves to show components not included in the initial view 4 Press the FORMAT USB butt...

Page 79: ...reen 2 1 1 Select the LANGUAGE tab in the System screen to open the Language Setting screen 2 Press any button to select the corresponding language The system reboots before the language change takes...

Page 80: ...tection Screen 2 Enter a password and re enter it to confirm Note Keep the password in a safe location This password is not stored in the system and cannot be recovered if it is lost 3 Press the FACTO...

Page 81: ...field 4 Press the ECHO button to test the Studio3 server connection Valid server credentials are confirmed by an Echo Successful message shown in the status bar 5 Select the Allow Deletion of Pending...

Page 82: ...cannot be unchecked Studio3 Networking Setup Setup Requirements A TCP IP network A Stryker Studio3 Media Server installed and configured Instructions 1 Enter the IP address of the Studio3 Media Serve...

Page 83: ...u you can 1 Toggle the IPV4 IPV6 button to select the connection type 2 Select a connection name or create a new connection 3 Define the Store Q R and Storage Commit SC 4 Configure the required fields...

Page 84: ...er account in the cloud and download information from the cloud to your local machine for Stryker Representatives only Link the facility s PowerShare account to the SDC3 and save case images to the Po...

Page 85: ...o to Settings Server Cloud Settings 2 Press the SETUP button under PowerShare Integration 3 Enter your PowerShare User ID and Password 4 To test the connection press VALIDATE If the connection is succ...

Page 86: ...80 2 Press the SETTINGS button 3 Select PowerShare to make PowerShare a Save option 4 Press EXIT to close the Save Settings screen...

Page 87: ...tings From the EMR Integration screen you can link the SDC3 to an EMR system The SDC3 links to four EMR systems AGFA Allscripts CERNER and EPIC This functionality is only available with the optional E...

Page 88: ...hat the disc drive is not being currently used Reboot the machine if the error persists Error locating logo bmp Make sure that the USB cable is connected properly Make sure that the logo file is prese...

Page 89: ...etwork in the save settings is selected Annotation list is blank Make sure that a procedure is selected in the Patient information screen in order to enable the annotation list Device status overlays...

Page 90: ...he measured field strength in the location in which the SDC3 system is used exceeds the applicable RF compliance level above the SDC3 system should be observed to verify normal operation If abnormal p...

Page 91: ...cables than the recommended separation distance calculated from the equation applicable to the frequency of the transmitter Conducted RF IEC 61000 4 6 3 Vrms 150 kHz to 80 MHz 3 V Recommended Separat...

Page 92: ...0 5 1kV differential mode Mains power quality should be that of a typical commercial or hospital environment 2kV common mode 0 5 1 2kV common mode Voltage dips short interruptions and voltage variatio...

Page 93: ...ult Do not use corrosive cleaning solutions to clean the unit as product damage may result Do not sterilize the unit as product damage may result Cleaning Should the unit need cleaning 1 Spray cleanin...

Page 94: ...d representative in Europe Made in France Stryker Firewire Radiation Emitting PPAA Compliance to Electrical Safety Standards Complies with Australian regulatory requirements Warning Caution See Instru...

Page 95: ...tains FCC ID RYK WUBR170GNM This device complies with part 15 of the FCC Rules Operation is subject to the following two conditions 1 This device may not cause harmful interference and 2 This device m...

Page 96: ...a DVI I connectors Encoding Format Resolution MPEG2 720 480 720 x 576 H 264 NTSC 720 480 PAL 720 576 XGA 1024 768 SXGA 1280 1024 720p 1280 720 1080p 1920 1080 Printer Auto Printing 1 2 4L 4S 6 8 12 or...

Page 97: ...91...

Page 98: ......

Page 99: ......

Page 100: ...624 4422 www stryker com Stryker Corporation or its divisions or other corporate affiliated entities own use or have applied for the following trademarks or service marks the Stryker logo All other t...

Reviews: