background image


ASSEMBLY   

1.


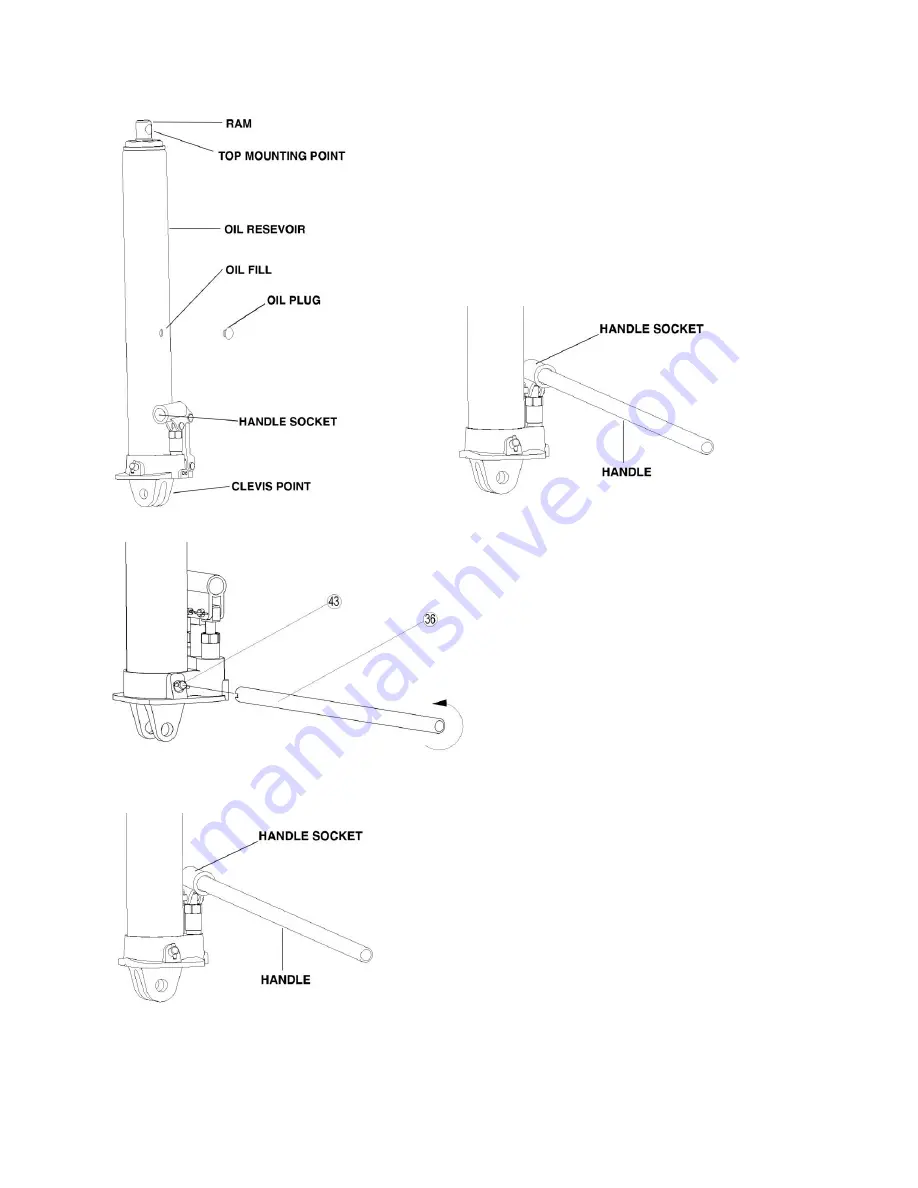
Familiarize yourself with the jack.   


2.


Use handle (36) to Turn release valve (43) counterclockwise on full turn to the open position. 


3. Line  up  the  handle  to the  handle  socket located  on  the  side  of the  jack,  then  insert  the  handle  inside  the  handle 
socket.   


Summary of Contents for 46217

Page 1: ...JACK OWNER S MANUAL WARNING Read carefully and understand all ASSEMBLY AND OPERATION INSTRUCTIONS before operating Failure to follow the safety rules and other basic safety precautions may result in serious personal injury Item 46217 ...

Page 2: ...angled to 3 degrees from vertical position After lifting loads must be immediately supported by appropriate means Each model is suitable for use in lifting or positioning vehicles machinery houses and or other building structures These jacks comply with ASME PALD Standards TECHNICAL SPECIFICATIONS Description Item 46217 Maximum Capacity 16 000 lbs Minimum Lift Height 24 3 4 inches Maximum Lift Hei...

Page 3: ...e for any damages or injury caused by improper use or neglect WARNING Always use Jack Stands DO NOT USE wood blocks or any other non approved load sustaining devices The manufacturer only warrants loads to be sustained by jack stands that meet current ASME standards DO NOT USE wood blocks or any other non approved lifting devices for a means of lifting with the jack and or load being raised Failur...

Page 4: ...ly chock and block stabilize the load to be lifted Never place any part of the body under a raised load without properly chocking and supporting the load Never use the jack on curved or tubular vehicle Bumpers this will result in the vehicle slipping off the jack and falling causing serious injury or death Use a bumper lift to lift most vehicles with curved bumpers or plastic bumpers Wear ANSI app...

Page 5: ...elf with the jack 2 Use handle 36 to Turn release valve 43 counterclockwise on full turn to the open position 3 Line up the handle to the handle socket located on the side of the jack then insert the handle inside the handle socket ...

Page 6: ...YSTEM AIR PURGE PROCEDURE IMPORTANT BEFORE FIRST USE Perform the following Air Purge Procedure to remove any air that may have been introduced into the hydraulic system as a result of product shipment and handling This step is to be completed without any weight on the jack 1 Turn release valve counterclockwise on full turn to the open position 2 Rapidly pump the handle 6 8 times Leave handle in do...

Page 7: ...use Oil vent is closed during shipping For units with rubber oil plugs With a flat blade screwdriver push the oil fill plug slightly to the side to purge trapped air from system Use caution not to tear or puncture the oil plug 4 Turn release valve clockwise to the closed position 5 Jack is now ready for use Check for proper pump action ...

Page 8: ...nto service 4 Inspect before each use Do not use if bent broken or cracked components are noted OPERATION RAISING THE JACK 1 Position the jack near desired lift point 2 Assemble the handle ensure that handle aligns with handle socket 3 Close the release valve by turning it clockwise until it is firmly closed 4 Before raising check and verify the load is centered and also has full contact with the ...

Page 9: ...e jack handle so your hands do not slip and ensure the release valve does not rapidly lower 2 Carefully open the Release Valve by slowly turning the handle counterclockwise Do not allow bystanders around the jack or under the load when lowering the jack 3 After removing jack from under the load push ram and handle sleeve down to reduce exposure to rust and contamination WARNING STOP PUMPING WHEN T...

Page 10: ...e use and lubricate when necessary After cleaning lubricate the equipment using light penetrating oil lubricating spray Use a good lubricant on all moving parts For light duty use lubrication once a month For heavy and constant use lubrication recommended every week NEVER USE SANDPAPER OR ABRASIVE MATERIAL ON THESE SURFACES Rust Prevention Check rams and pump plungers on the power unit assemblies ...

Page 11: ...11 TO ADD JACK OIL 1 Position the jack on level as shown and lower the ram 2 Remove the oil plug 3 Fill the oil case until oil level is just beneath the lower rim of the oil fill hole ...

Page 12: ...ure TO REPLACE JACK OIL 1 Position the jack on level as shown and lower the ram 2 Open release valve by turning handle counter clockwise 4 full turns 3 Remove the oil fill plug 4 Turn the jack on its side so that old oil will drain from the oil fill hole ...

Page 13: ... on level ground and with the ram in the lowered position 7 Fill the oil case until oil level is just beneath the lower rim KEEP DIRT AND OTHER MATERIAL CLEAR WHEN POURING 8 Replace oil plug 9 Perform the Air Purge Procedure ...

Page 14: ...ATIONS Additional Jack Notes Periodically check the pump piston and ram for signs of rust or corrosion Clean as needed and wipe with an oil cloth NEVER USE SANDPAPER OR ABRASIVE MATERIAL ON THESE SURFACES When not in use store the jack with pump piston and ram fully retracted TROUBLESHOOTING JACK WILL NOT LIFT LOAD JACK WILL NOT HOLD LOAD JACK WILL NOT LOWER POOR JACK LIFTING WILL NOT LIFT TO FULL...

Page 15: ...15 ASSEMBLY DIAGRAM ...

Page 16: ... QYL8 19 Pin 1 20 T30808 17 Shaft 1 21 T30808 18 Washer 1 22 GB93 Spring Washer 1 23 GB70 Bolt M10x25 1 24 T30808 12 Copper Washer 1 25 T30808 1 3 Clique 1 26 GB308 Ball 1 27 T30808 1 2 Spring 1 28 GB308 Ball 1 29 T30808 1 3 Plug 1 30 T30808 11 O Ring 1 31 T30808 08 Pump Cylinder 1 32 T30808 10 O Ring 1 33 T30808 09 Back up Ring 1 34 T30808 07 Plunger 1 35 T30808 05 Handle Socket 1 36 T30308 06 Ha...

Page 17: ...ent illustrations provided are a convenient reference of location and position in the assembly sequence When ordering parts the following will be required Model Number Serial Number and Description The distributor reserves the rights to make design changes and or improvements to product lines and manuals without notice For replacement parts and technical questions please call 1 800 222 5381 ...

Page 18: ... product by make and model number and follow the claim instructions that will be provided The product and the purchase receipt must be provided to Us in order to process Your warranty claim Any returned product that is replaced or refunded by Us becomes our property You will be responsible for return shipping costs or costs related to Your return visit to a retail store Remedy Limits Product repla...

Reviews: