background image

13

GPS Antenna / USB Ports

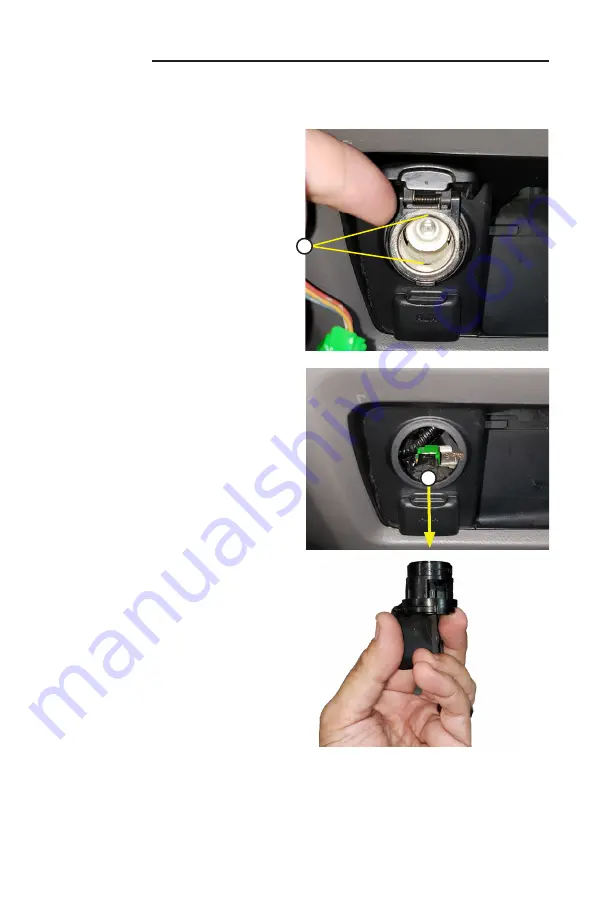
3. To remove the factory power outlet, 
use a pick tool to press the two 
locking tabs (top and bottom) from 
inside the power outlet. 

Press and pull out on the inner metal 
sleeve. Once removed, unclip 2-Pin 
power harness. 

4. After the metal sleeve is removed, 
reach inside the plastic sleeve and 
pull it from the dash. 

Feed the 2 USB cables from the dual 
USB port through the opening, and 
route them to the inner dash where 
the radio will be mounted. 

Thread the cables through the locking 

nuts and tighten nuts. Tighten the first 

nut, then tighten the second nut to 
prevent rotation. 

3

4

Summary of Contents for HEIGH10 STH10CIV

Page 1: ...Read this installation guide thoroughly before disassembling the vehicle or making wire connections Installation of this product requires technical skill experience and specialized tools If you feel...

Page 2: ...may result Exposed wires must be insulated with electrical tape Otherwise a short circuit fire or electric shock may result To prevent damage to the vehicle confirm the locations of hoses electrical w...

Page 3: ...hillips Screwdriver Wire Crimpers Pliers Battery Terminal Wrench Pick Tool Wire Connectors Zip Ties NOTE This installation guide outlines basic installation For any additional features adding a rear c...

Page 4: ...umn 3 Lower the steering wheel to its lowest position to remove the gauge cluster trim panel Start on the left side and pull the panel toward the rear of the vehicle When removing the right side hold...

Page 5: ...runk release lever by the driver s door sill Gently pry the right side up as shown 7 Remove the Phillips screw Note There are also 2 plastic clips holding this panel in place 8 Pull upward on the door...

Page 6: ...onents will need to be removed from the factory radio climate control assembly and transferred to the HONK838 dash panel A Air Vent B Passenger Air Bag Light C Hazard Switch D Climate Control Knobs Bu...

Page 7: ...Remove the two Phillips screws on the passenger side air bag light 3 Remove the three Phillips screws holding the air vent only one visible in image 4 Remove the two Phillips screws on the hazard swi...

Page 8: ...f not using 6 Optional Blue Speed Sense Wire If adding a front camera or adding HEIGH10 Navigation Card connect the Blue Extension Wire provided to the Blue wire labeled SPEED on the HEIGH10 10 Pin Mu...

Page 9: ...hite P Cont Amp On N C Red ACC Red Black Ground Black Yellow BAT Yellow Orange Illumination Orange White Blue Antenna Turn on Blue Honda 17 Pin Vehicle Harness H06 Antenna Adapter Pink Parking Brake P...

Page 10: ...Light Green or Orange Using a multimeter verify the parking brake wire The correct wire will show Ground when parking brake is engaged Connect the Pink wire to the parking brake wire If adding a rear...

Page 11: ...to remove 6 Connect the Green White Reverse wire to Pin 15 on the green 42 Pin plug In 4 door vehicles this wire will be Brown In 2 door vehicles this wire will be Violet Connecting The Optional Speed...

Page 12: ...ss cable in the back of the radio opening The SSUSB2 Dual USB is designed to extend the two USB ports on the back of the HEIGH10 to where they are accessible once the radio is installed Apple CarPlay...

Page 13: ...Once removed unclip 2 Pin power harness 4 After the metal sleeve is removed reach inside the plastic sleeve and pull it from the dash Feed the 2 USB cables from the dual USB port through the opening a...

Page 14: ...g Bracket Display Mounting Clamp M4 x 6 Screws 4 M4 x 14 Screws 4 M5 x 10 Screws 2 NOTE The Display Mounting Clamp is shipped connected to the Plastic Mounting Bracket To remove the clamp assembly fro...

Page 15: ...astic Mounting Bracket Radio Module Using the middle set of holes on the back of the display attach the Clamp Assembly to the display using four M4 X 14 screws The clamp assembly should be approximate...

Page 16: ...de Brackets 3 4 With the locking tabs on the bottom snap the trim ring into the main panel from the front 5 Align and attach both side brackets to the main panel using two of the 8 X 3 8 smallest scre...

Page 17: ...e screws on each side Push forward on the assembly and tighten all screws Radio Panel Assembly Plastic Mounting Bracket on Top 6 Slide the HEIGH10 assembly into the dash kit from the back until the fr...

Page 18: ...he completed radio panel assembly plug the following into the back of the HEIGH10 module If you have connected Speed Sense or installed the External Microphone plug those in at this time 2 With all th...

Page 19: ...lly seat panel Before mounting the display the optional accordion boot can be used to hide the display bracket and cables 5 The boot attaches to the bracket on the back of the display Align the tab on...

Page 20: ...into the back of the display and feed any slack back into the dash opening A Hook the bottom hook to the lower rail B Push upward from the bottom C Hook the top hooks on the upper rail NOTE Once the d...

Page 21: ...and make a test call Page 10 in User Guide Select BT Music and play audio from paired device Engage parking brake and insert a USB thumb drive with Audio and Video files into one of the USB Ports Sel...

Page 22: ...rs kick panel 3 Reinstall the drivers door sill panel 4 Reinstall the Phillips screw into the trunk release cover and reinstall the lock cover panel 5 Reinstall the gauge cluster trim panel 6 Reinstal...

Page 23: ...23...

Page 24: ...th those instructions or other misuse of its product If you do not agree please discontinue use and contact STINGER This product is intended for off road use and passenger use only TECHNICAL SUPPORT 7...

Reviews: