background image

Fresh Aero FlightLights

TLR Light Lens Mounting Kit

For Sonex Aircraft

12

The Final Fitting …

continued

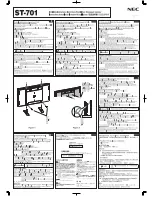
If the lower retainer is not mating properly on top of the lens, remove the lens and trim additional

material from the edge.  Remember, it may take several attempts to obtain correct “fit” but the
results will be worth the effort. After trimming, repeat the above steps until retainer can be
pulled into place and drawn down properly over the lens (photo 14).

Don’t be concerned if a small gap exists between the lens and inside wing surface, the foam

sealing tape installed in the final assembly will fill this space. This said, the gap should be no
larger than 3/32 inch at any location on the profile.

Note:

 we do sell the lens separately, if you inadvertently cut your lens too short or otherwise damage it.

   4.6  With the lens still in place, start the remaining two 5/8

inch long 4-40 screws in the outboard holes of the lower
retainer screws and confirm that the screws can be started
easily.

   4.7  When you’re satisfied with the lens install fit, remove the

lens by first removing the lower  retainer bracket

          completely.

Note:

If your light isn’t installed yet, This would be an ideal time to

do it. If you purchased a Fresh Aero TLR Light, please refer to the
TLR Light installation manual now.

4.8 Reinstall lower lens retainer using two 5/8 inch long 4-40

screws in the inboard holes. Position retainer in the
extended, upward, leaning aft position as in step 3.16.

   4.9  Remove the protective tape on the lens and clean the inside surface removing any residue from

tape. Mount the included foam tape on the forward curved edges of the lens with about half the
width of the tape extended over the edges.

Note:

Additional foam tape is supplied for fitting on the upper and lower surfaces of the lens, just aft of the

top and bottom lens opening, but this may be a tight fit. Consider cutting the foam strip in half for less bulk. If
you’re satisfied with the lens to skin seal without the foam, top & bottom, just omit it.

  4

.10  Attach lens handle once more, directly on the lens front surface. Do not wrap tape around edges

of lens and keep tape at least ½ inch from the top and bottom edges.

Note:

 If tape does not adhere to lens on this final install, you may need to use fresh piece of tape to improve

the gripping force.

14

Properly seated
Lens and retainer

Summary of Contents for FRESH AERO

Page 1: ...FRESH AERO FlightLights TLR Light Lens Mounting Kit For Sonex Aircraft The Steelebrook Group Where Imagination Meets Innovation User Manual...

Page 2: ...plates will guide you easily through the entire leading edge cut out and lens install process The lens kits include everything you ll need to mount the lens the lens retainers drill screws and foam se...

Page 3: ...g to determine if your judgment or reflexes will be impaired while taking these drugs n Always maintain proper footing and balance during the lens install process Ask for help if necessary Awkward pos...

Page 4: ...original purchaser that this product is free from defects in materials and workmanship for the period of 3 years from the date of purchase This warranty does not apply to damage due directly or indire...

Page 5: ...and skin bending moments at the outboard locations The Sonex OneX may be an exception to this recommendation as the section inboard of the wing fold is a separate skin section and is inherently rigid...

Page 6: ...seam at the spar The actual dimension isn t critical but the distance at each side must be equal This ensures that the lens opening is square with the leading edge Very Important Important If you are...

Page 7: ...ing photo 5 The edge of the the retainer must be parallel to the opening edge and 3 8 inch 9 5 mm from the lens opening It s very important to maintain the spacing and parallelism Also confirm that th...

Page 8: ...l be used multiple times during the fitting process Hint Use an additional strip of tape on the inside of the handle sticky side to sticky side to prevent your hands from sticking to the tape photo 7...

Page 9: ...roper acrylic plastic cutting and stock removal procedures when trimming lens Do not use snips or any other tool that might crack or damage the acrylic Also during the lens trimming process it s bette...

Page 10: ...for repeating results THIS STEP WILL AFFECT FINAL APPEARANCE AND FIT 3 14 Remove lens and install lower retainer with two of the four included 5 8 inch long 4 40 screws in the two inboard holes Push...

Page 11: ...iner in place upper retainer screws may need to be loosened slightly to facilitate lens insertion and with lower retainer raised carefully install the lens confirming that lower edge of lens fits betw...

Page 12: ...emoving the lower retainer bracket completely Note If your light isn t installed yet This would be an ideal time to do it If you purchased a Fresh Aero TLR Light please refer to the TLR Light installa...

Page 13: ...four screws 4 14 Tighten the four upper retainer screws Caution To prevent stripping the retainer threads do not over tighten the retainer screws These screws should not back out To prevent this just...

Page 14: ...ix Use the following templates to facilitate your wing leading edge lens installation procedure The procedure steps will identify the correct template to use and how to apply the templates Lens Openin...

Reviews: