stayer LOM130PD Operating Instructions Manual Download Page 9

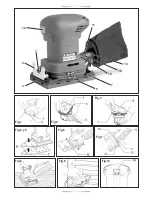
To remove the sandpaper:

1. Set the tool upside down so that the sandpaper is on top.
2. Grasping one corner of the sandpaper, peel it from the pad.

Note:
If the sandpaper is in good condition, save it for further use.

When  sanding  in  narrow,  hard-to-reach  areas  (e.g.,  shutters, 
blinds, louvres), attach the cone-shaped abrasive papers to the 
end of the pad (bottom and top). To sand the end of thin materials, 
fold the abrasive paper and attach to the side of the pad as shown 
in 

Fig. 4 and 5

.

Tube powder collector (Fig. 7)

The use of the tube powder collector makes sanding operations 
clean and dust collection easy. To attach the dust bag, fit the tube’s 
entry port onto the dust spout on the tool so that the hole in the

Switch action (Fig. 8)

CAUTION:
Always check to see that the tool is switched off before plugging in 
the tool.

To start the tool, press the “ON (I )” side of the switch. To stop, 
press the “OFF (O)” side of the switch.

Operation (Fig. 9 & 10)

Hold the tool firmly. Turn the tool on and wait until it attains full 
speed.  Then  gently  place  the  tool  on  the  workpiece  surface. A 
finishing sander is generally used to remove only a small amount 
of  material  at  a  time.  Since  the  quality  of  the  surface  is  more 
important than the amount of stock removed do not bear down on 
the tool.

Keep  the  base  flush  with  the  workpiece  at  all  times.  Excessive 
pressure may damage the paper and shorten
tool life. You can put a high polish on furniture or other fine surfaces 
by using a cloth under the tool.

For 

This tool is handy for sanding louvres, etc. When sanding louvres, 
insert the protruding portion of the pad between the louvres and 
sand them using the upper or lower side of the abrasive paper.
CAUTION:
 Do not block motor vent with your finger or hand.
 Never run the tool without paper. You may seriously damage the 
pad.

MAINTENANCE

CAUTION:
Always be sure that the tool is switched off and unplugged before 
attempting to perform inspection or maintenance.

To maintain product SAFETY and RELIABILITY, repairs, carbon 
brush  inspection  and  replacement,  any  other  maintenance  or 
adjustment  should  be  performed  by  a  Stayer  Authorized  or 
Factory Service Centers, always using Stayer replacement parts.

ENGLISH

9

9

EC-DECLARATION OF CONFORMITY

We declare under our sole responsibility that this product is in 

compliance with the following standards or standardized 

documents,

EN60745

in accordance with Council Directives, 2006/42/CE,

2004/108/CE and  2006/95/CE. 

Ramiro de la Fuente

Director General

Summary of Contents for LOM130PD

Page 1: ...Sector I Calle Sierra de Cazorla n 7 C P 28320 Pinto Madrid SPAIN Email info grupostayer com Manual de instrucciones ES Istruzioni d uso IT Operating instructions GB Bedienungsanleitung DE Instructio...

Page 2: ...Fig 2 Fig 3 Fig 1 Fig 4 y 5 Fig 6 Fig 7 2 1 3 5 7 14 12 11 13 10 8 Fig 10 Fig 8 Fig 9...

Page 3: ...e plate of your machine The trade names of the individual machines may vary Angaben gelten f r Nennspannungen U 230 240 V Bei niedrigeren Spannungen und in l nderspezifischen Ausf hrungen k nnen diese...

Page 4: ...tipo gancho y lazo velcro Para colocar el papel de lija 1 Ponga la herramienta bocabajo de forma que el plato quede arriba 2 Coloque el papel de lija haci ndolo coincidir con la forma de la base Aseg...

Page 5: ...jos de despiece e informaciones sobre las piezas de recambio las podr obtener tambi n en internet bajo info grupostayer com Nuestro equipo de asesores t cnicos le orientar gustosamente en cuanto a la...

Page 6: ...azioni di sicurezza fornite dal produttore del materiale 6 Usare sempre la mascherina il respiratore antipolvere adatto per il materiale e l applicazione con cui si sta lavorando CONSERVATE QUESTE IST...

Page 7: ...iccole quantit di materiale alla volta Poich la qualit della superficie pi importante della quantit di materiale rimossa non esercitare forza eccessiva sull utensile Tenere sempre la base a livello de...

Page 8: ...orrect dust mask respirator for the material and application you are working with SAVETHESE INSTRUCTIONS OPERATING INSTRUCTIONS Attaching abrasive paper CAUTION Always be sure that the tool is switche...

Page 9: ...terial at a time Since the quality of the surface is more important than the amount of stock removed do not bear down on the tool Keep the base flush with the workpiece at all times Excessive pressure...

Page 10: ...rn Sie sich vor dem Anbringen oder Abnehmen des Schleifpapiers stets dass die Maschine ausgeschaltet und vom Stromnetz getrennt ist Hinweis Die technischen Daten k nnen von Land zu Modell BO4553 Abb 1...

Page 11: ...bzutragen Da die Qualit t der Oberfl che wichtiger als die Menge des abgetragenen Materials ist sollten Sie die Maschine nicht niederdr cken Achten Sie stets darauf dass die Grundplatte flach auf dem...

Page 12: ...r du mat riau 6 Utilisez sans faute le masque poussi res respirateur appropri au mat riau utilis et au type de travail effectu CONSERVEZ CES INSTRUCTIONS MODE D EMPLOI Fixation du papier abrasif ATTEN...

Page 13: ...pour ne retirer de la p ese qu une petite quantit de mat riau la fois Il n est donc pas n cessaire d appliquer une pression sur l outil puisque l op ration consiste non pas retirer une grande quantit...

Page 14: ...empre a m scara contra o p respirador apropriado para o material e aplica o com que est a trabalhar GUARDE ESTAS INSTRU ES INSTRU ES DE FUNCIONAMENTO Colocar a folha de lixa PRECAU O Antes de instalar...

Page 15: ...ena quantidade de material de uma s vez Como a qualidade da superf cie mais importante do que a quantidade de material removida n o se apoie com for a sobre a m quina Mantenha sempre a base encostada...

Page 16: ...www grupostayer com Area Empresarial Andaluc a Sector I Calle Sierra de Cazorla n 7 C P 28320 Pinto Madrid SPAIN Email info grupostayer com...

Reviews: