


10
11
ROTATION SPEED ADJUSTMENT
Comment:
Turn the machine off before changing the rotation speed.
Check the positioning and rotation of the mould cutter before operating the
machine!
Select the rotation speed with the switch for the rotation speed regulator (10).
RH1500: 6000 - 26000 min
•
Adjust the cutting speed, turn the speed control dial. Position “1” denotes the
lowest speed. Position “6” denotes the highest speed. Turn the dial to increase
or decrease the speed. The smaller the cutter head, the higher the speed.
The larger the cutter head, the lower the speed. A cutter head which runs too
fast causes scorching of the workpiece and leaves burnt marks.
CAUTION:
Do not change the speed when the machine is working under load.
•
After working with low rotation speed for a long time, allow the machine to cool
down for about 2 minutes with it running idle at maximum rotation speed.
MOULD CUTTER DEPTH ADJUSTMENT
•
The mould cutter depth can be adjusted in different ways.
ADJUSTMENT WITH AN ARBITRARY OBJECT
You can simply cut as deep as the height of any chosen object.
•
Set the adjustable depth stopper (7) so that the height measuring stick is brought
down to the lowest level.
•
Loosen the set screw (8) of the depth measuring stick.
•
Loosen the height adjuster (12) and press the mould cutting tool with the handle
far under, so that it touches the work piece.
•
Secure this adjustment by tightening the height adjuster.
•
Lift the depth measuring stick (9) up.
•
Lay your selected object between the lowest level of the depth stopper (7) and
the depth measuring stick (9). The metal point (b1) of the depth measuring stick
(9) must touch the selected object.
•
Secure this adjustment by tightening the set screw (8) of the depth measuring
stick.
•
The mould cutter depth is now set.
•
Now loosen the height adjuster to get the mould cutter ready for operation.
CALIBRATION IN 4 mm INTERVALS
The adjustable depth stopper (7) allows a quick approximate adjustment in 4 mm
intervals.
•
Insert the appropriate mould cutter.
•
Set the adjustable depth stopper (7), so that the height measuring stick shows the
lowest level when brought down.
•
Loosen the set screw (7) of the depth measuring stick.
•
Loosen the height adjuster (11) and press the mould cutting tool with the handle
far under, so that it touches the work piece.
•
Secure this adjustment by tightening the height adjuster.
•
Lift up the depth measuring stick (9) a little.
•
Now adjust the depth stopper by turning it.
•
For every step that it climbs, an additional 3 mm is added to the mould cutter
depth. So when it is at position 3, the mould cutter depth is 9 mm.
•
Adjust the depth measuring stick with the metal point (b1) so that it is on the
desired step, while you tighten the set screw (8) of the depth measuring stick.
CALIBRATION CALCULATION
You know the exact cutting depth in centimeters and would like to change it.
You would like to drill exactly a 2 mm deep screw into a wooden board, for example.
•
Insert the appropriate mould cutter.
•
Adjust the depth stopper (7), so that the height measuring stick shows the lowest
level when brought down.
•
Loosen the set screw (8) of the depth measuring stick.
•
Loosen the height adjuster (11) and press the drilling tool with the handle (2) far
under, so that it touches the work piece.
•
Secure this adjustment by tightening the height adjuster.
•
Make sure that the depth measuring stick (9) with the metal point (b1) is sitting on
the depth stopper.
•
Now the starting position can be read from the read-off point on the depth
measuring scale (a1).
•
The desired drilling depth can simply be subtracted from the displayed centimeter
number. (Example : 4 cm is displayed on the scale, and you want to drill 2 mm.
So the scale should be adjusted to display 3.8 cm.) Lift the depth measuring stick
up, so that the read-off point on the scale (a1) shows the corresponding value.
(3.8 cm in the example)
•
Now adjust the depth measuring stick (9) with the new calibration. The depth
measuring stick can be locked in position by tightening the set screw (8). You now
have set the desired drilling depth.
•
Now loosen the height adjuster (11) to get the mould cutter ready for operation.
OPERATION
PROTECTIVE CLOTHING
•
If possible, wear designated gloves for protection from splinters and shavings.
•
While working, wear designated protective goggles. Flying shavings can cause
injury.
•
Wear hearing protection for protection against continuous noise in the work place.
•
Wear a designated dust mask for protection against airborne dust.
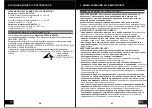
DRILLING DIRECTION
The drilling must always turn in the opposite running direction of the drill
(counter-rotation). The rotation direction is indicated by the arrow (3) on the front of
the machine.
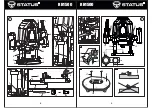
5. SETTING UP THE ROUTER
See illustration (H).
Danger of accident! While drilling in normal rotational direction,
the router could be torn away from your hand.
•
Pay attention to the rotation direction of the driller head!
•
Only drill in counter-rotation!
Summary of Contents for RH 1500
Page 3: ...4 5 ...
Page 4: ...6 7 ...
Page 25: ...48 НАЗНАЧЕНИЕ ИЗДЕЛИЯ ИНСТРУКЦИЯ К ИЗДЕЛИЮ 49 ИНСТРУКЦИЯ ПО БЕЗОПАСНОСТИ ...
Page 26: ...50 51 ЭКСПЛУАТАЦИЯ ИЗДЕЛИЯ ...
Page 30: ...59 58 ...


