background image


71 

WatchLock Cube User Guide 

Places 

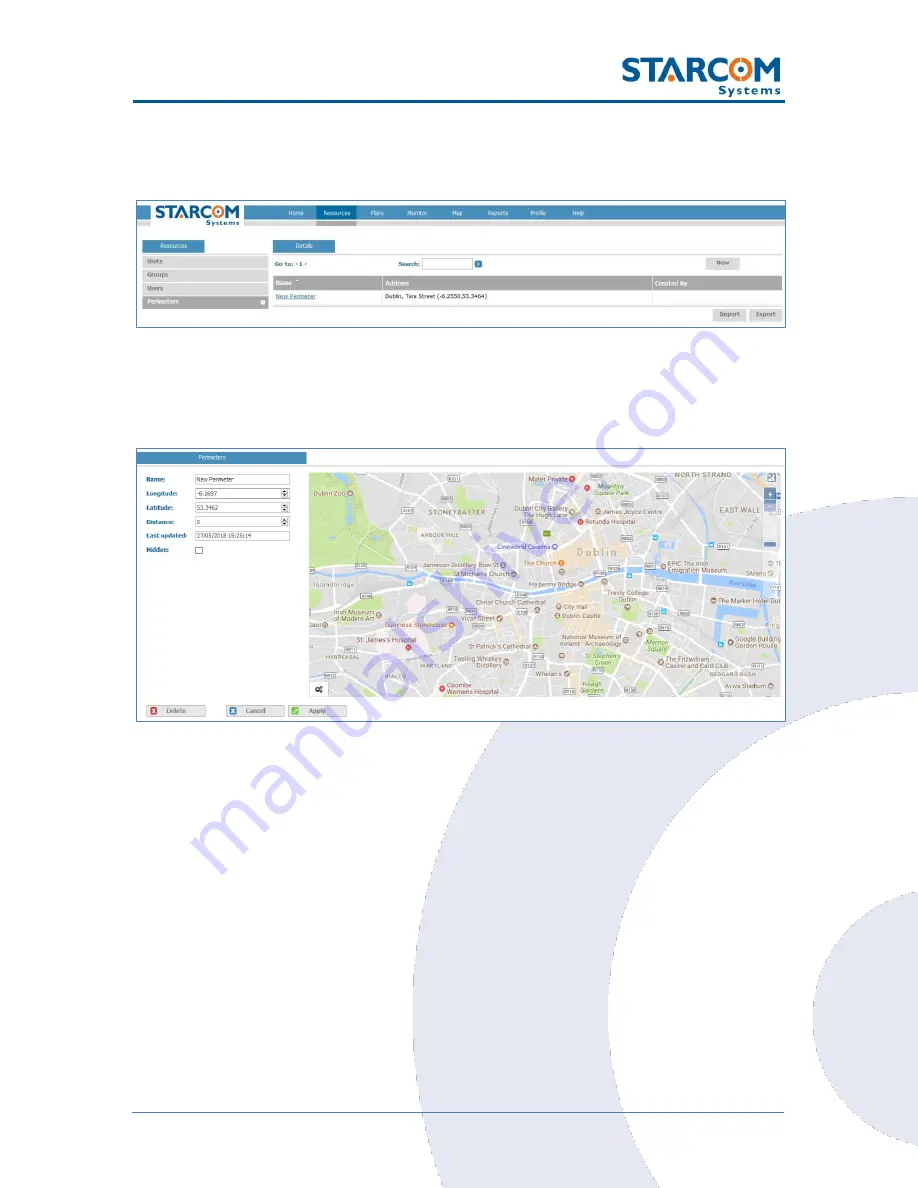
You can create new and modify the existing perimeters. 


To create a new perimeter, click 

New

. The Perimeters page opens. In 

the 

Name

 field, enter a name for the new perimeter. 


To create a new perimeter, click on the settings icon in the lower right 
corner of the map, 

Options > Create new perimeter

 at the top right 

corner  of  the  map.  Click  once  anywhere  on  the  map  to  start  the 
perimeter  selection  (this  point  would  be  the  top  left  corner  of  the 
perimeter). Move the mouse and click again anywhere on the map to 
finish the perimeter (this point would be the bottom right corner of the 
perimeter). 


Summary of Contents for WATCHLOCK CUBE

Page 1: ...WATCHLOCK CUBE User Guide Version 1 0 ...

Page 2: ...of a derivative thereof in any standard paper book form for commercial purposes is prohibited unless prior permission is obtained from the copyright holder DOCUMENTATION IS PROVIDED AS IS AND ALL EXPRESS OR IMPLIED CONDITIONS REPRESENTATIONS AND WARRANTIES INCLUDING ANY IMPLIED WARRANTY OF MERCHANTABILITY FITNESS FOR A PARTICULAR PURPOSE OR NON INFRINGEMENT ARE DISCLAIMED EXCEPT TO THE EXTENT THAT...

Page 3: ..._________ 26 Connecting the device to the computer_________________ 29 Configuring the device _____________________________ 31 Network settings __________________________________ 38 Transmission Rates settings _________________________ 40 Hardware settings _________________________________ 42 Saving the configuration ____________________________ 44 Configuring a new device with the saved configura...

Page 4: ...ns ___________________________________________ 74 Monitor _________________________________________ 80 Map ____________________________________________ 83 Reports _________________________________________ 87 Scheduled reports ______________________________ 89 Profile __________________________________________ 92 Help ____________________________________________ 94 Appendix A Device Communication i...

Page 5: ...ners trailers and other portable storage solutions WatchLock Cube can also be used to secure gates warehouses and restricted areas Any irregular event will immediately trigger an emergency alert allowing you to prevent breach and damage to your cargo or station WatchLock Cube is a stand alone autonomous system It doesn t require any wiring and is easily installed just like a padlock Providing both...

Page 6: ...6 WatchLock Cube User Guide 2 Package Contents 1 Watchlock Cube with protective rubber cover 2 Keys 3 USB programming cable optional 2 3 1 ...

Page 7: ...the programming cable or the batteries in the device it will sound one 1 audible signal beep to indicate that it was activated After this the device will connect to the cellular network Once the device performs a successful connection to the cellular network it will sound two 2 audible signals beeps At the same time the device will connect to the GPS and get the location Once the device performs a...

Page 8: ... Battery Type Power 4 AA batteries rechargeable non rechargeable Varies by type of AA batteries used It is the capacity of a single AA battery used multiplied by 0 8 GSM Communication Type Networks GSM 850 900 1800 1900 SMS GPRS HSDPA 850 900 class 4 2 Watt 1800 1900 class 1 1 Watt Physical Specifications Dimensions Weight 7 5 x 7 5 x 8 cm 17 cm with C2 shackle 910 g padlock included Accelerometer...

Page 9: ...nstaller application setup file please contact Starcom technical support by Email support starcomsystems com or Skype starcom support Installing the Software Locate the folder where you saved the installer setup file Double click the InstallSetup exe A Windows Defender window appears Click More info ...

Page 10: ...10 WatchLock Cube User Guide Click Run anyway The Select Destination Location window appears ...

Page 11: ...11 WatchLock Cube User Guide Click Next The Select Components window appears ...

Page 12: ...e User Guide Click Next The Select Start Menu Folder window appears NOTE Select Don t create a Start Menu folder checkbox if you do not want to create a start menu folder Click Next The Ready to Install window appears ...

Page 13: ...13 WatchLock Cube User Guide Click Install The installation starts and a progress bar appears in the window indicating the progress of the installation ...

Page 14: ...14 WatchLock Cube User Guide When the installation is complete the Completing the Starcom Installer Application Setup Wizard window appears Click Finish ...

Page 15: ...nstaller update software locate the folder where you saved the update file Double click IUpdate exe The Starcom Installer Update window appears Verify that the Destination folder points to the location where the Starcom Installer software is installed and click Extract ...

Page 16: ...16 WatchLock Cube User Guide A Confirm file replace dialog box appears Click Yes to All The installation starts and a progress bar appears in the window indicating the progress of the installation ...

Page 17: ...ded from the following location http www ftdichip com Drivers VCP htm Download the driver for the proper Windows version The driver Installation Guide can be found at the following location http www ftdichip com Support Documents InstallGuides htm Download the Installation Guide for the proper Windows version Follow the instructions in the Guide to install the cable driver ...

Page 18: ...18 WatchLock Cube User Guide Disassembling the device Use the key to open the lock and remove the shackle ...

Page 19: ...19 WatchLock Cube User Guide Remove the rubber cover from the device ...

Page 20: ...20 WatchLock Cube User Guide Pull the plastic cover to remove it from the device ...

Page 21: ...21 WatchLock Cube User Guide Use a cross head screwdriver to remove the two screws in the top cover ...

Page 22: ...22 WatchLock Cube User Guide Remove the top cover Carefully pull and slide out the battery holder ...

Page 23: ...23 WatchLock Cube User Guide ATTENTION Be careful when taking out the battery holder Do not tear the wires ...

Page 24: ...24 WatchLock Cube User Guide Use the cross head screwdriver to remove the two screws underneath the battery holder ...

Page 25: ...25 WatchLock Cube User Guide Pull the top part to disassemble the device and reveal the lower part with the SIM card holder ...

Page 26: ...26 WatchLock Cube User Guide Inserting the SIM card Gently push and pull back the plastic SIM card holder to release and open the SIM card slot ...

Page 27: ...27 WatchLock Cube User Guide Insert the SIM card into the SIM card slot with its gold contacts facing you and its cut off corner facing out the SIM card slot as shown in the following image ...

Page 28: ...28 WatchLock Cube User Guide Put the SIM card holder back into vertical position Gently press and push the SIM card holder forward to snap it back into place ...

Page 29: ...e connector to the USB port on your computer Connect the 5 pin connector to the device Make sure that the slot on the device connector socket corresponds with the bulge on the cable connector plug The three 3 pins on the cable connector plug must point upwards and the two 2 pins downwards ...

Page 30: ...30 WatchLock Cube User Guide ...

Page 31: ...staller application from the Start menu select Starcom Systems Installer Application The Installer company name window appears Enter your company name and click OK The Wizard window appears Unclick the Always show this wizard on program startup option and press Cancel ...

Page 32: ...32 WatchLock Cube User Guide The Installer window appears Click Technical Communications or press the Communications button on the taskbar at the top of the window ...

Page 33: ...hLock Cube User Guide Click the Advanced button The Communications Window will appear Click the Add button The Network Selection window appears Select Helios from the list and press OK to add a Helios network ...

Page 34: ... now display the new connection in the Available Networks list which is named Helios 1 The name Helios in this case of the device connection to the Installer applies globally to all device types Click on Helios 1 button to configure and activate the connection ...

Page 35: ...t number of the WatchLock Cube cable port in the Com Port menu To verify the COM port being used by WatchLock Cube in your computer go to My Computer Manage Device Manager Ports Set the Baud Rate to 115200 Check the Activate checkbox and click Save ...

Page 36: ...ar in green color at the bottom left corner of the Installer application main screen To access the device parameters press Technical Watchlock Parameters or right click on the taskbar at the top of the Installer application window and press Customize Select Watchlock Parameters and drag drop it into the taskbar ...

Page 37: ...37 WatchLock Cube User Guide Press on Watchlock Parameters and use the settings to configure the device Press the Read from device button to read the parameters already configured in the device ...

Page 38: ...e SIM card number used in the SMS Terminal device connected to the routing server or the SMPP target number For more information see SMS Notifications guide APN settings The APN settings are essential in order for the device to transmit messages and alerts The APN settings are provided by your cellular operator with the SIM card you are using in the device GPRS APN Access Point Name the name of th...

Page 39: ...k First server main routing server which the devices transmit to by default it is Starcom Systems server 1 Secondary server auxiliary routing server which the devices transmit to by default it is Starcom Systems server 2 Port port open for communication on the routing server default port is 6600 ...

Page 40: ...val of the GPS update which defines how often the device s GPS module will update its location Transmission and GPS Peek values are usually left the same In some instances these parameters can be configured with different values For example GPS Peek can be faster than Transmission when between the regular transmissions the device can enter or exit a specified perimeter In such case a Perimeter eve...

Page 41: ...e sent if during the selected period a weak impact was detected NOTE This will disable the weak impact transmissions Standby if Only weak impact is detected is enabled use this setting to set the tracking rate when the device is stationary This interval must be slower than the Transmission rate e g use 1 day as Standby and 15 minutes for Transmission When the device is out of GPRS coverage the mes...

Page 42: ... will be turned on upon every transmission and location update transmissions will be sent Location by Cellular when enabled location lookup will be done according to cellular antennas if GPS is not available Filter inputs when enabled the switches status will be changed only after 2 seconds of continuous state Use debugging beeps factory testing setting Do not use Transmit after first start up or ...

Page 43: ... the Weak Impact force will be scaled in quarter of a g This option can be used to make the accelerometer more sensitive to smaller impacts The default values configured in the device are based on the laboratory testing results they were found to be acceptable in most cases These values can be tested and changed according to the specifics of your work To change these values according to specific c...

Page 44: ...ant the configuration file to be saved on your computer name the file and press Save Configuring a new device with the saved configuration To configure a new device with the saved parameters click the Load button in the Watchlock Parameters window browse to the location where you saved the configuration file select the file and press Open Click the Select All button to select all the parameters an...

Page 45: ...eceive a successful message check your APN settings Watchlock Parameters Network Contact your cellular provider and make sure the SIM card is open for GPRS Verify that your SIM card is not protected by a PIN code If necessary use a mobile phone to cancel the PIN code You can also perform the test manually using the Terminal window Open the Terminal window Communications Advanced Communication Wind...

Page 46: ...r to get a proper GPS location the device has to be placed outside the building or outside the window where it can access the satellites Open the Terminal window Communications Advanced Communication Window Configuration Helios 1 Open Terminal and type tdg GPS mode GPS readings will be displayed When you see A 3 reading it will indicate a GPS fix signal ...

Page 47: ...t Status window Enter the device number in the Unit Number field select Request status and press Send The device information will appear Click on the Inputs tab press Request status and check the response in the Device Status window Use the Location tab to check the device s GPS data Use the Various tab to see the device information ...

Page 48: ...de 6 Installation Inserting the batteries NOTE WatchLock Cube uses four 4 standard AA batteries You can use either rechargeable or non rechargeable batteries Before installation please verify that the batteries are fully charged ...

Page 49: ...49 WatchLock Cube User Guide Carefully insert each battery according to the polarity markings on the battery holder ensuring that the plus and minus terminals are aligned correctly ...

Page 50: ...50 WatchLock Cube User Guide ...

Page 51: ...51 WatchLock Cube User Guide Assembling the device Slide the top part onto the lower part of the device ...

Page 52: ...52 WatchLock Cube User Guide Use the cross head screwdriver to screw back the two screws underneath the battery holder ...

Page 53: ...53 WatchLock Cube User Guide Carefully slide the battery holder back in its place ...

Page 54: ...54 WatchLock Cube User Guide Place the wires back in the track If necessary use a small flat screwdriver to carefully fixate the wires ...

Page 55: ...55 WatchLock Cube User Guide Place the top cover back and use the cross head screwdriver to screw back the two screws ...

Page 56: ...56 WatchLock Cube User Guide Slide the plastic cover back onto the device ...

Page 57: ...57 WatchLock Cube User Guide Place the rubber cover over the device insert the shackle back into the device and use the key to close the lock ...

Page 58: ...58 WatchLock Cube User Guide The device is now ready for installation ...

Page 59: ... the Username and Password fields and click Sign in Starcom Online horizontal menu bar features the following categories Home lists the most recently accessed devices including their location Resources allows to manage the device and customer information Plans allows to create and manage events and alerts Monitor monitors the events and alerts from the device Map displays the actual location of th...

Page 60: ...itional links Live status displays the current status of all live devices as shown in the following image Full list opens the Resources section that displays a full list of all your devices Location opens the Map section that displays a map showing the current location of the device Quick List links that enable you to access the Resources and Plans sections ...

Page 61: ...he existing perimeters Units The Units page features the Details area which arranges the device information in the following columns Number the device serial number Clicking on the device number link will display the Unit Information page where you can modify the device information Name displays the icon and the name of the device Clicking on it will reveal a pop up menu with the quick access link...

Page 62: ...lect this checkbox No data will be collected for inactive devices they will appear as dimmed in the devices list Use this section to enter the device Number and Name In the Cellular Number field enter the country code or the number of the SIM card installed in the device In the Unit Type list select Watchlock Cube No Activity Alert Hours used to receive an alert when the device has stopped transmi...

Page 63: ...make the device available for in the Search field The name of the group will appear in the dropdown list Click on it to add it to the Groups list To remove the group click on the minus sign on the left of the group name When finished click Apply The new device is saved To modify a device in the Units page click on the device name link of the device you want to modify The Unit Information page appe...

Page 64: ...64 WatchLock Cube User Guide Groups You can create new and modify the existing groups of devices To create a new group click New The Group page opens In the Name field enter the name of the new group ...

Page 65: ...r in the Search field The name of the user will appear in the dropdown list Click on it to add it to the Users list To remove the user click on the minus sign on the left of the user name In the Sharing section click the respective checkbox if you want the group to Share Perimeters or Share Events Click Apply The new group is saved To modify a group in the Groups page click on the group name link ...

Page 66: ...hLock Cube User Guide Users You can create new and modify the existing users To create a new user click New The Users page opens Here you can enter the new user information and define their access permissions ...

Page 67: ...67 WatchLock Cube User Guide ...

Page 68: ...e status requests Allow outgoing commands enables the user to send commands to the devices Allow changing tracking interval enables the user to change the devices tracking interval Allow set unit parameters enables the user to change the devices settings Allow adding the units using QR code Mobile enables the user to add a new Zeppos device in Olympia Tracking app Allow stopping vehicle enables th...

Page 69: ... requires the user to change the password once a month Allow editing cellular number enables the user to edit the phone number of the SIM card installed in the device Add Users allows to create new users Permissions allow you to define the viewing and editing permissions of the user for all the sections of the site After you configured all the parameters click Apply The new user is saved ...

Page 70: ...nk of the user you want to modify The Users page appears Modify the user details as required Click Apply The modified user details are saved To delete a user in the Users page click on the user name link of the user you want to delete The Users page appears Click Delete The user is deleted ...

Page 71: ... create a new perimeter click on the settings icon in the lower right corner of the map Options Create new perimeter at the top right corner of the map Click once anywhere on the map to start the perimeter selection this point would be the top left corner of the perimeter Move the mouse and click again anywhere on the map to finish the perimeter this point would be the bottom right corner of the p...

Page 72: ...er Guide In the Perimeter Name field enter the name of the perimeter Click Ok The new perimeter is saved and appears on the map To view edit the GPS parameters of the perimeter use the Longitude Latitude fields on the left ...

Page 73: ...list on the Resources section To modify a perimeter in the Places page click on the perimeter name link of the perimeter you want to modify The Perimeters map page appears Modify the perimeter as required Click Apply The modified perimeter is saved To delete a perimeter in the Places page click on the perimeter name link of the perimeter you want to delete The Perimeters map page appears Click Del...

Page 74: ...n features the following tabs Basic allows to set up basic plans for LCU500 devices Do not use Events allows to create events for your devices To create a new event you need to create an event Type first Click Types The Types page opens In this section you can see the types of events already created in the system You can use one of them or create a new type ...

Page 75: ...w Enter the name of the event type in the Name field Leave Day of the week and Time Range as Changeable later you will be able to change these settings in the event itself Click the Add Event button and select the event type you want to create from the dropdown list ...

Page 76: ...ill be performed simultaneously And then when you create several events the following event will start only after the first one is performed Transmit the event will be transmitted End ends an event For example you can create an output event which after it performs the necessary actions will simply end You can create a complex event type which consists of several events When finished click Apply Th...

Page 77: ...ddress to receive the event notification If you select the Monitor checkbox the event will be displayed on the Monitor page see below in real time Click the Add Event button and select the type of the event you want to create from the dropdown list ...

Page 78: ...em and create a new event based on this type Go to Events and click New Enter the name of the event in the Name field In the Units list select the devices you want to include in the event and click Add The devices will be moved to the Available for list Enter the cellular number and email address to receive the event notification Select the Monitor checkbox if you want the event will to be display...

Page 79: ...t in the Name field Select the necessary time and date range Select the necessary perimeter in the Perimeter list Select Entering in the Condition list Click Apply The new event which will send an alert when the device enters a specific location is created ...

Page 80: ...em displayed in real time On the left side the Monitor section features the following tabs Monitor displays the events in real time Settings allows creating new and modifying existing monitoring events To create a new perimeter go to the Settings tab and click New The Details page opens In the Name field enter a name for the new event ...

Page 81: ...Available reasons list select the reasons you wish to receive an alert for and click Add The reasons will be moved to the Notify for list Tracking alerts on every regular transmission Event alerts on every event created in the Plans section Emergency not applicable to WatchLock Cube Low battery alerts you of the battery getting low Static Pin IN OUT not applicable to WatchLock Cube Mobile Pin IN O...

Page 82: ...s on Light on Light off not applicable to WatchLock Cube Temperature high Temperature low Temperature normal not applicable to WatchLock Cube Logging alerts on every logging transmission No Activity this event can be used to receive alerts when devices have stopped transmitting The default value is 336 hours 2 weeks Enter the email for the notification to be sent to in the Notify for section Press...

Page 83: ... It also shows the device information and commands You can select a device or a group of devices in the dropdown list on the left In the Search field you can enter the device number to be displayed Once you select the device its location will be displayed on the map and its information will appear on the left ...

Page 84: ... and time of last transmission from the device Reason the reason for the transmission Version the device firmware version Location the GPS location of the device including Valid the date and time of the last location transmission from the device Coordinates the GPS coordinates of the last position of the device Altitude the last altitude of the device ...

Page 85: ...g stops the tracking command and returns the device to its regular transmission rate The Queued commands option allows you to send a command to the device while it is in sleep mode The next time the device wakes up to transmit it will receive the command This can be used to change the device tracking interval for example To enable the queued command select the command and then press the plus icon ...

Page 86: ...uired name appears Create new perimeter allows to create a new perimeter Edit perimeter allows you to edit an existing perimeter Distance measurement allows to measure the distance between two points on the map Shapes displays your perimeters on the map All units displays all your devices on the map at once Map types you can select the following map types OpenStreetMap Yandex ESRI Imagery Google R...

Page 87: ...reports that generate automatically on a daily monthly or weekly basis You can generate the following types of reports Work Hours Work Hours Summary Work Hours Group Summary History History Technical Violations Live Status Events Perimeter Entry Transmit Reasons Monitored events Stops To generate a report select the report type in the Report dropdown list Select the device or group of devices in t...

Page 88: ...88 WatchLock Cube User Guide ...

Page 89: ...ent of the device The total number of map pointers available per report is 50 On the bottom of the Map section there is a Play button that enables you to play back the movement of the device on the map To save the report click Save The report is saved as a PDF file or as an HTML file in a zip To export a report click Export The report is exported as a CSV file which can be viewed in Excel To print...

Page 90: ...ices for the report Select the Fields Graphics and Transmit Reasons you want to see in the report in the respective fields From the Repeat dropdown list select if you want the report repeated Daily Weekly or Monthly Use the Start time and End time dropdown lists to select the time at which you want to generate the report The Send to field is populated with the default email address for the account...

Page 91: ...ick the link of the report schedule you want to modify The Report Scheduling page appears Modify the report schedule as required Click Apply The modified schedule details are saved To delete a scheduled report in Reports click Schedule In the Details section under the Generate column click the link of the report schedule you want to delete The Report Scheduling page appears Click Delete The schedu...

Page 92: ...on shows your profile details that were created when you purchased your devices You can view and modify these details as required To view or modify your profile click the Profile tab and modify the information as required Click Apply The changes are saved ...

Page 93: ...ndow on the Map page when you select a device To see all the parameters that can be configured in the Map Tooltip Format field click on the green question mark located to the right of the field The Map Tooltip Format legend window will appear Once you made all the necessary changes click Apply Then go to the Map page and check the device info window ...

Page 94: ...94 WatchLock Cube User Guide Help The Help section contains answers to some frequently asked questions and Starcom Online tutorials Click on the appropriate tab to access the necessary information ...

Page 95: ... The system uses advanced software algorithms for field tracking of devices and provides customers with a selection of real time information about the tracked device The following image illustrates the Starcom Systems communication channels The device transmits messages according to the values specified in WatchLock Parameters Transmission Rates settings GPRS SMS ...

Page 96: ...will be repeated in 5 minutes Every 5 minutes the device will attempt to connect to the network and transmit via GPRS This process is illustrated in the following figure The device saves all the information that could not be sent in its memory Once it is able to connect to the network again it will transmit all the stored data The device sends encrypted data to the routing server When the routing ...

Page 97: ...p www starcomsystems com Technical Support Comprehensive support information is available online at http wiki starcomsystems com wiki index php Support Should you have any questions regarding our system please contact Starcom technical support For personalized support use Email support starcomsystems com or Skype starcom support ...

Reviews: