Technical Primer - Aurora
8
Common troubleshooting examples
8.1
The Charger cannot be powered ON
Phenomenon : The Charger cannot be powered ON
General working principle
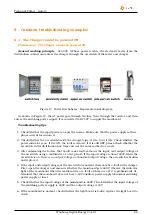
- AC400V, 3-Phase power reaches the electricity meter from the
distribution cabinet and enters the charger through the air switch of the meter and charger.
Figure 17: Power flow Scheme - Representational diagram
As shown in Figure 17, the AC power goes through the fuse, then through the varistor, and then
enters the switching power supply. It is converted to DC12V to supply the mainboard.
Troubleshooting tips
1. Check whether the input power is as per the norms. Make sure that the power supply is three-
phase current for Aurora 11.
2. Check whether the air switch beside the charger trips. If it is, turn it ON. Check whether the
power indicator is on. If it is ON, the fault is cleared. If it is still OFF, please check whether the
air switch in the distribution box trips and use the same method to recover.
3. After eliminating the factors that would cause fault, measure the input, and output voltage of
the air switch using a multimeter or a test pencil. If the input voltage is about 400V when the
air switch is on, there is no output voltage or abnormal output voltage, the air switch is broken
and replace it.
4. If the input and output voltages of the air switch are normal, there may be a fault in the charger.
First, open the charger and measure whether the mainboard gets 400V. Observe the indicator
light of the mainboard when the mainboard is on. If all of them are off, it is preliminarily de-
termined that the mainboard does not have a 12V auxiliary power supply (abnormal switching
power supply or fuse).
5. Check whether the input voltage of the mainboard is 400V. Check whether the input voltage of
the switching power supply is 400V and the output voltage is 12V.
6. If the mainboard is normal, check whether the light board is faulty, replace the light board to
check.
Wanbang Digital Energy Co.Ltd
24

